This quickstart takes you from an empty Google Cloud project to a reachable Hybrid Manager (HM) console on a dedicated GKE cluster, using the installer console.
It mirrors the six phases of the step-by-step installation guide — plan, gather requirements, deploy Kubernetes, prepare your environment, install HM, and explore post-installation — but collapses each phase to the shortest supported path. The two planning phases are deliberately brief: rather than have you design the deployment, the quickstart prescribes an opinionated architecture and set of requirements and records them for you, so the decisions here map one-to-one onto the full guide and onto later platform quickstarts. Each phase links to the guide page that explains it in depth.
Commands set shell variables that later phases reuse, so run them in a single session.
Why commands, variables, and validation
This quickstart gives you explicit commands rather than a script, since infrastructure varies (org policy, quotas, region, CNI) and commands are easier to read and adapt to your environment. It uses environment variables to keep resource names consistent and cleanup easy (see TICKET below), and follows most steps with a describe/get validation rather than an echo, so a typo or an empty variable fails fast at that step instead of surfacing cryptically several steps later.
Note
This path was validated end to end on GKE with HM 1.4.1, the edb-hcp-operator 2.0.0, and the installer console chart 1.11.17.
Phases
This quickstart prescribes Phases 1 and 2 — captured below as their architecture decision record (ADR) — so they're already decided for you; begin at Phase 3. Confirm the requirements checklist on the quickstart overview first.
- Phase 1 — Plan your architecture
- Phase 2 — Gather system requirements
- Phase 3 — Deploy the GKE cluster
- Phase 4 — Prepare your environment
- Phase 5 — Install Hybrid Manager
- Phase 6 — Explore post-installation
Phase 1: Plan your architecture (prescribed ADR)
The quickstart prescribes the architecture so you don't have to design one. These are the decisions you would otherwise capture in an architecture decision record; the Planning your architecture guide covers the full set of choices and trade-offs.
- Topology — One dedicated GKE cluster, 1:1 with HM, in a single region.
- Nodes — A labeled control-plane node pool for HM's services and an optional Postgres pool for database workloads, placed with the
edbaiplatform.io/control-planeandedbaiplatform.io/postgresnode labels. - Ingress — A single public Google Cloud load balancer, provisioned automatically from HM's Istio ingress gateway. No load-balancer controller add-on is required on GKE.
- Scenarios — All scenarios:
coreplusdbaas,migration,ai,analytics, andklio.coreis required and always on; this quickstart enables the full set so every capability is available. For a minimal HM console,corealone is sufficient.
Phase 2: Gather system requirements (prescribed ADR)
These are the prescribed requirements for the architecture above — your system-requirements record. The Gathering your system requirements guide gives the full matrix and the reasoning behind each value.
| Requirement | Quickstart value |
|---|---|
| Kubernetes | GKE, x86-64 node pools, Kubernetes 1.32–1.34 |
| Control-plane nodes | 3 × e2-standard-8 (8 vCPU / 32 GB), 500 GB pd-ssd boot disk |
| Data-plane nodes | 1 × e2-standard-8 (non-HA; use 3 or more for HA) |
| Block storage | standard-rwo (default) plus a VolumeSnapshotClass |
| Object storage | A dedicated, empty GCS bucket and a service account key |
| Ingress and DNS | Public load balancer; A records to its IP in a Cloud DNS zone |
| TLS | Self-signed for a test HM console; a cert-manager issuer for production |
| Registry and token | Images from docker.enterprisedb.com/pgai-platform; an EDB subscription token |
Note
e2-standard-8 provides 8 vCPU and 32 GB (the E2 standard family is 4 GB per vCPU); the standard family has no size between 8 and 16 vCPU, so use an e2-custom or e2-highmem type if you need something in between. Boot disks are billed on provisioned size, so lower --disk-size or use pd-balanced/pd-standard if you don't need the headroom.
Phase 3: Deploy the GKE cluster
Authenticate, select your project, and enable the required APIs:
gcloud auth login

export PROJECT_ID="my-gcp-project"
export REGION="us-east1"
export ZONE="$(gcloud compute zones list --filter="region:$REGION" --format='value(name)' | head -1)"
export TICKET="ticket-00000"     # this is a helpful lowercased prefix so that your work can be readily identified; prefixes every resource name for easy cleanup

gcloud config set project "$PROJECT_ID"
gcloud config set compute/region "$REGION"
gcloud services enable container.googleapis.com compute.googleapis.com storage.googleapis.com

# validate: the values resolved to real resources, not just non-empty strings
gcloud config list                                                   # [core] project + [compute] region
gcloud compute zones describe "$ZONE" --format="value(name,status)"  # -> <zone>  UP
Note
TICKET is a naming prefix — use your Jira ID, slugged to lowercase, since GCP resource names must be lowercase and DNS-safe. It names the cluster, the data-plane pool, the bucket, and the service account, sets a ticket label on the cluster, and — because you set PORTAL_DOMAIN from it in Phase 4 — is carried into the portal and migration DNS records too. (GKE names the control-plane pool default-pool; it's covered by the cluster.) So you can find and remove everything later — see Clean up.
Create a regional cluster — its control plane spans zones at no extra cost — with worker nodes pinned to one zone to keep node counts literal and costs down. GKE always creates one node pool at cluster-create, so size and label that initial pool as the control plane rather than discarding it, then add a data-plane pool for Postgres. HM places components by node label; see Set your node abstractions. Each of the two operations takes roughly 4 minutes while Google provisions the VMs.
export CLUSTER="${TICKET}-hm"

# The cluster's initial pool IS the control plane: 3 x e2-standard-8 (8 vCPU / 32 GB), labeled control-plane.
# GKE names that first pool "default-pool" (you can't rename it) — only its label matters to HM.
gcloud container clusters create "$CLUSTER" \
  --region "$REGION" --node-locations "$ZONE" \
  --release-channel regular --enable-ip-alias \
  --labels ticket=$TICKET \
  --num-nodes 3 --machine-type e2-standard-8 \
  --disk-type pd-ssd --disk-size 500 \
  --node-labels edbaiplatform.io/control-plane=true

gcloud container clusters get-credentials "$CLUSTER" --region "$REGION"
gcloud container clusters describe "$CLUSTER" --region "$REGION" --format="value(name,status)"   # -> $TICKET-hm  RUNNING

# Data-plane (Postgres) pool: 1 node (use 3+ for HA)
gcloud container node-pools create "${TICKET}-dp" \
  --cluster "$CLUSTER" --region "$REGION" \
  --machine-type e2-standard-8 --disk-type pd-ssd --disk-size 500 --num-nodes 1 \
  --node-labels edbaiplatform.io/postgres=true

kubectl get nodes -L edbaiplatform.io/control-plane,edbaiplatform.io/postgres   # expect 4 nodes: 3 control-plane, 1 postgres
GKE provides the standard-rwo storage class but no VolumeSnapshotClass object. Create one — HM uses it for backups:
kubectl apply -f - <<'EOF'
apiVersion: snapshot.storage.k8s.io/v1
kind: VolumeSnapshotClass
metadata:
  name: gke-snapshotclass
driver: pd.csi.storage.gke.io
deletionPolicy: Delete
EOF

kubectl get volumesnapshotclass     # -> gke-snapshotclass   pd.csi.storage.gke.io
Create the object storage the platform will use for backups and WAL archives now, alongside the other Google Cloud infrastructure. Create a dedicated, empty GCS bucket and a service account key, then the edb-object-storage secret HM reads. The service account needs bucket-scoped roles/storage.admin — the installer validates the secret with a bucket-metadata read (storage.buckets.get), which objectAdmin does not grant. See Configuring object storage.
export BUCKET="${TICKET}-hm-object-store-$PROJECT_ID"
export SA_NAME="${TICKET}-hm-obj"

gcloud storage buckets create "gs://$BUCKET" --location "$REGION" --uniform-bucket-level-access
gcloud storage buckets update "gs://$BUCKET" --update-labels=ticket=$TICKET
gcloud iam service-accounts create "$SA_NAME" --display-name "EDB HM Object Storage ($TICKET)"
gcloud storage buckets add-iam-policy-binding "gs://$BUCKET" \
  --member "serviceAccount:$SA_NAME@$PROJECT_ID.iam.gserviceaccount.com" \
  --role roles/storage.admin
gcloud iam service-accounts keys create sa-key.json \
  --iam-account "$SA_NAME@$PROJECT_ID.iam.gserviceaccount.com"
export GCP_CREDENTIAL_BASE64=$(base64 < sa-key.json | tr -d '\n')

kubectl create secret generic edb-object-storage -n default \
  --from-literal=provider=gcp \
  --from-literal=location_id="$REGION" \
  --from-literal=project_id="$PROJECT_ID" \
  --from-literal=bucket_name="$BUCKET" \
  --from-literal=credentials_json_base64="$GCP_CREDENTIAL_BASE64"

# validate
gcloud storage buckets describe "gs://$BUCKET" --format="value(name)"   # bucket exists
kubectl get secret edb-object-storage -n default                        # secret present
Confirm the cluster can obtain a public load balancer, and note the Cloud DNS zone you will write records into. On GKE the load balancer is provisioned natively from HM's Istio gateway — no controller add-on is needed. See Deploying your Kubernetes cluster.
kubectl create service loadbalancer lb-check --tcp=80:80
kubectl get svc lb-check -w    # EXTERNAL-IP goes from <pending> to an IP within ~1-3 min, then Ctrl-C
kubectl delete service lb-check

gcloud dns managed-zones list --format="table(name,dnsName,visibility)"    # note the NAME column
Phase 4: Prepare your environment
Set the variables the remaining phases reuse:
export EDB_SUBSCRIPTION_TOKEN="your-edb-subscription-token"
export HM_VERSION="1.4.1"
export INSTALLER_VERSION="1.11.17"
export INSTALL_REGISTRY="docker.enterprisedb.com/pgai-platform"
export EDB_HELM_REPO="https://downloads.enterprisedb.com/$EDB_SUBSCRIPTION_TOKEN/pgai-platform/helm/charts/"
export REGISTRY_USER="pgai-platform"
export DNS_DOMAIN="example.com"                       # your Cloud DNS zone's domain (its dnsName, without the trailing dot)
export PORTAL_DOMAIN="portal-$TICKET.$DNS_DOMAIN"     # portal hostname; Phase 5.3 derives the migration host from it
Create the image-pull secret. It stores your EDB registry credentials so the cluster can pull Hybrid Manager's container images from EDB — without it, image pulls fail.
edbctl image-pull-secret create \
  --registry "$INSTALL_REGISTRY" --username "$REGISTRY_USER" --password "$EDB_SUBSCRIPTION_TOKEN" -y

edbctl image-pull-secret list        # validate
Create the install secrets. This generates the platform's core secrets — the bootstrap Fernet key (which encrypts connector configuration) and the system-database credentials — and, crucially, prompts for the HM console admin email and password, which is your console login. It also creates the namespaces the operator uses, so run it before installing the operator (Phase 5).
For a non-production install you can press Enter through the prompts: the keys are generated for you and the optional entries (a second admin, AI/HuggingFace tokens) are skippable — just set an admin email and password you'll remember. Production installs can manage each secret explicitly (per-scenario keys, an external admin identity provider, and so on); see Customizing secrets.
edbctl hm create-install-secrets --version "$HM_VERSION" -y

edbctl hm list-install-secrets --version "$HM_VERSION"   # lists what this version requires
kubectl get secret -A -l app.kubernetes.io/managed-by=edbctl   # lists what was created
Phase 5: Install Hybrid Manager
Install the operator, deploy the installer console and work through its screens, then point DNS at the load balancer.
5.1 Install the operator
Install the operator, which provides the custom resources the installer console depends on. edbctl selects the matching operator version automatically:
edbctl hm upgrade-operator \
  --registry-uri "$INSTALL_REGISTRY" --registry-username "$REGISTRY_USER" --registry-password "$EDB_SUBSCRIPTION_TOKEN" -y

kubectl get pods -n edb-hcp-operator-system     # controller-manager Running
kubectl get crd | grep -i edbpgai               # hybridcontrolplanes, preflights, postflights, hmregistries
5.2 Deploy and run the installer console
Deploy the installer from the EDB Helm repository and wait for its pod to come up.
helm repo add enterprisedb-edbpgai "$EDB_HELM_REPO"
helm repo update enterprisedb-edbpgai

helm upgrade --install hm-installer enterprisedb-edbpgai/hm-installer \
  --version "$INSTALLER_VERSION" \
  -n edbpgai-bootstrap --create-namespace \
  --set "imagePullSecrets[0].name=edb-cred"

kubectl -n edbpgai-bootstrap get pods -w     # wait for hm-installer to be Running, then Ctrl-C
Open the installer with a port-forward.
Reach the installer only through the port-forward
The installer console has no authentication — it is for install-time use only. Reach it exclusively through this local port-forward; never expose it through an Ingress, a LoadBalancer, or any other public endpoint.
kubectl -n edbpgai-bootstrap port-forward svc/hm-installer 8080:8080
Open http://localhost:8080 in your browser, then work through the installer's five screens; each gates the next. For the operator method in detail, see Install Hybrid Manager on Kubernetes.
5.2.1 Prerequisites
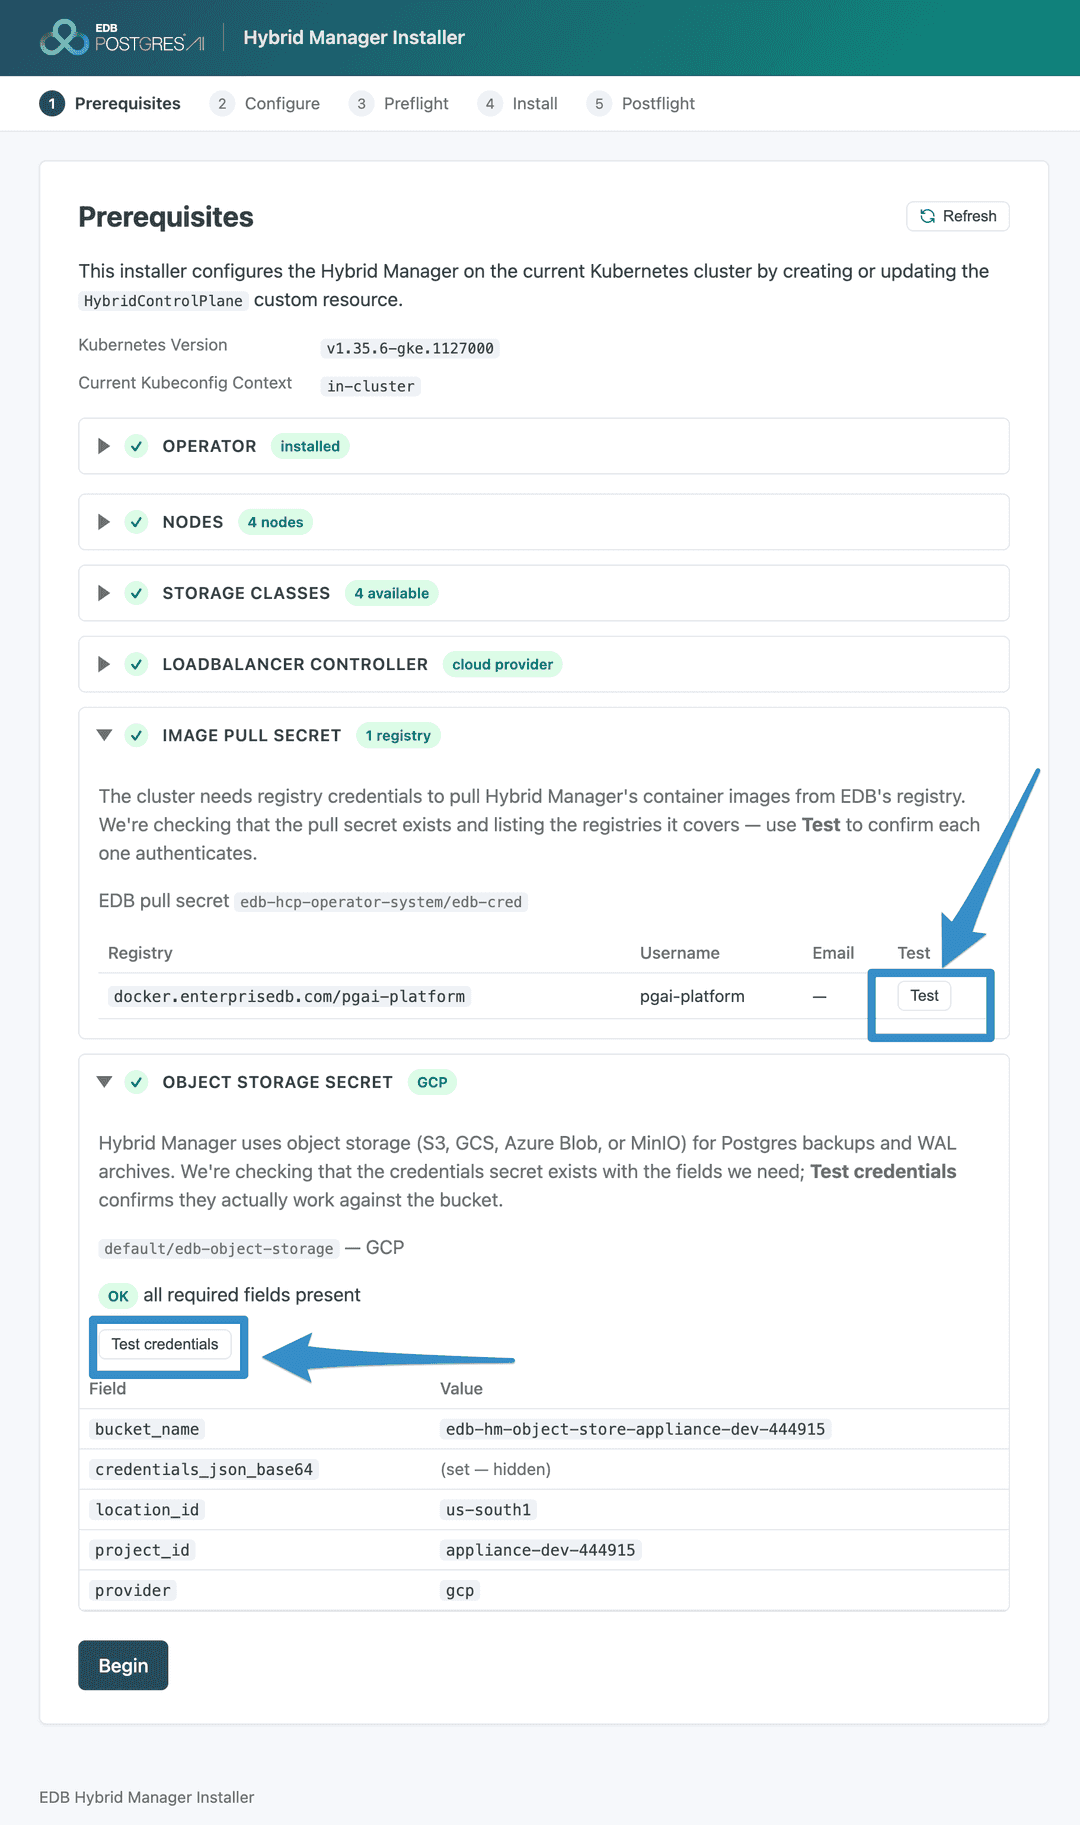
The installer validates the cluster before letting you proceed. The operator check is the hard gate; the screen also verifies the nodes and their role labels, the storage classes, the load-balancer controller, and the image-pull and object-storage secrets. Use the per-row test controls, fix anything flagged, refresh, then begin.
5.2.2 Configure
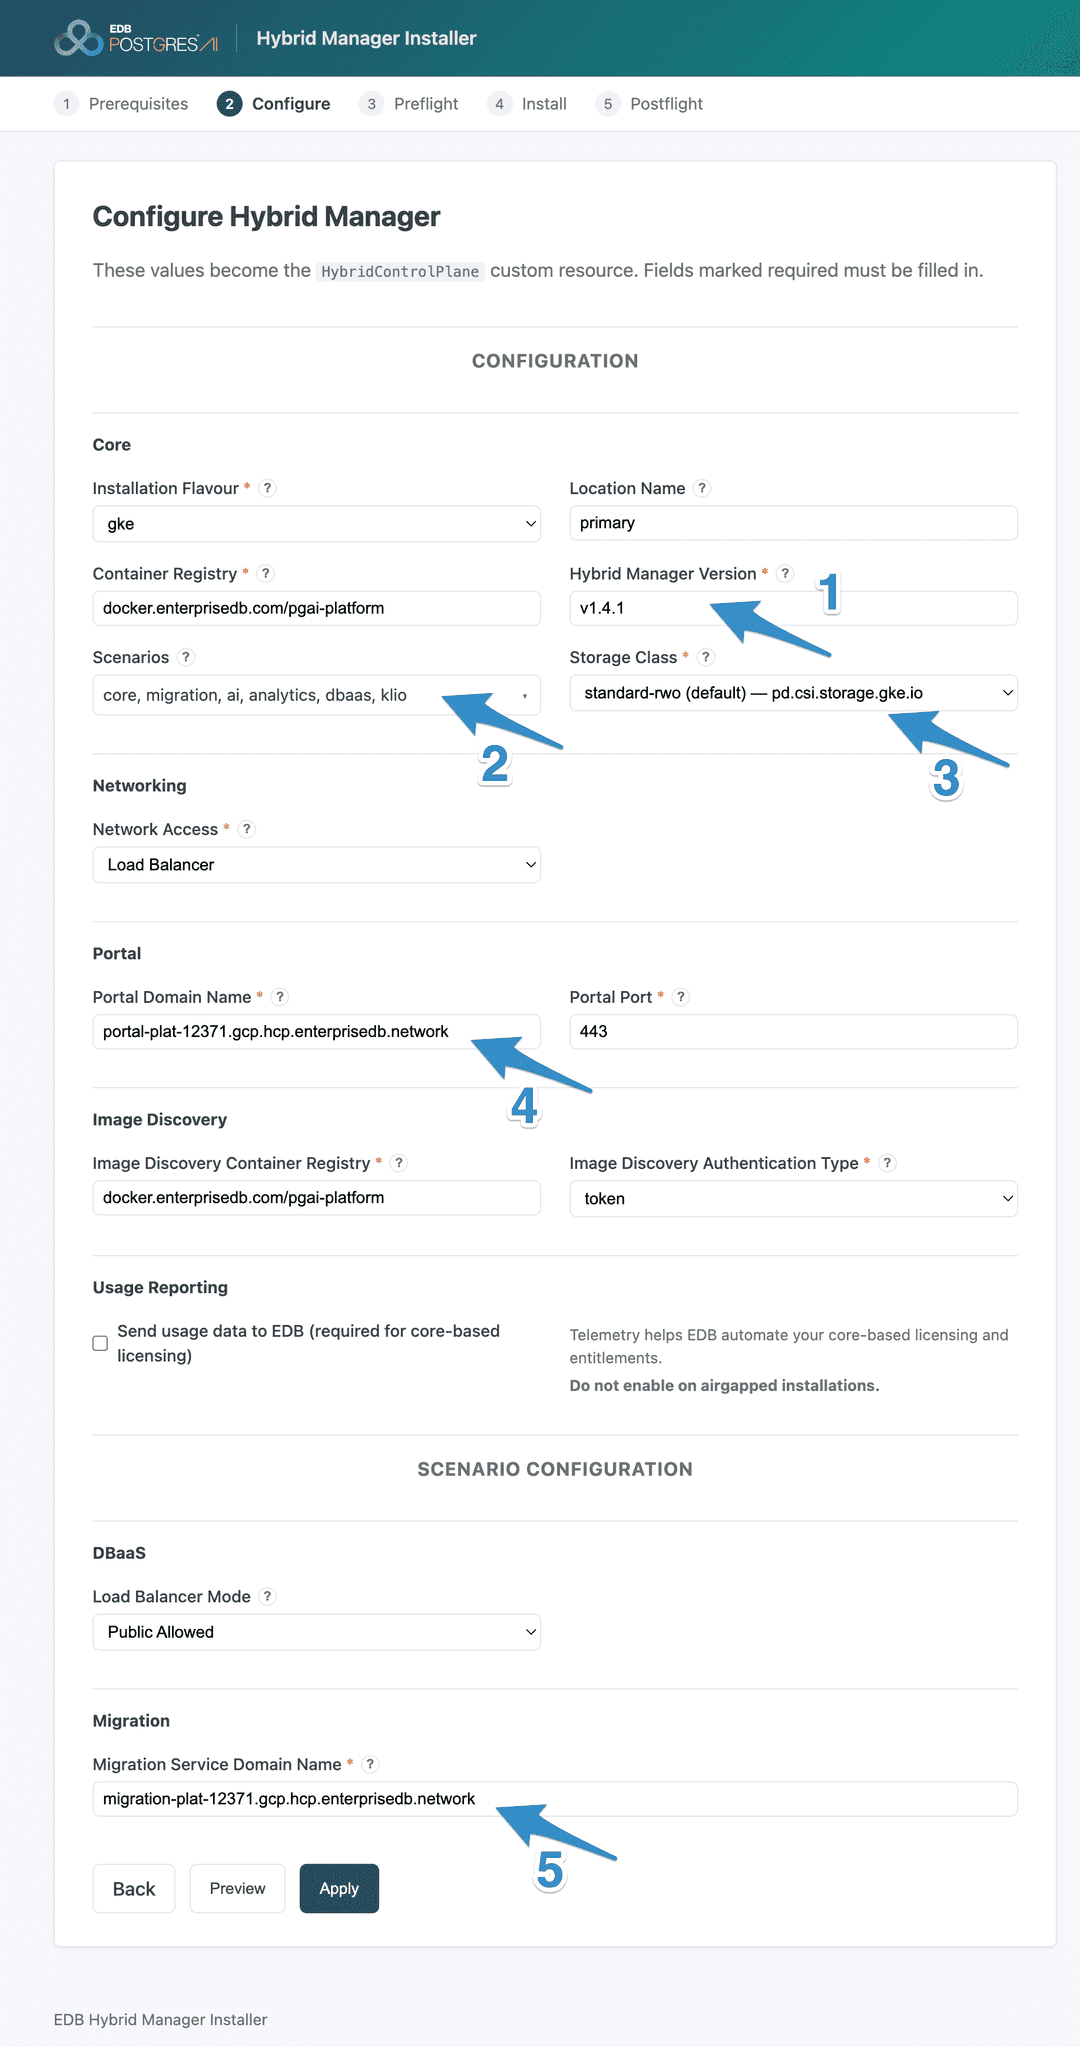
Set the values that become the HybridControlPlane custom resource — the only screen with significant input. gke and Load Balancer are auto-detected and core is always on. Print the values to enter with:
echo "Hybrid Manager Version   : $HM_VERSION"
echo "Portal Domain Name       : $PORTAL_DOMAIN"
echo "Migration Service Domain : $(echo "$PORTAL_DOMAIN" | sed 's/^portal/migration/')"
echo -n "Storage Class (default)  : "; kubectl get sc -o jsonpath='{.items[?(@.metadata.annotations.storageclass\.kubernetes\.io/is-default-class=="true")].metadata.name}'; echo
- Hybrid Manager Version — the HM release to install (
$HM_VERSION). - Scenarios — feature bundles. Select all scenarios (
core,dbaas,migration,ai,analytics,klio) to enable the full platform;coreis required and always on. Selectingdbaasormigrationreveals additional fields (Load Balancer Mode and the Migration Service Domain). - Storage Class — the class marked
(default):standard-rwo. - Portal Domain Name — the hostname users browse to (
$PORTAL_DOMAIN). Becomesportal_domain_namein the custom resource and the first DNS record you create below. - Migration Service Domain Name — shown only when the
migrationscenario is enabled. Use a sibling of the portal hostname. Becomesdms_domain_name.
Container Registry and Image Discovery Container Registry are both $INSTALL_REGISTRY; Portal Port is 443; set Image Discovery Authentication Type to token (your subscription token). Leave Send usage data to EDB off for a proof of concept.
5.2.3 Preflight
After you apply, the operator validates the Kubernetes secrets the custom resource references and advances automatically when they pass. If a secret is missing or malformed, the screen reports the specific blocker; fix it and retry.
5.2.4 Install
The operator rolls out the selected components, scenario by scenario. Expect about 45 minutes — most of that is the operator pulling component images on demand as each scenario deploys. The HybridControlPlane moves from deploying to deployed.
5.2.5 Postflight
When the deployment reaches deployed, the operator runs its ongoing health checks — pods, databases, backups, nodes, and certificates — and reports Healthy, then shows the HM console link. Create the DNS records in the next section so that link resolves.
kubectl get hybridcontrolplane -o wide    # status -> deployed
kubectl get postflight                    # phase -> Healthy
5.2.6 Clean up the installer console
Removing the installer is the correct last step here, not optional tidying — it has no authentication of its own, and your HM installation doesn't depend on it staying deployed.
helm uninstall hm-installer -n edbpgai-bootstrap5.3 Point DNS at the load balancer and sign in
Read the load-balancer IP and the HM hostnames from the custom resource, then create an A record for each unique hostname. On GKE the load balancer is an IP address, so use A records, not CNAMEs. Set DNS_ZONE to the managed zone's resource name (the NAME column above), not its DNS name.
export LB_IP=$(kubectl get svc -n istio-system istio-ingressgateway -o jsonpath='{.status.loadBalancer.ingress[0].ip}')
export DNS_ZONE="<managed-zone-name>"

for H in $(kubectl get hybridcontrolplane -A -o jsonpath='{range .items[*]}{.spec.globalParameters.portal_domain_name}{"\n"}{.spec.globalParameters.dms_domain_name}{"\n"}{.spec.componentsParameters.upm-beacon.server_host}{"\n"}{end}' | sort -u); do
  gcloud dns record-sets create "${H}." --zone="$DNS_ZONE" --type=A --ttl=300 --rrdatas="$LB_IP" \
    || gcloud dns record-sets update "${H}." --zone="$DNS_ZONE" --type=A --ttl=300 --rrdatas="$LB_IP"
done
Note
The installer console derives the agent (Beacon) hostname from the portal domain by default, so sort -u above yields two records, not three: portal and migration (DMS) — because this quickstart enables the migration scenario. (A core-only install would yield just one.) For production, set distinct portal, agent (Beacon), and migration (DMS) hostnames, and create a DNS record for each; see DNS requirements.
Confirm each hostname resolves to the load-balancer IP, then sign in at https://<portal_domain_name> with the HM console admin credentials you set in Phase 4. The HM console uses a self-signed certificate by default, so accept the browser warning.
Phase 6: Explore post-installation
Create a single-instance Postgres cluster from the console or the CLI, then connect.
The CLI path talks to your running HM control plane, so first authenticate edbctl to it with an access key you generate in the HM console — see Access key:
# HM console -> your profile -> Access Keys -> Create New Key, then:
edbctl credential import-access-key --name hm --access-key <ACCESS_KEY> --address "https://$PORTAL_DOMAIN"
edbctl project list                       # find your project id
edbctl config set context_credential hm
edbctl config set context_project <PROJECT_ID>
Obtain an imageId from edbctl image list-image-tags --location-id <location>, then create the cluster:
cat > pg.yaml <<'EOF'
clusterType: single
clusterName: my-first-pg
password: ChangeMe-12chars-min
primaryPgName: primary-node
imageId: <from: edbctl image list-image-tags>
deploymentLocation: <your-location-id>
networking: public
instanceSize:
  cpuCores: 2
  memoryGi: 4
storage:
  databaseStorage:
    sizeGi: 20
    storageClass: standard-rwo
EOF

edbctl cluster create -F pg.yaml -y
edbctl cluster list-connection-info --id <cluster-id>
psql "postgres://edb_admin@<rw-host>:5432/edb_admin?sslmode=require"
Note
HM accepts very small and very large instance sizes (fractional CPU, memory in MiB, single-gigabyte storage). The values above are a comfortable set for a test cluster; use extreme sizes only deliberately.
From here, mirror the guide's post-installation phase — see Exploring your post-installation options:
- Identity and access — connect an identity provider and map users to roles so access is least-privilege from the start.
- Advanced node placement — use separate node groups, with affinity and tolerations, so control-plane, Postgres, and AI workloads land on dedicated, isolated hardware.
- Capabilities — estate monitoring, migration, analytics, and AI Factory build on this base.
Clean up (optional)
Because every resource carries $TICKET — the cluster (name + ticket label), the data-plane pool, the bucket, the service account, and the portal/migration DNS records — you can find them all at any time, for teardown or a cost review:
gcloud container clusters list   --filter="resourceLabels.ticket=$TICKET"   # the cluster (its pools, LB, and PVs go with it)
gcloud storage buckets list      --filter="name~$TICKET"                    # object-storage bucket
gcloud iam service-accounts list --filter="email~$TICKET"                   # storage service account
gcloud dns record-sets list --zone="$DNS_ZONE" --filter="name~$TICKET"      # portal + migration A records
This quickstart lists resources but doesn't script their deletion. To tear down, remove the cluster and the bucket yourself against the names above — deleting the cluster takes its node pools, load balancer, and persistent volumes with it; the service account and DNS records are separate.