Using
Suggest editsAfter you configure your EDB Postgres distribution, you can use Precisely Connect CDC's replication functionality. These examples show the replication functionality using EDB Postgres Advanced Server.
- Configure Postgres Distribution as a source instance in Connect CDC Director.
- Set up and configure EDB Postgres Advanced Server as a source instance for Connect CDC Director.
- Configure Postgres Distribution as a target instance in Connect CDC Director.
- Set up and configure EDB Postgres Advanced Server as a target instance to Connect CDC Director.
- Create distribution on Connect CDC Director.
- Define how to replicate data from source to target in a model.
- Save the model.
- Save, validate, and commit the model created for replication.
- Execute Copy Replication using Connect CDC MonCon.
- Execute Copy Replication to copy all the data from the source tables to the target tables.
- Create replication distribution using Connect CDC Director.
- Replicate all the changes made on the source tables to the target tables.
- Execute replication using Connect CDC MonCon.
- Replication distribution replicates all the changes done on the source tables to the target tables.
With Precisely Connect CDC, you can also transform your data as you replicate it from a source to target using data transformation. For information on how to enable this feature, see Data transformation.
- Data transformation
- Modify the source data you're distributing or create or derive the data you distribute to the target system.
Configure Postgres distribution as a source instance in Connect CDC Director
Set up and configure EDB Postgres Advanced Server as a source instance for Connect CDC Director.
Open Connect CDC Director.
Select New.
Right-click Hosts, Servers, Tables, and select New Host.
Enter information for the host. The host is the machine where Connect CDC Director is running.
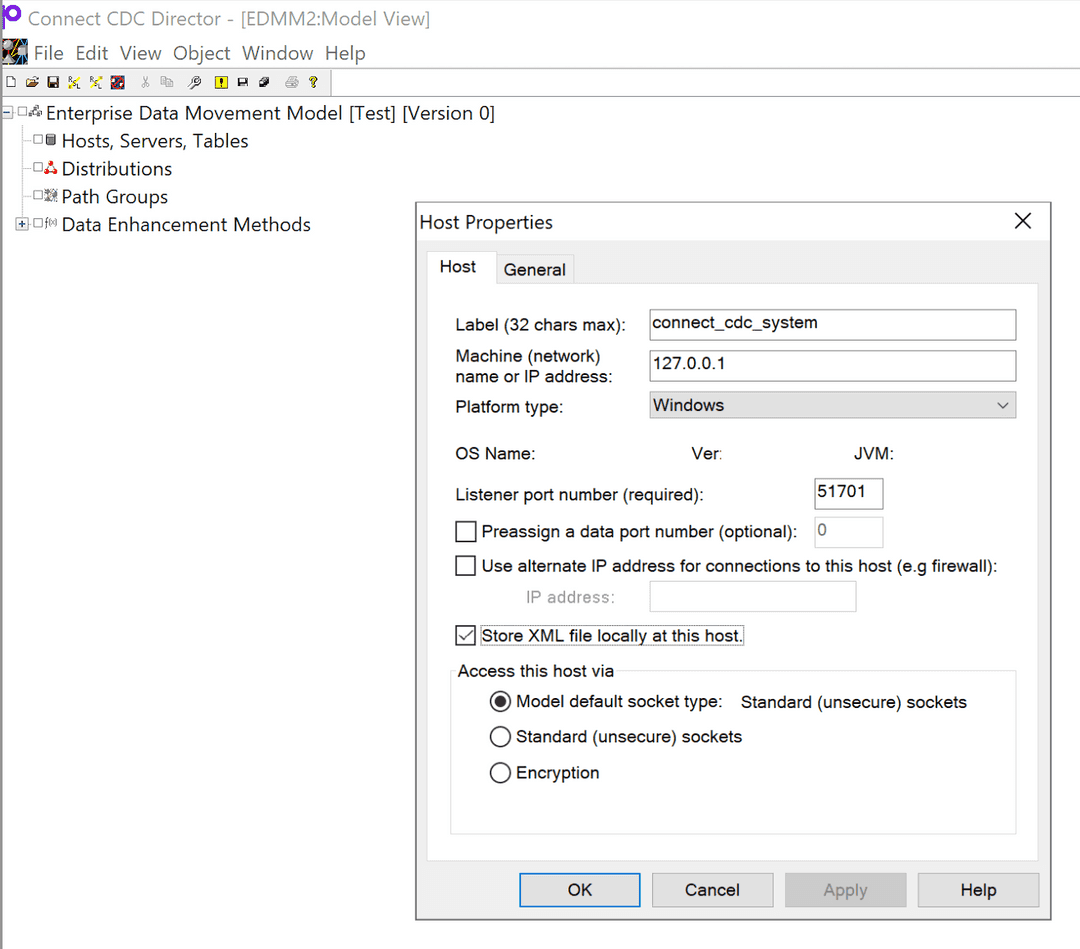
Right-click the newly added host, and select Test Connection. A success message appears.
Right-click the newly added host, and select New Server.
Enter connection information for EDB Postgres Advanced Server as the source instance. (Server Name is where you give the database name.)
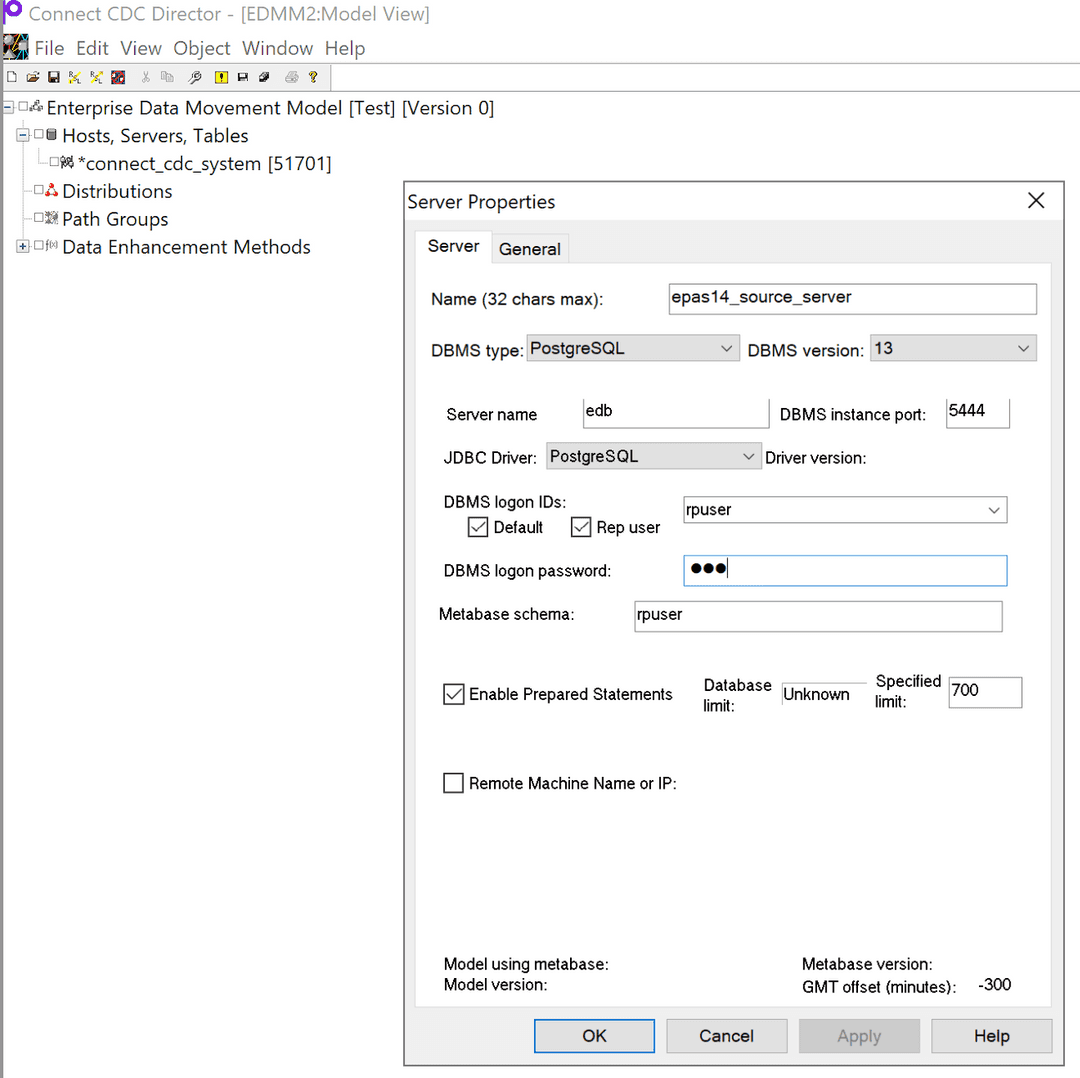
Right-click the newly added server, and select Install Source Metabase.
On the User ID and Password screen, provide the EDB Postgres Advanced Server source instance user name and password.
When prompted on the User ID and Password screen, provide the password of rpuser. Refer to the user name and password given on the New Server screen.
Note
rpuser is the replication user added by default by Precisely Connect CDC.
On the Install Source Metabase screen, select OK.
After the source metabase is created on the EDB Postgres Advanced Server source instance, a success message appears.
Open pgAdmin and connect to your EDB Postgres Advanced Server source instance. Navigate to Schemas. The rpuser schema was created there.
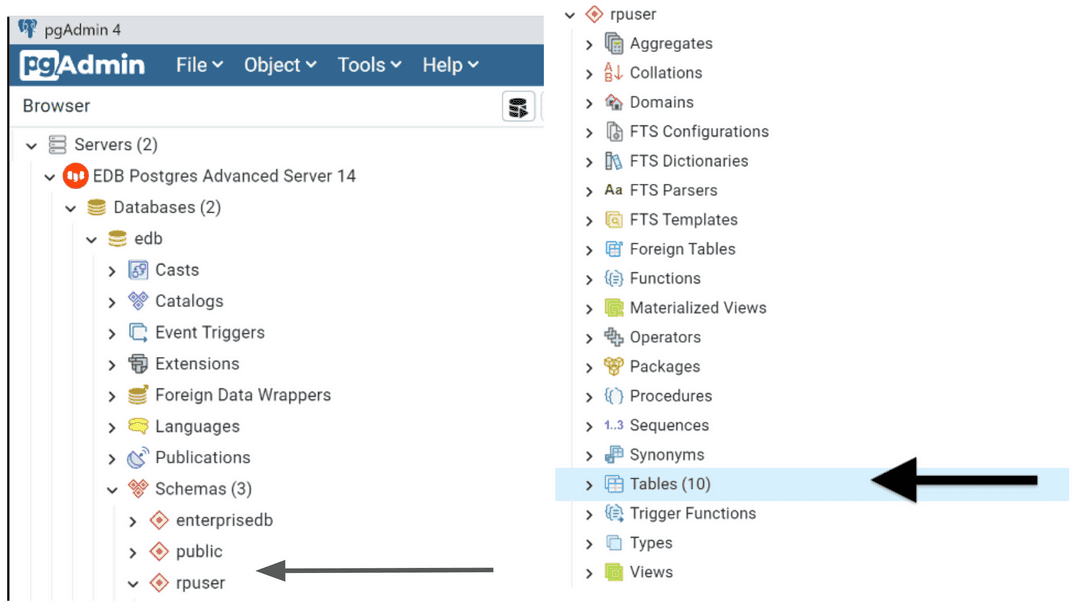
Navigate back to Connect CDC Director. Right-click the newly added server, and select Test Connection. A success message appears.
To add the replication user to the public database, right-click the newly added server, and select Prepare User Database.
On the Database/Schema Name screen, provide the schema name for the schema you want to replicate. This example uses the schema
public.On the User ID and Password screen, provide the EDB Postgres Advanced Server source instance user name and password.
On the Prepare User Database screen, select OK.
After the Prepare User Database operation is successful, a success message appears.
Right-click the newly added server, and select Refresh Available Tables.
Select Refresh list. Select the schema
publicand select OK.
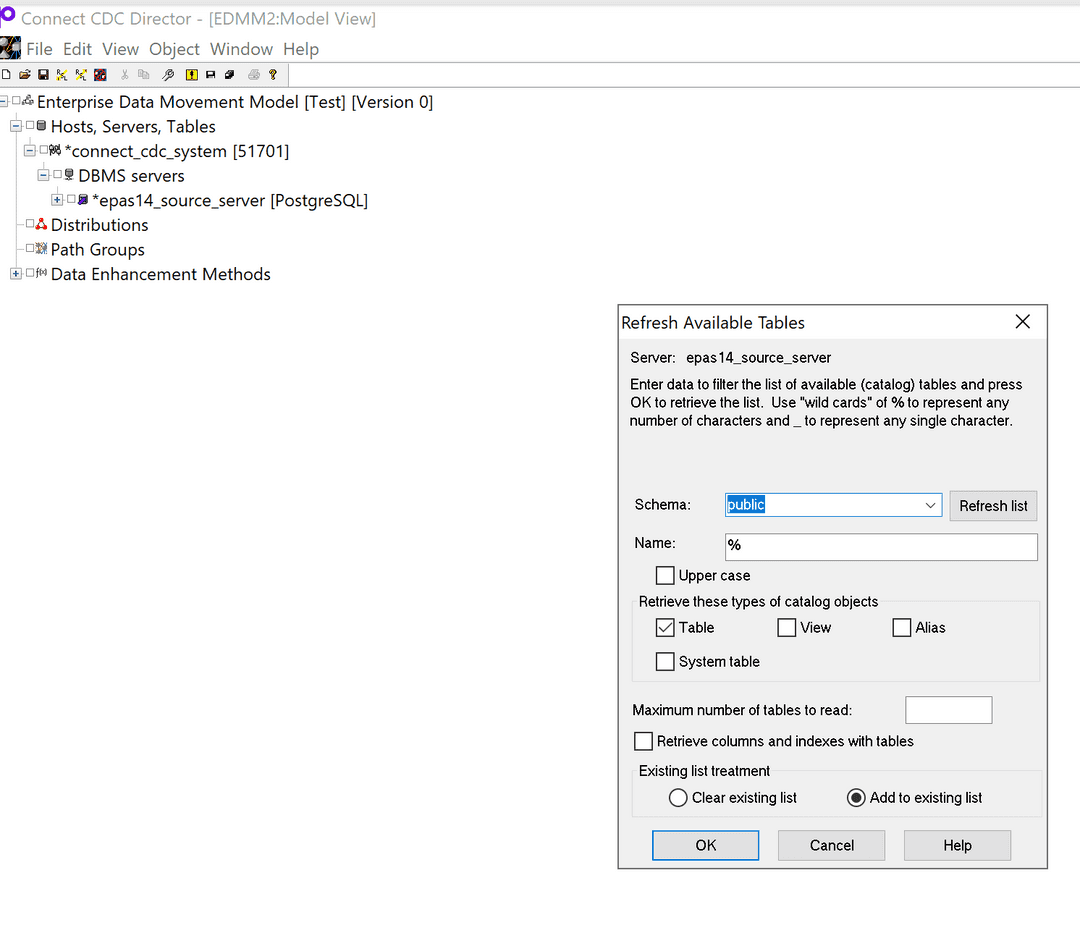
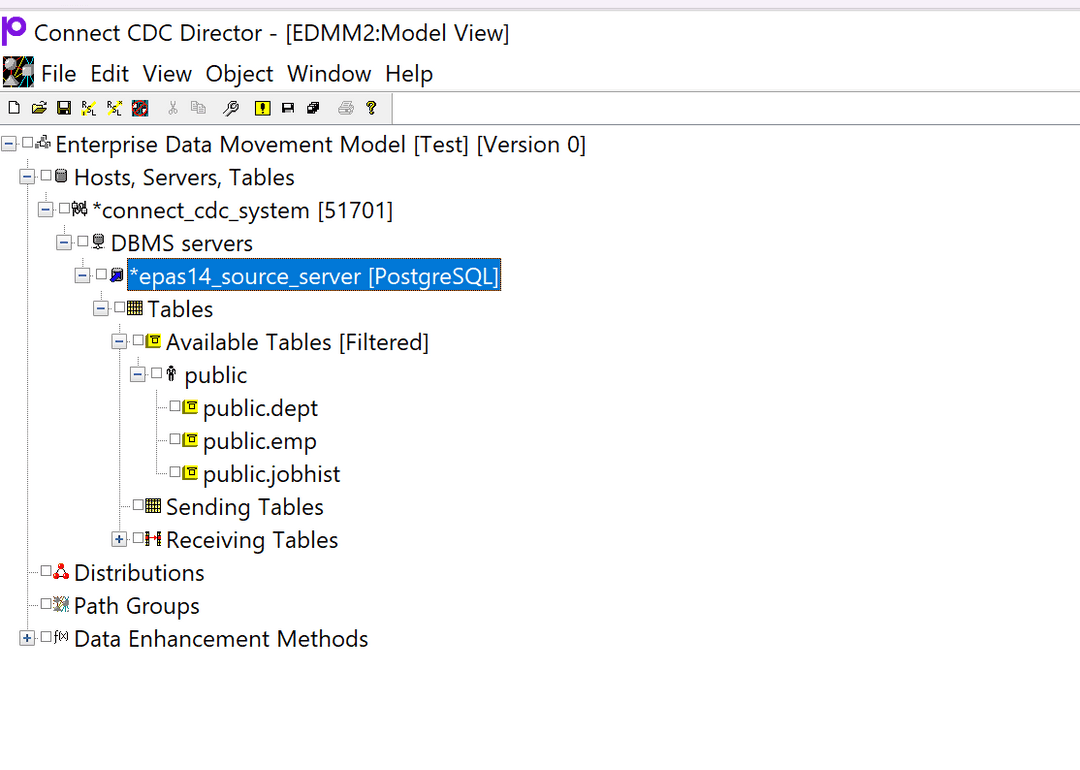
- To display the available tables, select the newly added server, and select Tables > Available Tables > Public > (Schema name). A list of available tables appears.
Configure Postgres Distribution as a target instance in Connect CDC Director
Set up and configure EDB Postgres Advanced Server as a target instance to Connect CDC Director.
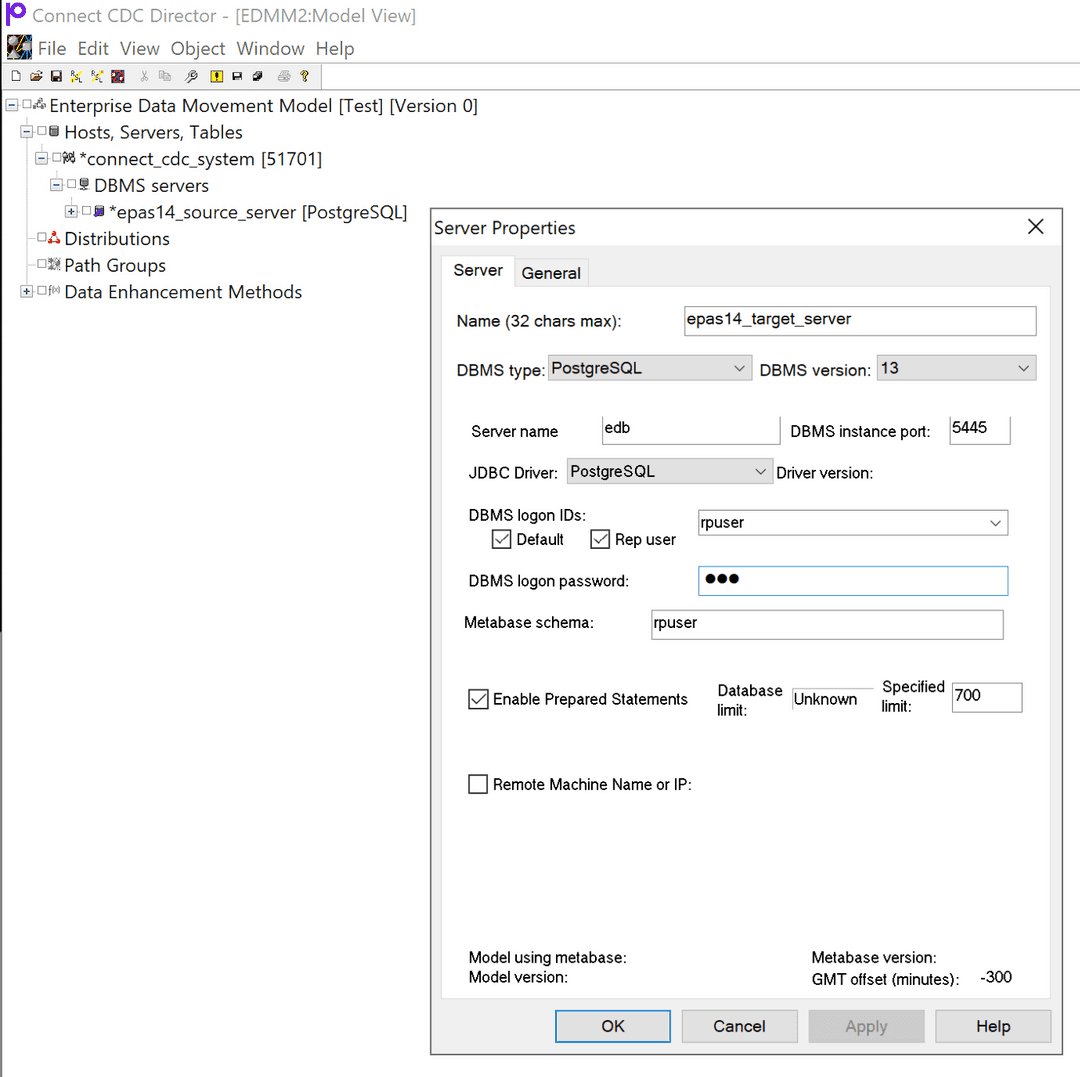
Right-click DBMS Servers, and select New Server.
Provide connection information for the EDB Postgres Advanced Server target instance.
Right-click the newly added server, and select Install Target Only Metabase.
On the User ID and Password screen, provide the EDB Postgres Advanced Server target instance user name and password.
When prompted on the User ID and Password screen, provide the password of rpuser. (Refer to the user name and password given on New Server screen.)
On the Install Target Only Metabase screen, select OK.
After the target-only metabase is created, a success message appears.
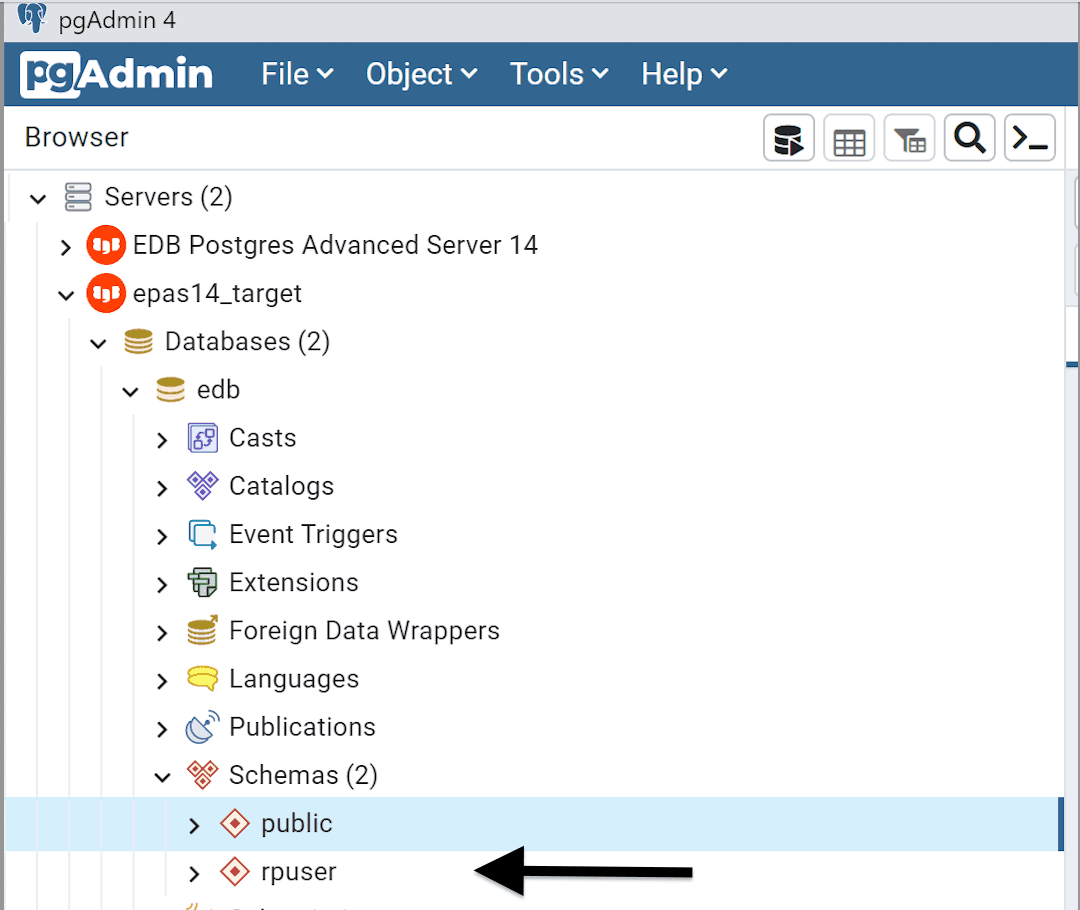
Open pgAdmin and connect to the EDB Postgres Advanced Server target instance. Under Schemas, the
rpuserschema was created.
Right-click the newly added server, and select Prepare User Database, which adds the replication user to the EDB Postgres Advanced Server target instance.
In Database/Schema Name, provide the schema name
public.On the User ID and Password screen, provide the EDB Postgres Advanced Server target instance user and password.
On the Prepare User Database screen, select OK.
After the prepare user database operation completes, success a message appears.
Create distribution on Connect CDC Director
Create a distribution that defines how to replicate data from source to target. This example replicates from an EDB Postgres Advanced Server source to an EDB Postgres Advanced Server target.
Open Connect CDC Director.
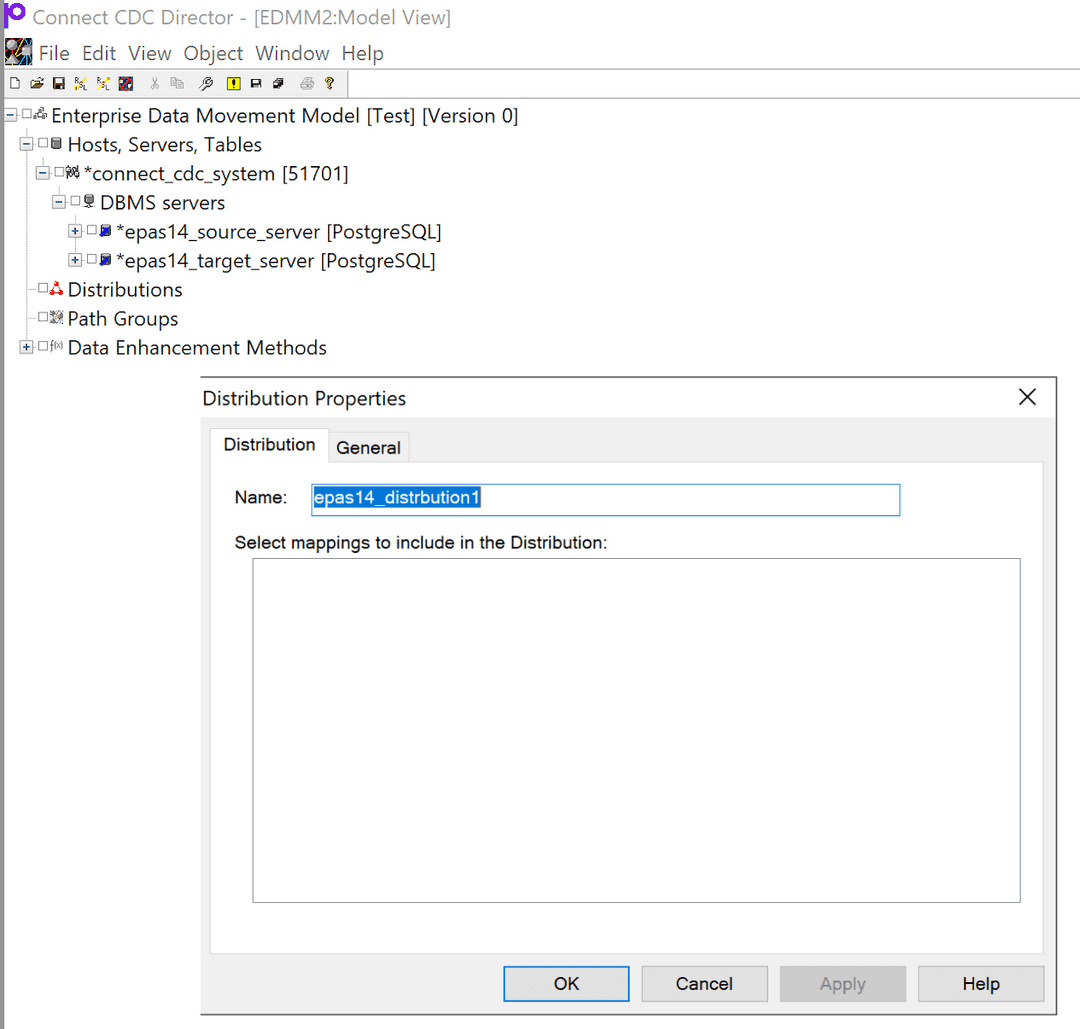
Right-click Distributions, and select New Distribution.
Enter the distribution information, such as distribution name and description. Select OK.
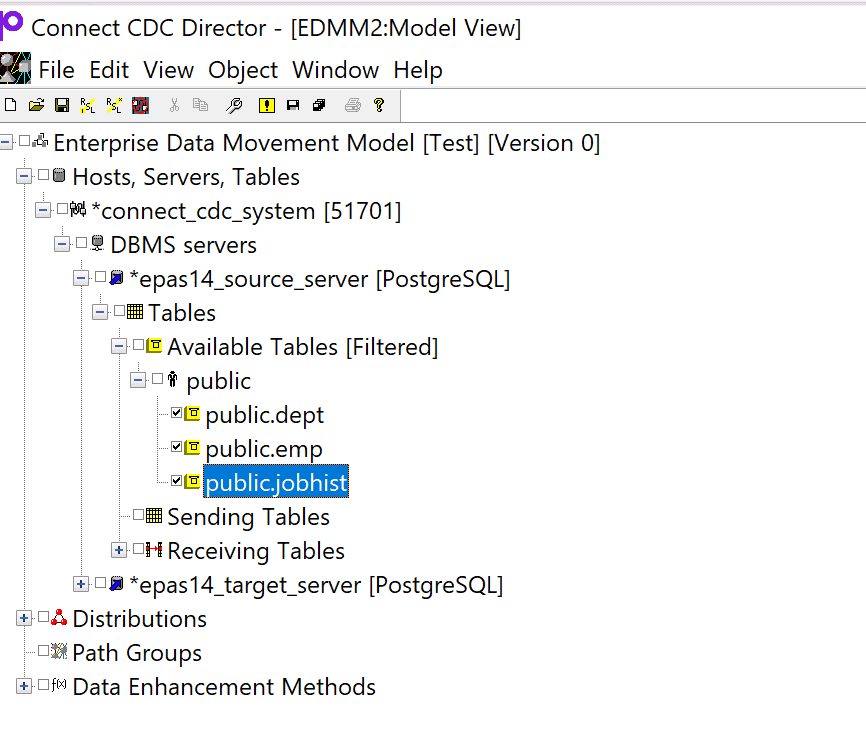
Go to the source DBMS server Tables > Available Tables > Public > (Schema name).
Using the check boxes, select the tables to replicate. Right-click, and select Select for Distribution > All Checked Tables.
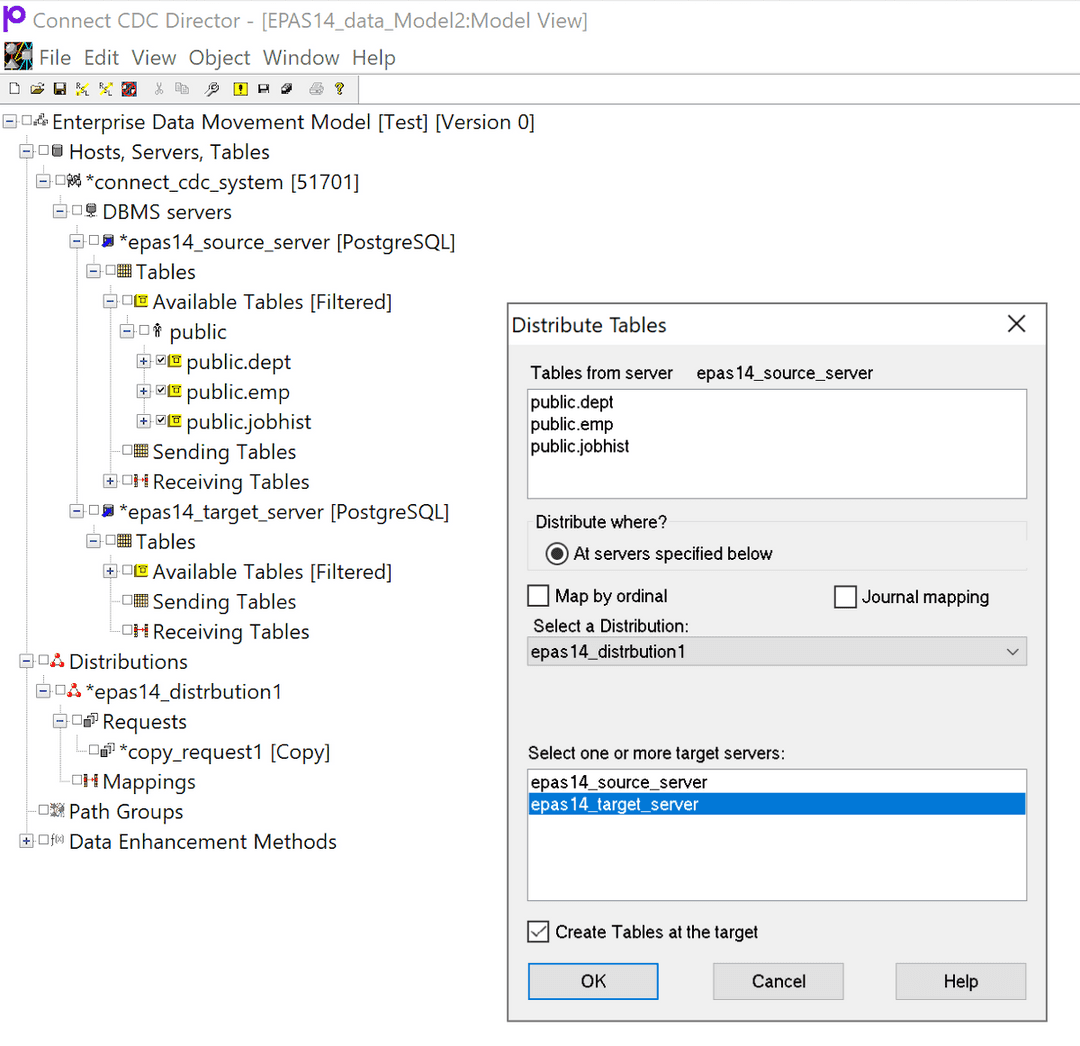
- On the Distributed Tables screen, under Select one or more target servers, select the target server. Select the Create tables on target option, the distribution under the Select a Distribution option, and select OK.
On the Connect CDC Director screen, select Yes.
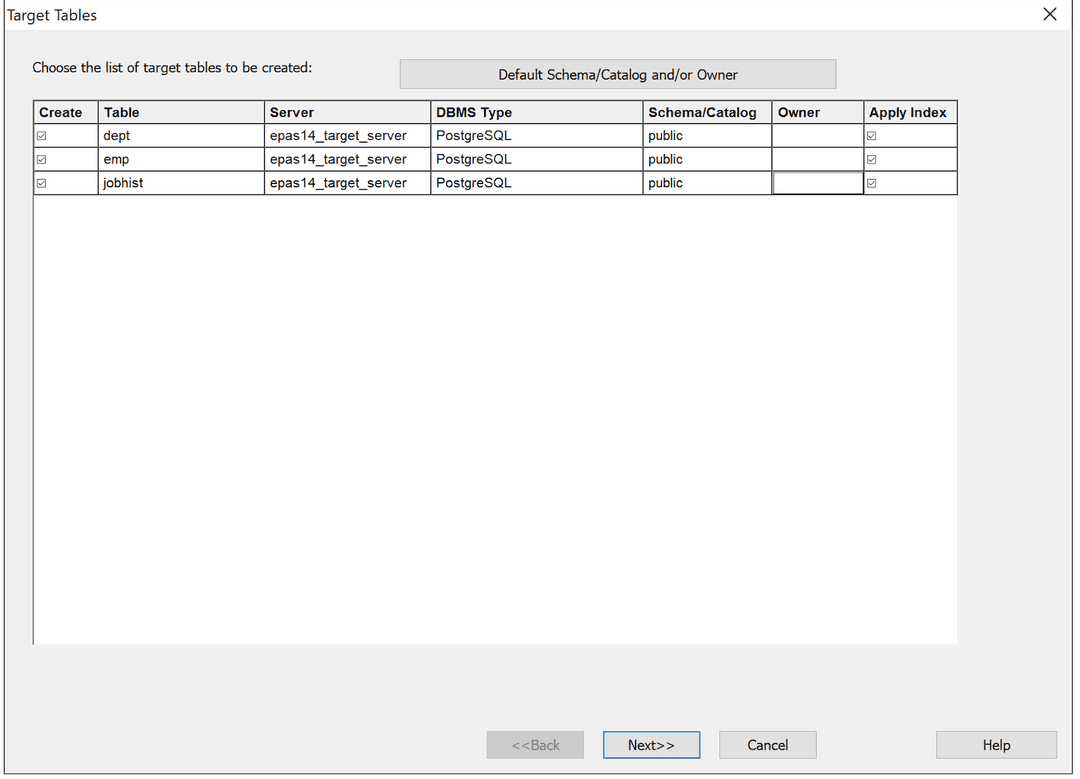
On the Target Tables screen, enter the target schema for each table, and select Next.
- On the Target Server Login Details screen, enter the EDB Postgres Advanced Server target instance user name and password, and select Test Connect. Once successful, select Add, and then select Create.

Select Finish.
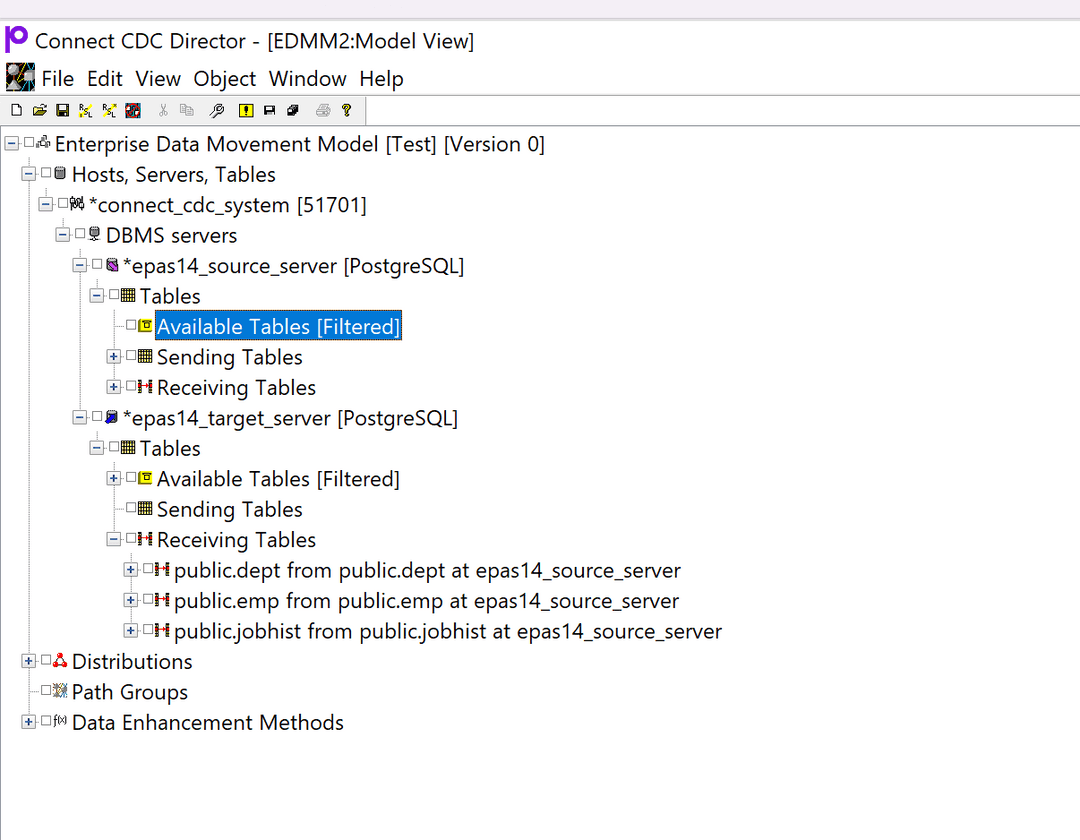
To confirm the tables were created on the target server, select Target DBMS Server > Tables > Receiving Tables. The list of the tables that are available on the source DBMS server is displayed.
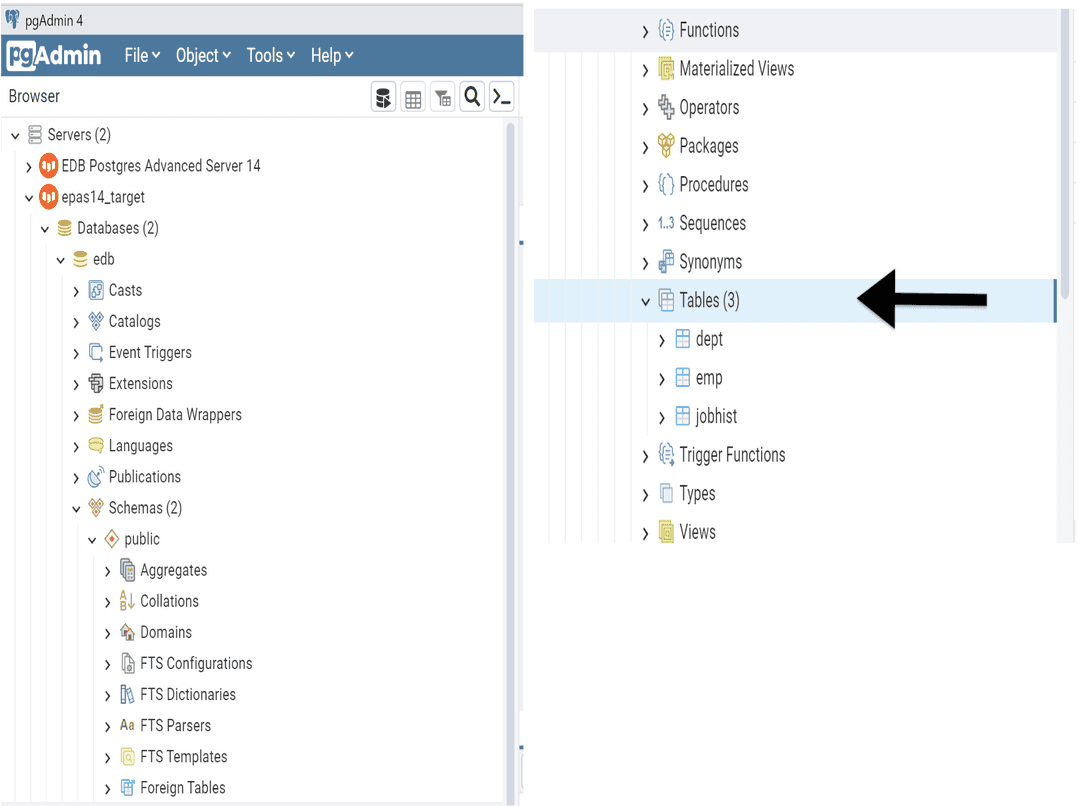
- Open pgAdmin, and connect to the EDB Postgres Advanced Server target instance. Under the schema
public, the tables were created.
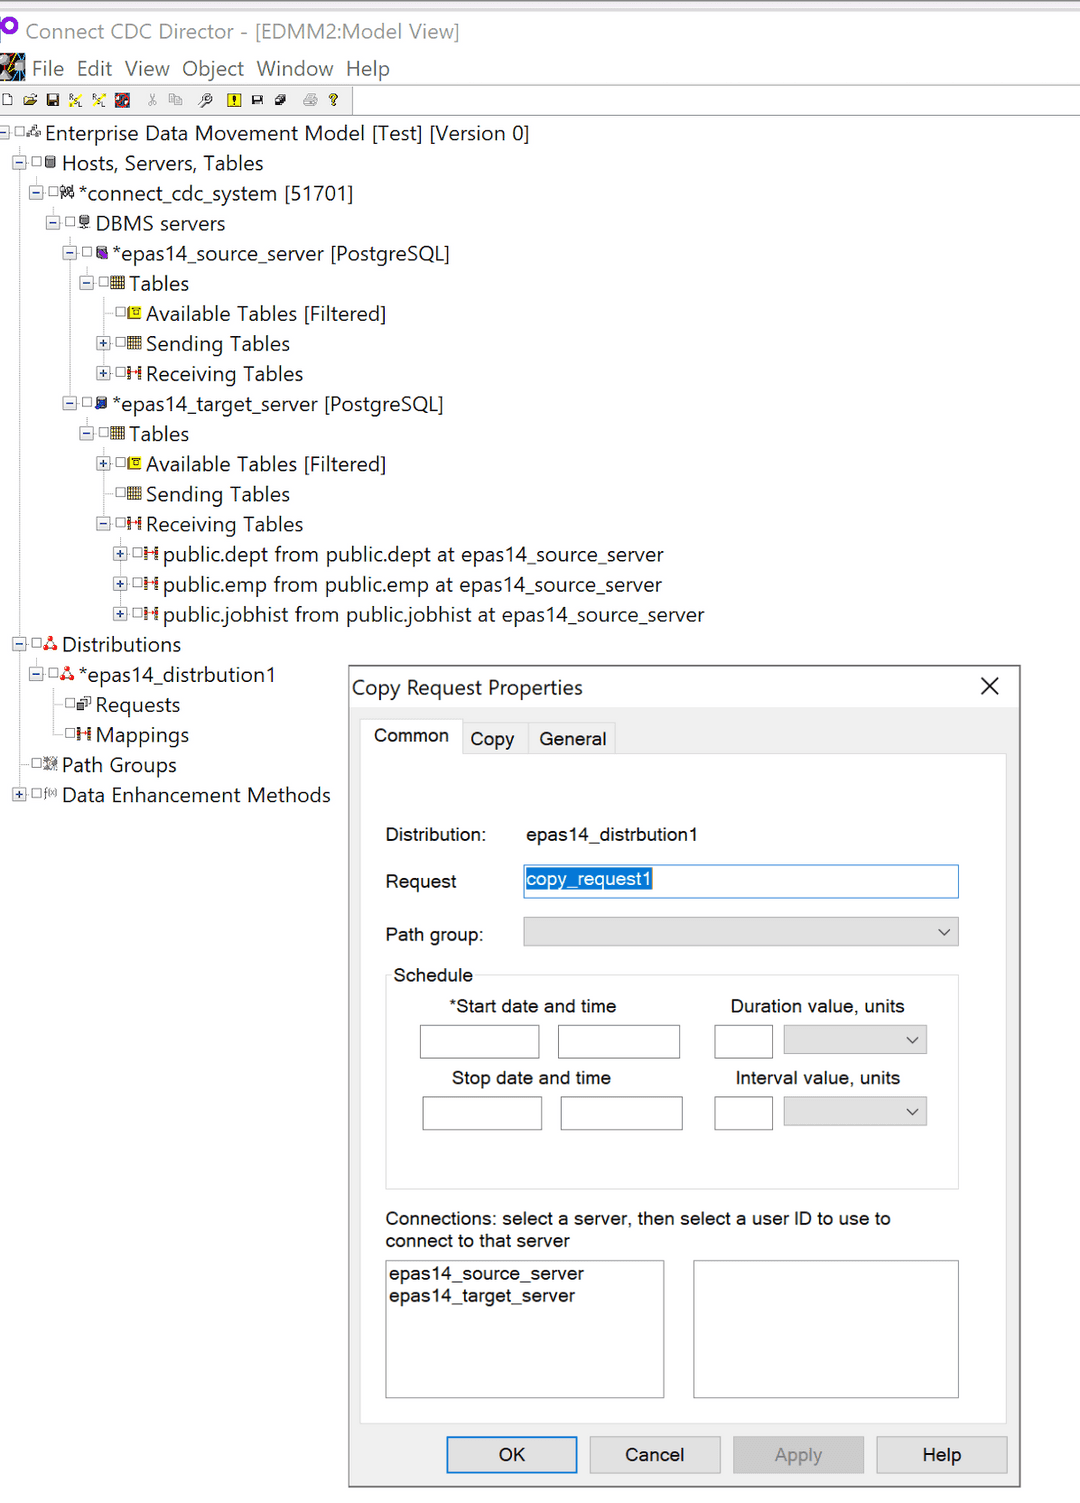
Mappings of tables set up for replication from the EDB Postgres Advanced Server source instance to the EDB Postgres Advanced Server target instance were created under Distributions > Mappings.

Open Distributions > Newly Created Distribution > Requests > New Request > Copy. Copy copies/replicates all the data in tables from the EDB Postgres Advanced Server source instance to the EDB Postgres Advanced Server target instance.
On the Copy Request Properties screen, provide the required information, and select OK.
Save the model
You need to save, validate, and commit the model you created before you can perform the replication.
To save the model, select File > Save, and provide the name for the model.
To validate the model, right-click Enterprise Data Movement Model, and select Validate.
If the model is valid, no error occurs.

- Right-click Enterprise Data Movement Model, and select Commit > Full.
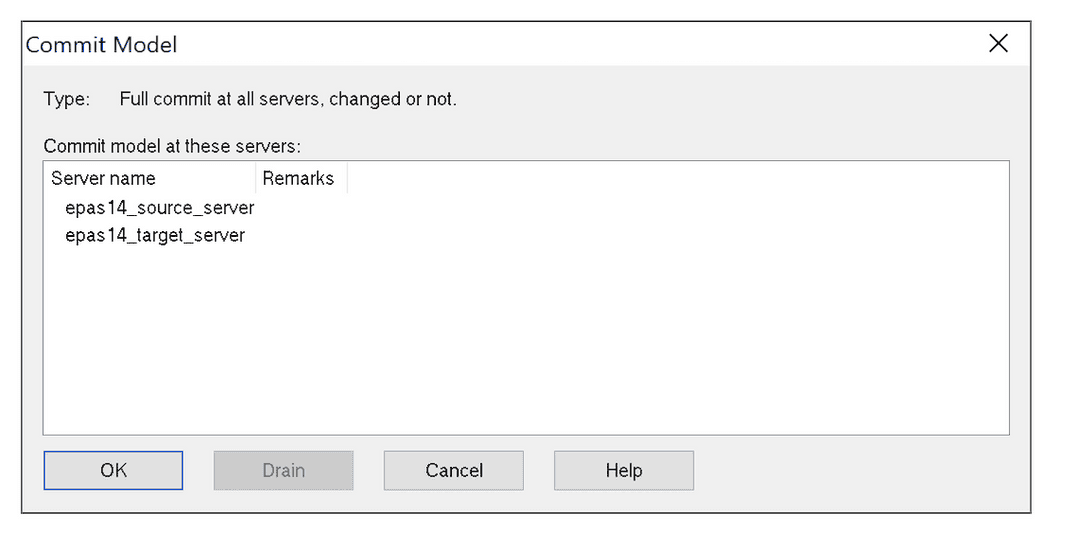
- On the Commit Model screen, select OK, which creates the model files.
Execute copy replication using Connect CDC MonCon
Connect CDC MonCon is a GUI application, separate from the Connect CDC Director, that you use for monitoring and control functions. This example uses Connect CDC MonCon to execute the copy replication. Copy replication copies all the data from the source tables to the target tables.
Open Connect CDC MonCon.
Select Model > New Model.
Provide the hostname/IP, and select the saved model from the list.
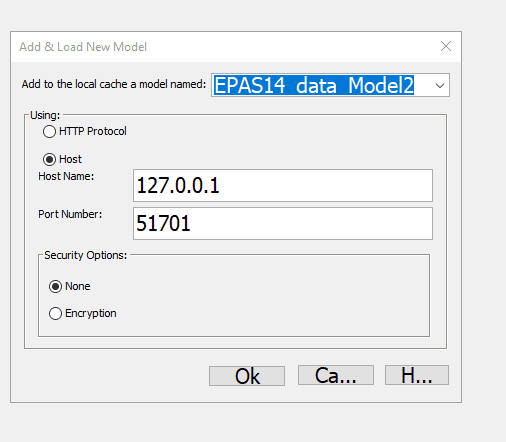
- In the Request section, select the distribution model that was created for copying data. Right-click, and select Start.
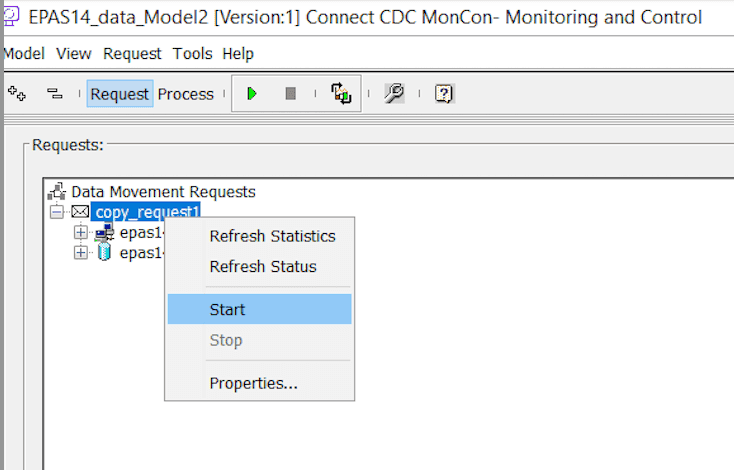
To see the progress, select Process.
After the copy operation has completed successfully, open pgAdmin and connect the EDB Postgres Advanced Server target instance. Check the tables to see whether the data was copied to them.


Create replication distribution using Connect CDC Director
Once the copy replication operation is successful, then execute a replication option to replicate all the changes made on the source tables to the target tables.
Open Connect CDC Director.
Create the replication request using Distributions > Newly Created Distribution > Requests > New Request > Replication.
Enter the name, and select OK.
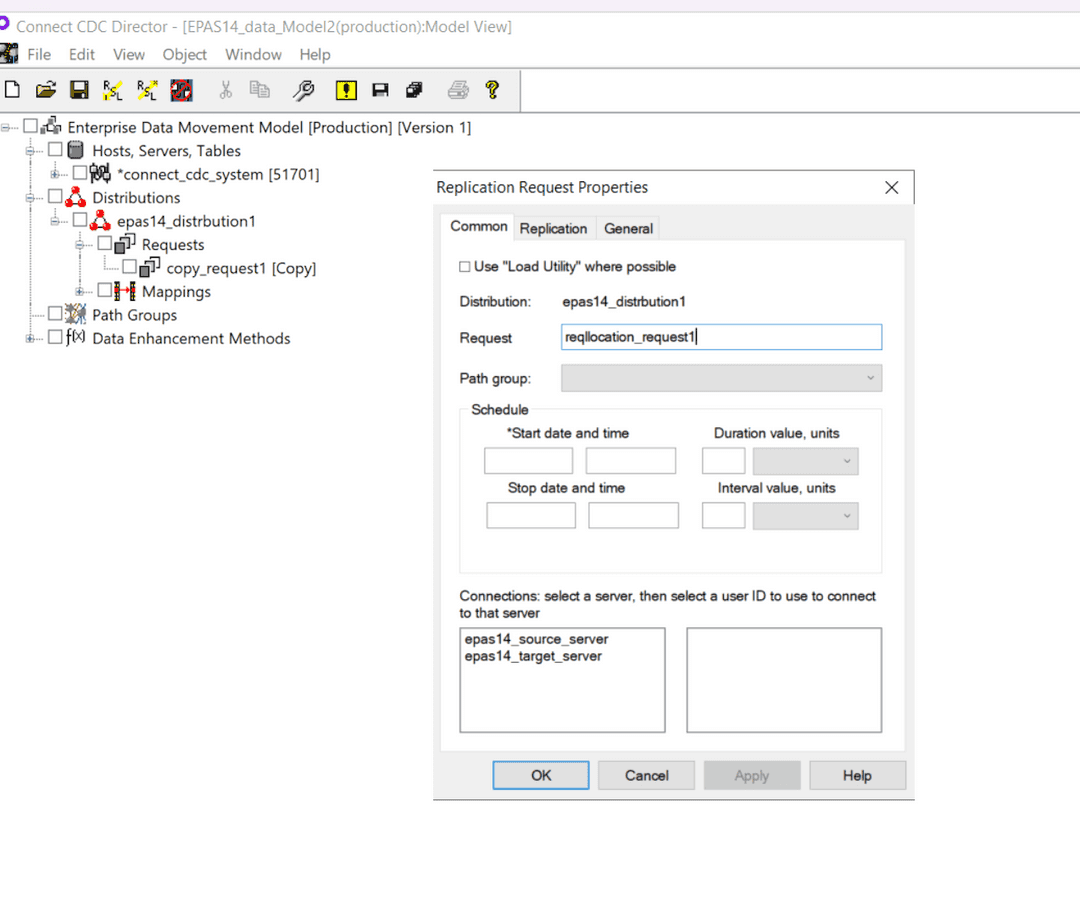
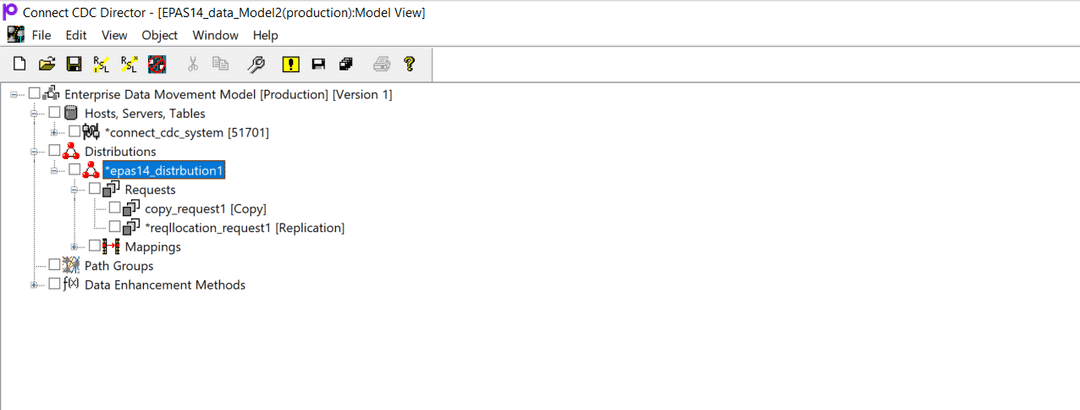
Save the changes in the model.
Right-click Enterprise Data Movement Model, and select Validate to validate the model.
Right-click Enterprise Data Movement Model, and select Commit > Full.
To create the model files, on the Commit Model screen, select OK.
Execute replication using Connect CDC MonCon
Replication distribution replicates all the changes done on the source tables to the target tables.
Open Connect CDC MonCon.
As the model is updated in the Connect CDC Director, to add the Replication Distribution, select Model Update. This adds the replication distribution to the Connect CDC MonCon interface.
After the model updates successfully, the replication request is displayed.
In the Request section, select the distribution model created for replication. Right-click, and select Start.
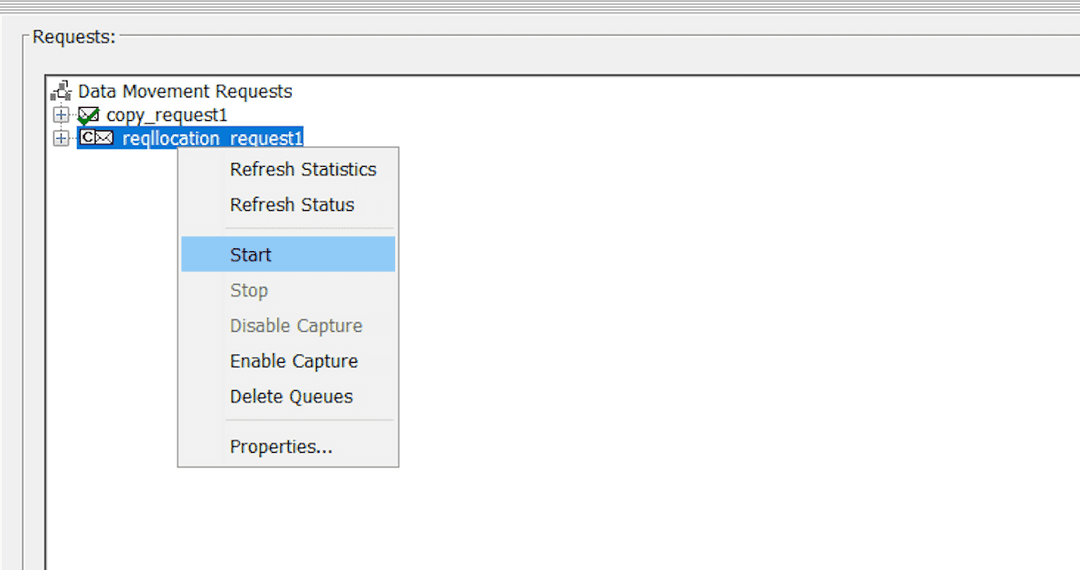
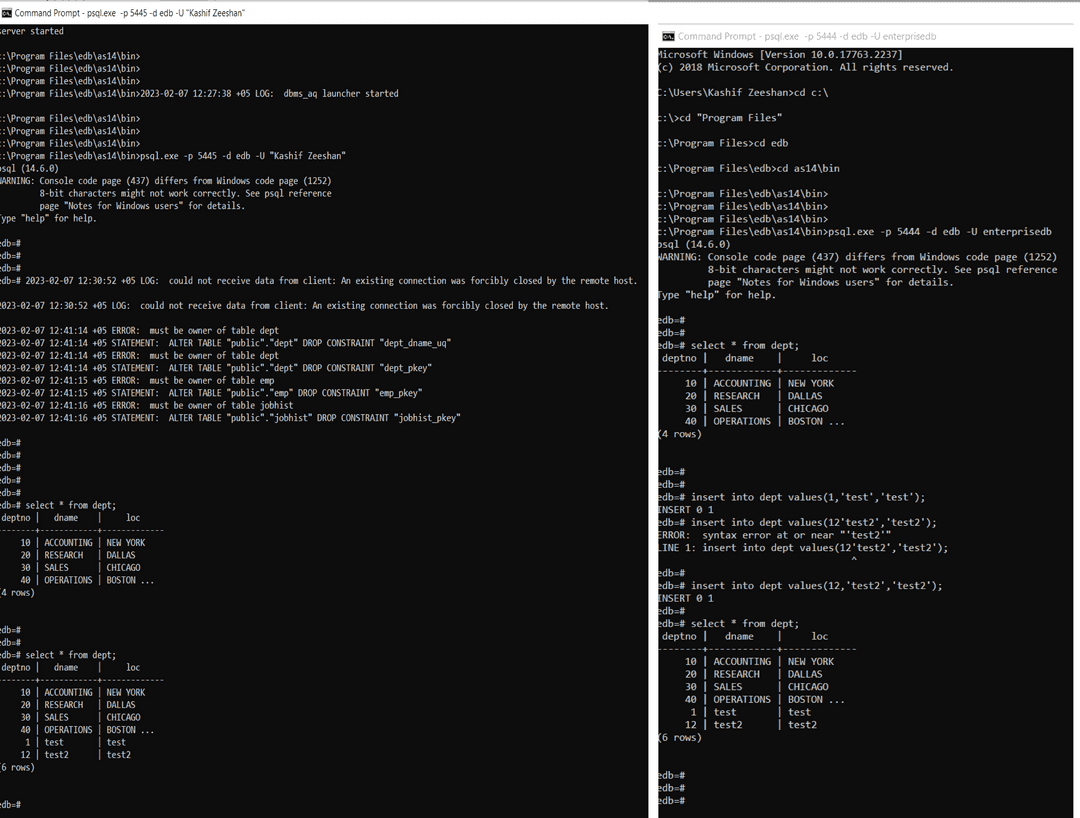
On the source instance, update the data to be replicated in the source tables.
On the target instance, check data in the target tables. The data is updated there.
Data transformation
Precisely Connect CDC has options that let you modify the source data you're distributing or even create or derive the data you distribute. You can use predefined functions to accomplish these data transformations, or you can construct your own operations or functions.
For example, to express source currency values in terms of a different currency, you specify the transformation algorithm to use for that column mapping. For some common transformations, the algorithm is supplied as a predefined Connect CDC function.
The algorithms you specify are known in the Connect CDC Director as expressions. The Connect CDC Expression Handler parses them and then creates runtime code that calculates the result for the expressions.
In addition to or instead of calls to predefined functions, expressions can have an arbitrary number of constants, column references, and calculations on those constants, columns, and functions. Their results must be compatible with the target column in type and length.
Steps to demonstrate data transformations
To demonstrate data transformations:
Open Connect CDC Director.
Go to Source DBMS Server > Tables > Sending Tables.
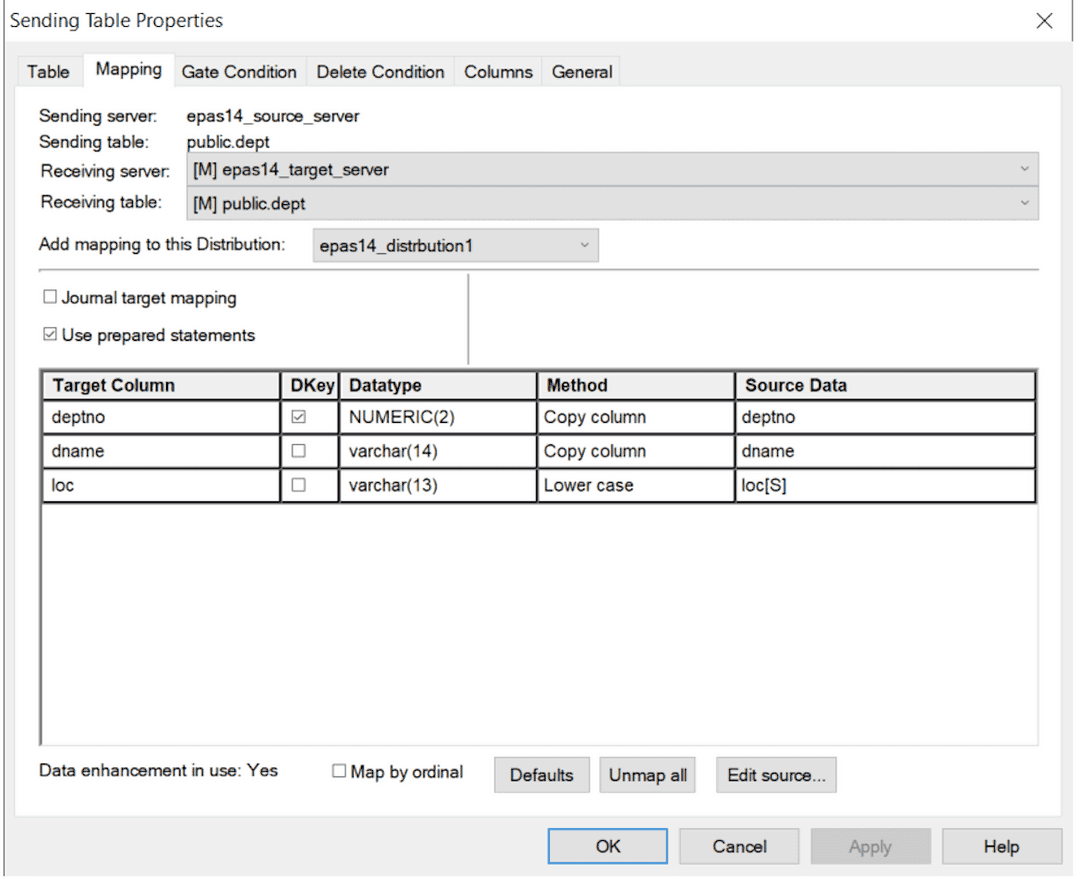
Using the check boxes, select the tables to perform data transformation. Right-click, and select Properties > Mapping.
On the Mapping tab, you define the column mappings for each of your target tables with respect to the source tables. The Mapping tab displays the corresponding columns in the Target Column and Source Data columns in each row. Connect CDC Director maps target columns to source columns that have the same name.
When the Connect CDC Director maps a source table to a same-named target table, it also associates individual source table columns with same-named target table columns. You then select:
The column pairings you want to include in your data distribution
The additional column pairings you want to arrange
The type of data transformation, if any, you want to assign to each column pairing
The Mapping tab has the following options:
Receiving server list: The name of the target server is displayed.
Receiving table list: The name of the target table is displayed. If it doesn't, for example, because its name doesn't match your source table’s, select the target table from the Receiving table list. The list includes all tables in the list of available tables for the target server. Any table name with [M]preceding it is already mapped to a source table.
The Mapping tab grid displays each target table column and its datatype as well as its default corresponding source column, if any. Copy column under Method in the grid means the source column value is to be distributed without any special handling or transformation.
Target column: Contains all the columns in the target table.
Datatype: Datatype of the column for both source and target tables as per the mapping defined between source and target table.
Source Data: Contains all the columns in the source table.
DKey: Identifies the distribution key. By default, DKey is marked for the primary key. You can clear the default and add as many check marks as necessary.
Method: Contains a list of data transformation functions.
- For this example, from the Method list for the target column
loc, select lower case. This data transformation converts the data in theloccolumn of the target table to lower case after the replication is done.
Perform the replication from Connect CDC MonCon.
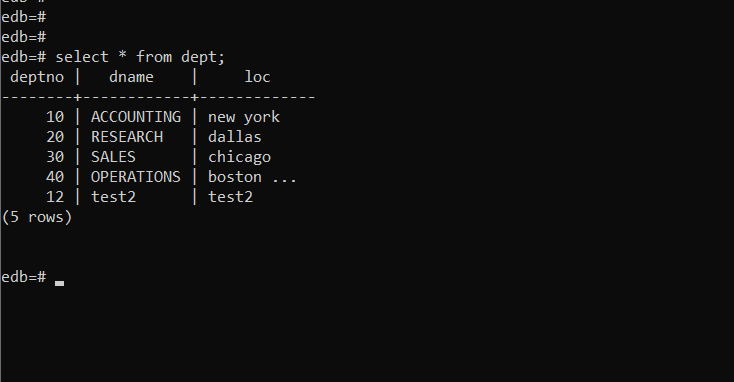
On the target instance, check the data in the target table
dept.datais transformed for the columnlocand is stored as lower case.
- On this page
- Configure Postgres distribution as a source instance in Connect CDC Director
- Configure Postgres Distribution as a target instance in Connect CDC Director
- Create distribution on Connect CDC Director
- Save the model
- Execute copy replication using Connect CDC MonCon
- Create replication distribution using Connect CDC Director
- Execute replication using Connect CDC MonCon
- Data transformation
Could this page be better? Report a problem or suggest an addition!