PostgreSQL 18은 OAuth2 인증을 도입해 기존 사용자명과 비밀번호 조합 대신 OAuth2 토큰으로 사용자를 인증할 수 있도록 지원합니다. 이 가이드에서는 널리 사용되는 pgx Go 드라이버를 참조 구현으로 활용해 PostgreSQL 클라이언트 라이브러리에 OAuth Bearer 토큰 인증을 구현하는 방법을 살펴봅니다.
Part-3 (이 글): PostgreSQL 18 OAuth2 OAUTHBEARER 클라이언트 구현 방법
이 글에서 사용하는 코드는 필자의 pgx 포크인 xugy99/pgx를 기반으로 합니다.
PostgreSQL 18의 OAUTHBEARER 인증 구조
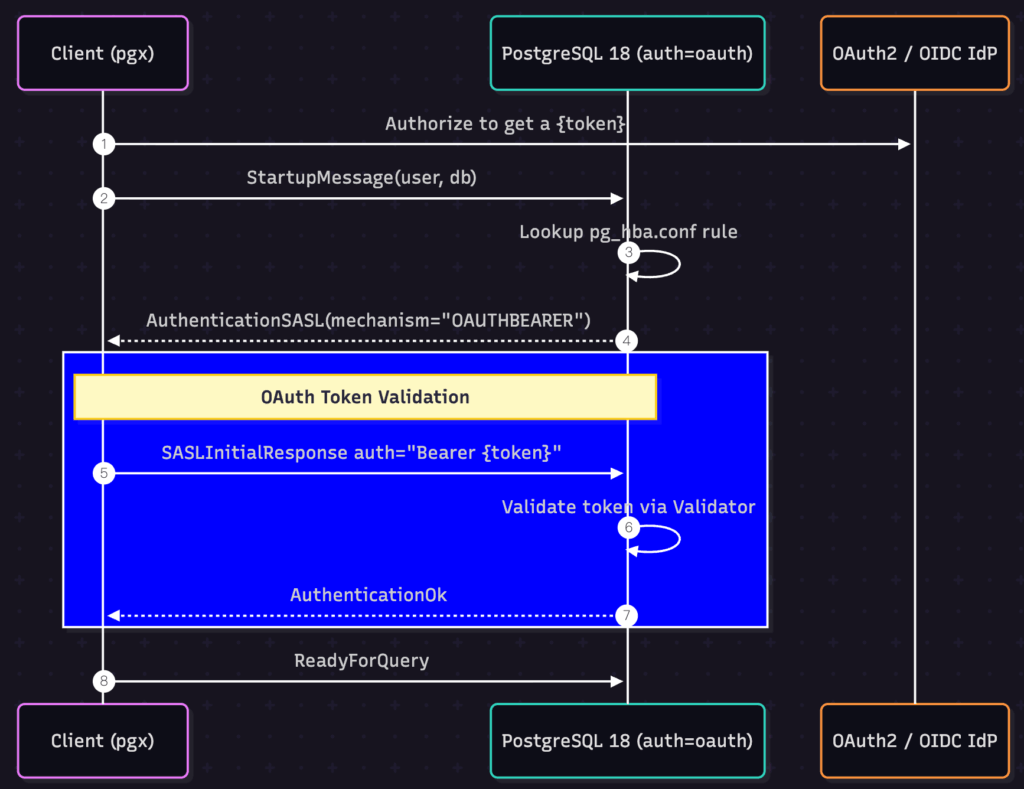
OAUTHBEARER SASL 메커니즘을 사용하면 클라이언트가 OAuth 2.0 Bearer 토큰으로 인증할 수 있습니다. PostgreSQL 18은 기존 SASL 인증 흐름에 OAUTHBEARER 인증을 통합했으며, 전체 OAUTHBEARER SASL 흐름은 이 시리즈의 Part-1에서 확인할 수 있습니다.
pgx의 PostgreSQL 연결 및 인증 구조
pgx는 ConnectWithOptions() 함수를 통해 PostgreSQL 클러스터 URL과 옵션을 받아 새로운 연결을 생성합니다. 이를 이용해 쿼리를 실행하는 기본 예시는 다음과 같습니다.
func main() {
   // ... ...
   url := "postgres://joe:joespassword@localhost:5432/my_db"
   conn, err = pgx.ConnectWithOptions(context.Background(), url, opts)
   if err != nil {
       log.Fatalf("Unable to connect to database: %v\n", err)
   }
   // run sql
   rows, err := conn.Query(context.Background(), *sql)
   if err != nil {
       log.Fatalf("Failed to execute SQL: %v\n", err)
   }
   defer rows.Close()
   // collect rows
   // ... ...
}
위 예시의 url에는 기존 방식의 사용자명과 비밀번호가 포함되어 있으며, 함수 호출을 통해 이후 쿼리에 사용할 수 있는 pgconn 객체를 반환받습니다.
pgx.ConnectWithOptions()는 크게 연결 문자열 파싱, 인증 방식 선택, 연결 수립 과정을 거칩니다. 각 단계의 처리 방식을 살펴보겠습니다.
//
// from pgconn/config.go in github.com/xugy99/pgx
//
if strings.HasPrefix(connString, "postgres://") || strings.HasPrefix(connString, "postgresql://") {
   connStringSettings, err = parseURLSettings(connString)
} else {
   connStringSettings, err = parseKeywordValueSettings(connString)
}
2. 서버 응답에 따른 인증 방식 선택
TCP/TLS 연결을 수립한 후 connectOne()은 스타트업 메시지를 보내고 서버의 인증 요청을 기다립니다. pgconn/pgconn.go의 connectOne()은 서버가 반환한 메시지 유형에 따라 인증 방식을 선택합니다.
//
// from pgconn/pgconn.go in github.com/xugy99/pgx
//
func connectOne(ctx context.Context, config *Config, connectConfig *connectOneConfig,
    ignoreNotPreferredErr bool,
) (*PgConn, error) {
   // ... ...
   switch msg := msg.(type) {
   case *pgproto3.AuthenticationOk:
       // No auth needed
   case *pgproto3.AuthenticationCleartextPassword:
       err = pgConn.txPasswordMessage(pgConn.config.Password)
   case *pgproto3.AuthenticationMD5Password:
       digestedPassword := "md5" + hexMD5(hexMD5(pgConn.config.Password+pgConn.config.User)+string(msg.Salt[:]))
       err = pgConn.txPasswordMessage(digestedPassword)
   case *pgproto3.AuthenticationSASL:
       err = pgConn.scramAuth(msg.AuthMechanisms)
       if err != nil {
           pgConn.conn.Close()
           return nil, newPerDialConnectError("failed SASL auth", err)
       }
   case *pgproto3.AuthenticationGSS:
       err = pgConn.gssAuth()  // GSSAPI/Kerberos
   }
   // ... ...
}
서버가 AuthenticationOk를 반환하면 인증이 완료되고 연결은 connStatusIdle 상태로 전환됩니다.
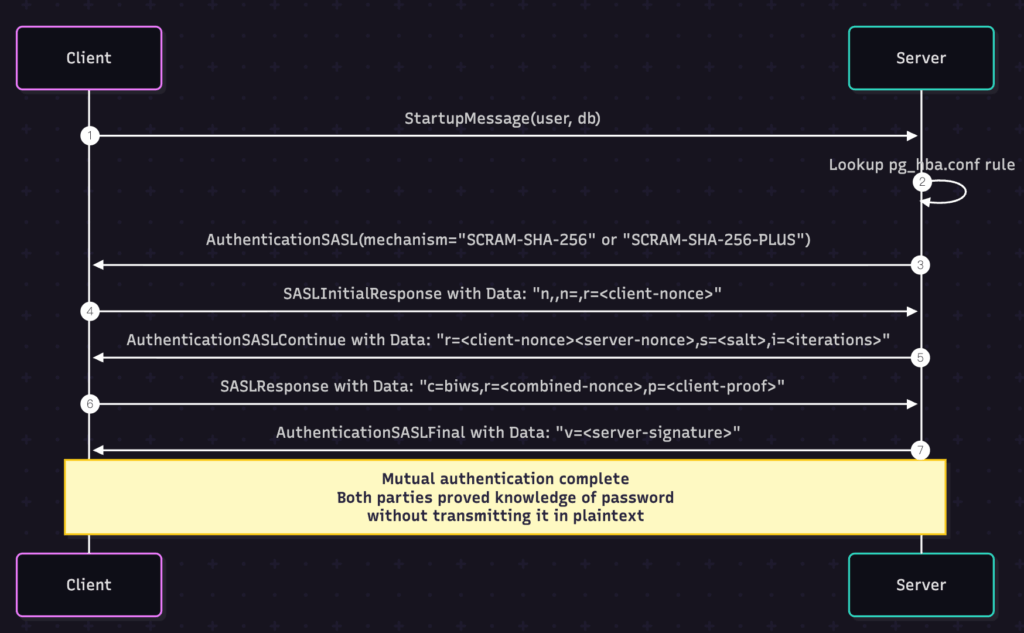
여기서 확인해야 할 부분은 pgproto3.AuthenticationSASL 분기입니다. 현재 pgx에서 SASL 기반으로 구현된 인증 방식은 SCRAM(Salted Challenge Response Authentication Mechanism)이며, 클라이언트가 AuthenticationSASL 메시지를 받으면 SCRAM 인증 흐름을 시작합니다.
3. SCRAM 기반 SASL 인증 흐름
PostgreSQL은 SCRAM-SHA-256과 SCRAM-SHA-256-PLUS를 지원합니다. 기본적인 핸드셰이크 흐름은 다음 다이어그램에서 확인할 수 있습니다.
msg.AuthMechanisms는 인증 메커니즘(SCRAM-SHA-256)을 지정하며, pgConn.scramAuth()는 다음 네 가지 메시지를 이용해 SASL 인증 흐름을 처리합니다.
SASLInitialResponse
AuthenticationSASLContinue
SASLResponse
AuthenticationSASLFinal
pgx에 OAUTHBEARER 인증 구현하기
기존 SCRAM 인증 처리 구조를 활용하면 AuthenticationSASL 메시지에서 OAUTHBEARER 지원 여부를 확인하고 OAuth2 전용 인증 함수로 연결하도록 확장할 수 있습니다.
클라이언트는 SASLInitialResponse에서 auth=""을 보내 OIDC 디스커버리를 요청하고 authorize 엔드포인트를 통해 OAuth2 로그인 흐름을 완료할 수도 있습니다. 이는 PostgreSQL 18의 OAuth2 인증 흐름을 보다 완전하게 구현하는 방식입니다. 이 글에서는 이 단계를 생략하고 이미 토큰을 확보했다고 가정한 뒤 SASLInitialResponse에 토큰을 직접 포함해 전송하는 방식을 사용합니다. 구현할 흐름은 다음과 같습니다.
PostgreSQL 18 and PGX Demo
1. OAUTHBEARER 인증 흐름 구현
핵심 OAuth 인증 로직은 연결 수립 과정에 구현합니다.
//
// from pgconn/auth_oauth.go in github.com/xugy99/pgx
//
func (c *PgConn) oauthAuth() error {
   // Check if we have a pre-configured bearer token
   if c.config == nil || c.config.OAuthBearerToken == "" {
       return fmt.Errorf("server requires OAuthBearerToken for this connection")
   }
   // Construct a SASLInitialResponse message
   reply := &pgproto3.SASLInitialResponse{
       AuthMechanism: "OAUTHBEARER",
       Data:          buildOAuthInitialResponse(c.config.OAuthBearerToken),
   }
   // Use frontend.Send() to populate the send buffer and flush it to the wire
   c.frontend.Send(reply)
   if err := c.flushWithPotentialWriteReadDeadlock(); err != nil {
       return err
   }
   // Wait for AuthenticationOk message
   _, err := c.rxOAuthSASLOk()
   return err
}
이 구현에서 확인할 주요 사항은 다음과 같습니다.
토큰 주입: 토큰은 전달된 pgconn 연결의 config에서 가져옵니다. 이후 단계에서 config 객체에 토큰을 전달하는 방법을 살펴봅니다.
SASL 통합: 기존 SASL 메시지 구조를 재사용하며, Data 페이로드는 buildOAuthInitialResponse() 함수에서 구성합니다.
응답 처리:rxOAuthSASLOk()는 PostgreSQL 서버의 응답을 기다리고 AuthenticationOk 메시지를 확인합니다.
2. OAuth 초기 응답 구성
다음으로 RFC 7628에 맞는 OAuth 초기 응답을 구성하기 위해 buildOAuthInitialResponse() 함수를 구현합니다.
RFC 7628 섹션 4.1의 Bearer 토큰 교환 예시는 다음과 같습니다.
[Initial connection and TLS establishment...] S: * OK IMAP4rev1 Server Ready C: t0 CAPABILITY S: * CAPABILITY IMAP4rev1 AUTH=OAUTHBEARER SASL-IR S: t0 OK Completed C: t1 AUTHENTICATE OAUTHBEARER bixhPXVzZXJAZXhhbXBsZS5jb20sAWhv c3Q9c2VydmVyLmV4YW1wbGUuY29tAXBvcnQ9MTQzAWF1dGg9QmVhcmVyI HZGOWRmdDRxbVRjMk52YjNSbGNrQmhiSFJoZG1semRHRXVZMjl0Q2c9PQ EB S: t1 OK SASL authentication succeeded As required by IMAP [RFC3501], the payloads are base64 encoded. The decoded initial client response (with %x01 represented as ^A and long lines wrapped for readability) is: n,a=user@example.com,^Ahost=server.example.com^Aport=143^A auth=Bearer vF9dft4qmTc2Nvb3RlckBhbHRhdmlzdGEuY29tCg==^A^A
PostgreSQL 18의 libpq 구현(backend/libpq/auth-oauth.c)에서는 다음과 같이 처리합니다.
static int
oauth_exchange(void *opaq, const char *input, int inputlen,
              char **output, int *outputlen, const char **logdetail)
{
   // ... ...
   //

   /* All remaining fields are separated by the RFC's kvsep (\x01). */
   if (*p != KVSEP)
       ereport(ERROR,
               errcode(ERRCODE_PROTOCOL_VIOLATION),
               errmsg("malformed OAUTHBEARER message"),
               errdetail("Key-value separator expected, but found character \"%s\".",
                           sanitize_char(*p)));
   p++;
   auth = parse_kvpairs_for_auth(&p);
   if (!auth)
       ereport(ERROR,
               errcode(ERRCODE_PROTOCOL_VIOLATION),
               errmsg("malformed OAUTHBEARER message"),
               errdetail("Message does not contain an auth value."));
   }
   // ... ...
   //
}
RFC 7628 및 PostgreSQL 18 요구사항을 충족하려면 다음 형식을 구현해야 합니다.
형식:n,,^Aauth=Bearer <token>^A^A
권한 부여 ID:n,은 authorization identity가 없음을 의미
키-값 구분:^A(0x01)로 key-value 쌍을 구분
토큰 형식:auth=Bearer <token>은 OAuth 2.0 Bearer 토큰 형식을 따르며, 원시 토큰을 base64로 인코딩해야 합니다.
^A=0x01이며 host/port는 RFC 7628에 따라 필수가 아닙니다.
이를 바탕으로 구현한 함수는 다음과 같습니다.
//
// from pgconn/auth_oauth.go in github.com/xugy99/pgx
//
func buildOAuthInitialResponse(token string) []byte {
   var b bytes.Buffer
   b.WriteString("n,,")           // No authorization identity
   b.WriteByte(0x01)              // Key-value separator
   b.WriteString("auth=Bearer ")  // OAuth Bearer token prefix
   b.WriteString(token)           // Actual token
   b.WriteByte(0x01)              // Key-value separator
   b.WriteByte(0x01)              // Final separator
   return b.Bytes()
}
3. AuthenticationOk 응답 처리
rxOAuthSASLOk() 함수는 PostgreSQL 서버에서 다음 응답 메시지를 받을 때까지 대기합니다.
//
// from pgconn/auth_oauth.go in github.com/xugy99/pgx
//
func (c *PgConn) rxOAuthSASLOk() (*pgproto3.AuthenticationOk, error) {
   // Block until we receive a message from the PostgreSQL server
   msg, err := c.receiveMessage()
   if err != nil {
       return nil, err
   }
   switch m := msg.(type) {
   case *pgproto3.AuthenticationOk:
       return m, nil
   case *pgproto3.ErrorResponse:
       return nil, ErrorResponseToPgError(m)
   // AuthenticationSASLContinue is received in when the token
   // is empty or invalid in SASLInitialResponse phase
   //case *pgproto3.AuthenticationSASLContinue:
   //      return nil, fmt.Errorf(": %s", string(m.Data))
   }
   return nil, fmt.Errorf("expected AuthenticationOk message but received unexpected %T", msg)
}
이 예제에서는 SASLInitialResponse에 항상 유효한 토큰을 전달한다고 가정하므로 AuthenticationSASLContinue 응답을 처리하지 않습니다. 다만 실제 구현에서는 AuthenticationSASLContinue 처리도 고려할 수 있습니다. 커스텀 검증기가 전달된 토큰을 검증하지 못하면 PostgreSQL이 OIDC 디스커버리 URL을 반환해 클라이언트가 지정된 IdP에서 다시 인증하도록 안내할 수 있기 때문입니다.
4. OAUTHBEARER를 pgx 연결 로직에 통합
OAUTHBEARER 메커니즘의 AuthenticationSASL을 처리하는 oauthAuth()를 구현했다면 이를 pgconn/pgconn.go의 기본 연결 흐름에 통합할 수 있습니다.
//
// from pgconn/pgconn.go in github.com/xugy99/pgx
//
func connectOne(ctx context.Context, config *Config, connectConfig *connectOneConfig,
    ignoreNotPreferredErr bool,
) (*PgConn, error) {
   // ... ...
   // ... ...
       case *pgproto3.AuthenticationSASL:
           // If the mechanism is OAUTHBEARER
           if slices.Contains(msg.AuthMechanisms, "OAUTHBEARER") {
               err = pgConn.oauthAuth()
               if err != nil {
                   pgConn.conn.Close()
                   return nil, newPerDialConnectError("failed OAUTHBEARER auth", err)
               }
               continue
           }
           // Fall back to SCRAM authentication
           err = pgConn.scramAuth(msg.AuthMechanisms)
           // ... error handling
   // ... ...

   // ... ...
}
5. OAuth Bearer 토큰을 위한 Config 확장
이 예제에서는 pgconn의 config가 이미 발급된 Bearer 토큰을 보유하고 있다고 가정합니다. 이를 위해 pgconn/config.go에 필요한 설정을 추가합니다.
//
// from pgconn/config.go in github.com/xugy99/pgx
//
// Config is the settings used to establish a connection to a PostgreSQL server. It must be created by [ParseConfig]. A
// manually initialized Config will cause ConnectConfig to panic.
type Config struct {
   // ... existing fields ...
   // The preconfigured OAuth2 Bearer Token for authentication
   OAuthBearerToken string
}

// ParseConfigOptions extension
type ParseConfigOptions struct {
   // ... existing fields ...
   // The callback function to get the OAuth bear token
   GetOAuthBearerToken GetOAuthBearerTokenFunc
}

type GetOAuthBearerTokenFunc func(ctx context.Context) string
GetOAuthBearerTokenFunc()는 pgx.ConnectWithOptions() 옵션을 통해 OAuth 2.0 토큰을 가져오는 콜백입니다. 다음 테스트 프로그램에서는 환경 변수에서 토큰을 가져오는 단순한 로직을 사용합니다.
OAUTHBEARER 인증 클라이언트 실행 및 테스트
OAuth Bearer 토큰 가져오기
GetOAuthBearerTokenFunc를 클로저로 사용하면 다음과 같이 OAuth 인증에 필요한 토큰을 가져올 수 있습니다.
func main() {
   // ... ...
   // ... ...
   opts.GetOAuthBearerToken = func(ctx context.Context) string {
       if et := os.Getenv("OAUTH_BEARER_TOKEN"); et != "" {
           return et
       }
       log.Println("using default fake token, you should expect to see login failure")
       return "whatever_token"
   }
   conn, err := pgx.ConnectWithOptions(context.Background(), *url, opts)
   // handling error ... ...
   // ... ...
}
OAuth2 클라이언트 전체 구현 예제
다음은 확장한 pgx 라이브러리로 OAuth 인증을 수행하고 쿼리 결과를 테이블 형태로 출력하는 전체 예제입니다.
//
// from examples/oauthtest/main.go in github.com/xugy99/pgx
//
package main
import (
   "context"
   "flag"
   "fmt"
   "log"
   "os"
   "github.com/jackc/pgx/v5"
   "github.com/pterm/pterm"
)
var (
   sql = flag.String("sql", "select version()", "SQL query to execute")
   url = flag.String("url", "postgres://joe@localhost:5432/my_db", "Database URL")
)
func main() {
   var (
       err  error
       opts pgx.ParseConfigOptions
   )
   flag.Parse()
   if *url == "" {
       log.Fatal("missing url")
   }
   // connect to server
   opts.GetOAuthBearerToken = func(ctx context.Context) string {
       if et := os.Getenv("OAUTH_BEARER_TOKEN"); et != "" {
           return et
       }
       log.Println("using default fake token, you should expect to see login failure")
       return "whatever_token"
   }
   conn, err := pgx.ConnectWithOptions(context.Background(), *url, opts)
   if err != nil {
       log.Fatalf("Unable to connect PostgreSQL by OAUTHBEARER: %v\n", err)
   }
   defer conn.Close(context.Background())
   // run sql
   rows, err := conn.Query(context.Background(), *sql)
   if err != nil {
       log.Fatalf("Failed to execute SQL: %v\n", err)
   }
   defer rows.Close()
   // convert to pterm table and print the result
   data := pterm.TableData{{}}
   //   - header row
   fieldDescriptions := rows.FieldDescriptions()
   for _, fd := range fieldDescriptions {
       data[0] = append(data[0], string(fd.Name))
   }
   //   - data row
   for rows.Next() {
       if rows.Err() == pgx.ErrNoRows {
           break
       }
       var row []string
       columns, _ := rows.Values()
       for _, v := range columns {
           row = append(row, fmt.Sprintf("%v", v))
       }
       data = append(data, row)
   }
   pterm.DefaultTable.
       WithBoxed(true).
       WithHasHeader(true).
       WithHeaderRowSeparator("-").
       WithData(data).
       Render() // show it
}
OAUTHBEARER 인증 테스트
이 시리즈 Part-2에서 설정한 PostgreSQL 18 RC1 서버가 있다면 먼저 psql을 사용해 트레이스에서 토큰을 가져옵니다.
cd examples/oauthtest
go run main.go -url 'postgres://joe@localhost:5432/my_db' -sql 'select current_user,session_user,version()'
정상적으로 인증되면 다음과 같은 결과를 확인할 수 있습니다.
┌──────────────────────────────────────────────────────────────────────────────────────────────────────────────────────────────────────────────────┐
| current_user | session_user | version                                                                                                            |
| ------------------------------------------------------------------------------------------------------------------------------------------------ |
| joe          | joe          | PostgreSQL 18rc1 on aarch64-apple-darwin24.6.0, compiled by Apple clang version 17.0.0 (clang-1700.0.13.5), 64-bit |
└──────────────────────────────────────────────────────────────────────────────────────────────────────────────────────────────────────────────────┘
독립적인 토큰 조회 및 갱신 메커니즘은 pgxpool의 config.BeforeConnect() 콜백에 구현할 수 있습니다. 이를 통해 풀에서 생성되는 새 연결이 최신 토큰으로 인증되도록 구성할 수 있습니다.
OAUTHBEARER 구현 시 추가로 고려할 기능
AuthenticationSASLContinue 응답 처리
이 글의 pgx 예제에는 PostgreSQL 서버가 반환하는 OIDC 디스커버리에 대한 AuthenticationSASLContinue 처리가 구현되어 있지 않습니다. 클라이언트가 이 메시지에 어떻게 대응할지는 애플리케이션의 인증 구조에 따라 달라질 수 있습니다.
토큰이 만료되었거나 유효하지 않은 경우 OAuth2 인가 흐름을 별도의 컴포넌트나 시스템에서 처리하도록 구성했다면 오류를 반환할 수 있습니다.
범용 PostgreSQL 클라이언트 형태로 구현하려면 서버가 지정한 IdP를 통한 인가 흐름을 처리할 수 있습니다.
pgx 연결 풀에서 OAuth2 토큰 관리
사전에 구성한 토큰은 pgx 연결 풀에도 통합할 수 있습니다. 본문에서 참조한 https://github.com/xugy99/pgx 코드에는 이 부분이 포함되어 있지 않지만 다음과 같은 방식으로 구성할 수 있습니다.
config, err := pgxpool.ParseConfig("postgres://joe@localhost:5432/my_db")
if err != nil {
   return err
}
config.ConnConfig.OAuthBearerToken = "my_token"
pool, err := pgxpool.NewWithConfig(context.Background(), config)
if err != nil {
   return err
}
defer pool.Close()
pgx의 네이티브 OAuth2 인가 흐름 구현
Go 생태계에는 OAuth2 인가 흐름을 구현할 수 있는 다양한 라이브러리와 방식이 있습니다. 이를 pgx의 연결 및 인증 구조와 결합하면 PostgreSQL 클라이언트에서 OAuth2 인가 흐름을 직접 처리하는 구조로 확장할 수 있습니다.
PostgreSQL 클라이언트의 OAuth2 인증 확장
이번 pgx 구현 예제를 통해 PostgreSQL 클라이언트 라이브러리에 OAUTHBEARER 인증을 추가하기 위해 필요한 주요 구조를 확인할 수 있습니다.
구성 확장: OAuth 토큰을 클라이언트 연결 설정에 전달
SASL 인증 프레임워크 통합: 기존 인증 처리 구조에 OAUTHBEARER 흐름 추가
RFC 7628: OAuth Bearer 토큰 인증에 필요한 메시지 형식 적용
PostgreSQL 18의 OAuth2 인증은 클라우드 네이티브 환경에서 OAuth 2.0 기반 인증을 활용하는 PostgreSQL 클라이언트 애플리케이션을 구현할 수 있는 기반을 제공합니다.
작성자: Amul Sul작성일: 2026년 3월 27일PostgreSQL은 뛰어난 데이터 무결성(Data Integrity)을 제공하는 데이터베이스로 잘 알려져 있습니다. 그러나 데이터 세트가 테라바이트 단위로 커지면 제약 조건을 검사하고 검증하는 비용이 시스템 운영의 부담으로 이어질...
Charlie Zhang2025년 9월 3일Protobuf로 gRPC·REST API·OpenAPI 통합하기이번 블로그 시리즈에서는 유용한 툴을 제공하는 MCP(Model Context Protocol) 서버를 구축하는 방법을 살펴봅니다. 처음부터 새로 만드는 대신, 기존 Protocol Buffers(Protobuf)와 Google의 gRPC Transcoding을 활용합니다.커스텀...