How to Automate PostgreSQL 12 Replication and Failover with repmgr Part 1

repmgr is an open-source toolset from 2ndQuadrant, a leading specialist in PostgreSQL-related technologies and services. The product is used to automate, enhance, and manage PostgreSQL streaming replication.
Streaming replication in PostgreSQL has been around since version 9.0. Natively setting up and managing streaming replication involves a number of manual steps which includes:
- Configuring replication parameters in both primary and each standby node
- Backing up primary node data with pg_basebackup from each standby node and restoring it there
- Restarting the standby node(s)
From an operational side, a few tasks include:
- Checking replication status using SQL statements
- Promoting a standby node when a switchover is necessary or when the primary is unavailable
- Fencing off failed or stopped primary node
- Recreating replication from the new read/write node to existing or new standby nodes
With repmgr most of these tasks can be automated, saving the DBA and operational staff both time and effort.
In this two-part series, we will see how repmgr and its daemon repmgrd can automate the high-availability and failover of a three-node PostgreSQL 12 cluster.
In this first part, we will set up replication using repmgr and register all the nodes. We will see how to check the status of the whole cluster using a simple command.
In the second part, we will simulate a primary node failure and see how the repmgr daemon can automatically sense the failure and promote one of the standbys to the new primary role. We will also see how repmgrd can start a new replication from the promoted primary to the existing standby node.
A Walk-through of the Environment
We will set up our PostgreSQL cluster in an AWS VPC in the us-east-1 region. The VPC spans across three availability zones and has three subnets, each subnet in a separate AZ. The nodes are all t2.large EC2 instances located in different subnets and will be running open-source PostgreSQL 12. The primary node will be replicating to two standby nodes with all three nodes also running repmgr.
There will also be a “witness node” running in the same AZ as the primary node. However, it will not be a part of the main replication cluster. As a standalone node, it will have minimum configuration changes. The role of the witness server is to assist the repmgr daemons in the standby nodes to reach a quorum when the primary becomes unavailable. To make this possible, the witness node will host a small database. This database will contain a copy of the main repmgr metadata, and is necessary for the witness’ operation.
The image below shows the simplified architecture of the cluster:
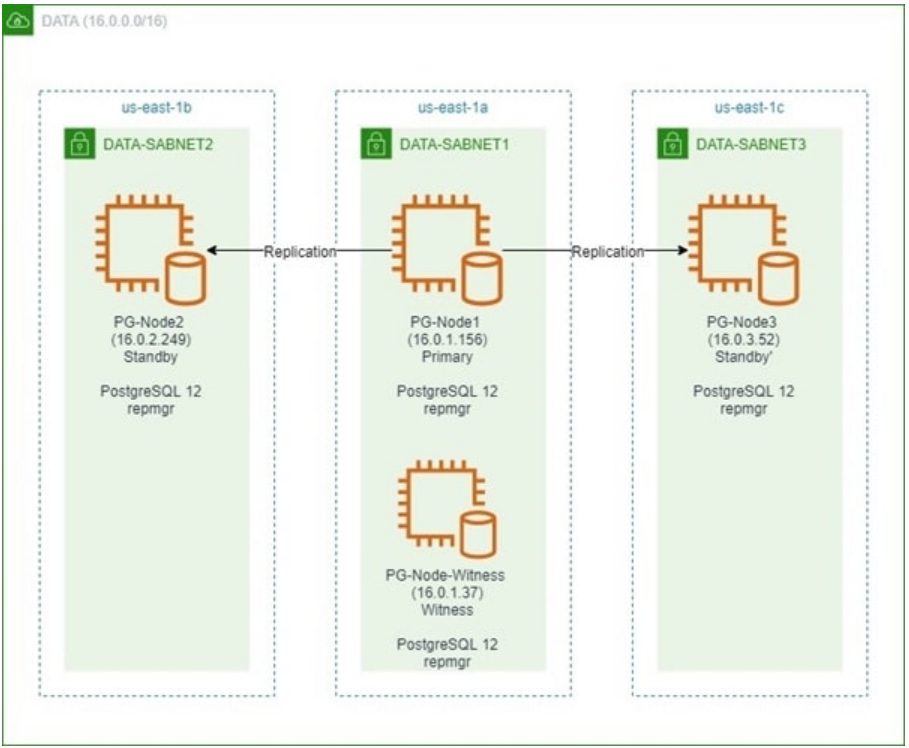
Throughout this post, we will keep referring to each these nodes, so here’s a table showing their details:
| Node Name | IP Address | Role | Apps Running |
| PG-Node1 | 16.0.1.156 | Primary | PostgreSQL 12 and repmgr |
| PG-Node2 | 16.0.2.249 | Standby 1 | PostgreSQL 12 and repmgr |
| PG-Node3 | 16.0.3.52 | Standby 2 | PostgreSQL 12 and repmgr |
| PG-Node-Witness | 16.0.1.37 | Witness | PostgreSQL 12 and repmgr |
All our EC2 nodes are running RedHat Enterprise Linux (RHEL) 8. In each node, we are running the following commands. The first command adds the PostgreSQL Global Development Group (PGDG) repo, the second one disables RHEL’s built-in PostgreSQL module, and finally, the third one installs PostgreSQL 12 from the PGDG repo.
# dnf -y install https://download.postgresql.org/pub/repos/yum/reporpms/EL-8-x86_64/pgdg-redhat-repo-latest.noarch.rpm

# dnf -qy module disable postgresql

# dnf install postgresql12-server postgresql12-contrib
Since PG-Node2 and PG-Node3 are standby nodes, we are leaving them and running initdb in the primary (PG-Node1) and witness (PG-Node-Witness) node only:
# /usr/pgsql-12/bin/postgresql-12-setup initdb
Step 2: Configuring PostgreSQL in Witness and Primary Node
We then make the following change in the witness node’s postgresql.conf file:
listen_addresses = '*'
Note
[The steps described here are for demonstration purposes only. Our example here is using externally reachable IPs for the nodes. Using listen_address = ‘*’ along with pg_hba’s “trust” security mechanism (shown later) therefore poses a security risk, and should NOT be used in production scenarios. In a production system, the nodes will all be inside one or more private subnets, reachable via private IPs from jumphosts]
We also add the following lines at the end of the postgresql.conf file in the primary node:
listen_addresses = '*'
max_wal_senders = 10
max_replication_slots = 10
wal_level = 'replica'
hot_standby = on
archive_mode = on
archive_command = '/bin/true'
With the changes made, we start PostgreSQL 12 service in both the primary and the witness node and enable the services.
# systemctl start postgresql-12.service
# systemctl enable postgresql-12.service
Step 3: Installing repmgr in Primary and Standby
Next, we install the repmgr repo definition in the primary node (PG-Node1) and both the standby nodes (PG-Node2 and PG-Node3). Although repmgr RPM packages can be downloaded from the 2ndQuadrant public repository, at the time of writing they are available for up to RHEL/CentOS version 7. RPM packages for repmgr are also available via Yum from the PGDG RPM repository. For RHEL 8, we are adding the repo from that location:
# wget https://download.postgresql.org/pub/repos/yum/reporpms/EL-8-x86_64/pgdg-redhat-repo-latest.noarch.rpm
And then installing the repmgr package:
# yum install repmgr12 -y
Step 4: Creating repmgr Database and User in the Primary Node
repmgr uses its own database to store its metadata. It is also recommended to use a special PostgreSQL user account for this application. The username and the database name can be anything, but for simplicity, we will call them both “repmgr”. Also, the user will be created as a PostgreSQL superuser. This is recommended by 2ndQuadrant for simplicity’s sake, as some repmgr operations require elevated privileges.
We are running the following commands in the primary node only. Note that we have switched to the postgres user from the shell prompt before running these commands.
The first command creates the repmgr user:
[postgres@PG-Node1 ~]$ createuser --superuser repmgr
The second one creates the repmgr database, with its owner as repmgr:
[postgres@PG-Node1 ~]$ createdb --owner=repmgr repmgr
Finally, we change the repmgr user’s default search path:
[postgres@PG-Node1 ~]$ psql -c "ALTER USER repmgr SET search_path TO repmgr, public;"
Step 5: Adding Primary Node PostgreSQL Config Parameter
With the database and the user created, we add the following line in the primary node’s postgresql.conf file:
shared_preload_libraries = 'repmgr'
This will load the repmgr extension when PostgreSQL starts. By default any PostgreSQL configuration files present in the data directory will be copied when cloning a standby, so any settings configured for the primary will be copied to the standby as well.
Step 6: Configuring repmgr in Primary and Standby Nodes
For PostgreSQL 12, the default location of the repmgr configuration file is /etc/repmgr/12/ and it is called repmgr.conf. We are configuring repmgr in the primary and the standby nodes below:
For primary node (PG-Node1):
node_id=1
node_name='PG-Node1'
conninfo='host=16.0.1.156 user=repmgr dbname=repmgr
connect_timeout=2'
data_directory='/var/lib/pgsql/12/data'
For standby node 1 (PG-Node2):
node_id=2
node_name='PG-Node2'
conninfo='host=16.0.2.249 user=repmgr dbname=repmgr
connect_timeout=2'
data_directory='/var/lib/pgsql/12/data'
For standby node 2 (PG-Node3)
node_id=3
node_name='PG-Node3'
conninfo='host=16.0.3.52 user=repmgr dbname=repmgr connect_timeout=2'
data_directory='/var/lib/pgsql/12/data'
These are the bare minimum parameters to configure for setting up replication with repmgr. Note how we are assigning a unique node ID for each machine and giving it a name. The name can be anything arbitrary, but in this case, we are keeping it the same as the host name. We are also specifying a connection string for each node and specifying the location of the PostgreSQL data directory.
Step 7: Configure pg_hba.conf in Primary Node
Next, we add the following lines in the pg_hba.conf file in PG-Node1. As we will see later, the pg_hba.conf file from the primary node will be copied to the two standbys when repmgr sets up replication. Note how we are using the CIDR range of the cluster instead of specifying individual IP addresses.
local   replication     repmgr                              trust
host    replication     repmgr      127.0.0.1/32            trust
host    replication     repmgr      16.0.0.0/16             trust

local   repmgr          repmgr                              trust
host    repmgr          repmgr      127.0.0.1/32            trust
host    repmgr          repmgr      16.0.0.0/16             trust
Once the configs are completed, we restart the PostgreSQL service in the primary node:
# systemctl restart postgresql-12.service
To test if the standby nodes can connect to the primary node, we are running the following command from both PG-Node2 and PG-Node3:
# psql 'host=16.0.1.156 user=repmgr dbname=repmgr connect_timeout=2'
In our test case, the connectivity is working as we see the primary node’s PostgreSQL prompt.at the repmgr database:
# repmgr>
Step 8: Registering the Primary Node in repmgr
We then run the following command in the primary node (PG-Node1) as the postgres user. This registers the primary node PostgreSQL instance with repmgr. This command installs the repmgr extension. It also adds metadata about the primary node in the repmgr database.
[postgres@PG-Node1 ~]$ /usr/pgsql-12/bin/repmgr -f
/etc/repmgr/12/repmgr.conf primary register
The output looks like this:
INFO: connecting to primary database...
NOTICE: attempting to install extension "repmgr"
NOTICE: "repmgr" extension successfully installed
NOTICE: primary node record (ID: 1) registered
We can now quickly check the status of our cluster:
[postgres@PG-NodeX ~]$ /usr/pgsql-12/bin/repmgr -f /etc/repmgr/12/repmgr.conf cluster show
As expected, our cluster has only one node – the primary:
 ID | Name     | Role    | Status    | Upstream | Connection string
----+----------+---------+-----------+----------+--------------------
 1  | PG-Node1 | primary | * running |          | host=PG-Node1 dbname=repmgr user=repmgr connect_timeout=2
Step 9: Cloning the Standby Nodes
Next, we will run the following command in both the standby nodes (PG-Node2 and PG-Node3) as the postgres user for a dry-run before actually cloning from the primary:
[postgres@PG-NodeX ~]$ /usr/pgsql-12/bin/repmgr -h 16.0.1.156 -U repmgr -d repmgr -f /etc/repmgr/12/repmgr.conf standby clone --dry-run
If the output is like the following, it tells us the cloning will succeed:
NOTICE: using provided configuration file "/etc/repmgr.conf"
destination directory "/var/lib/pgsql/12/data" provided
INFO: connecting to source node
NOTICE: checking for available walsenders on source node (2 required)
INFO: sufficient walsenders available on source node (2 required)
NOTICE: standby will attach to upstream node 1
HINT: consider using the -c/--fast-checkpoint option
INFO: all prerequisites for "standby clone" are met
If there are errors reported, we need to go back to the logs to check further. If both the standby nodes show all prerequisites for standby clone are met, we can go ahead with the clone operation:
[postgres@PG-NodeX ~]$ /usr/pgsql-12/bin/repmgr -h 16.0.1.156 -U
repmgr -d repmgr -f /etc/repmgr/12/repmgr.conf standby clone
A successful clone operation shows a series of messages like this:
NOTICE: destination directory "/var/lib/pgsql/12/data" provided
INFO: connecting to source node
DETAIL: connection string is: host=16.0.xxx.xxx6 user=repmgr dbname=repmgr
DETAIL: current installation size is 66 MB
NOTICE: checking for available walsenders on the source node (2 required)
NOTICE: checking replication connections can be made to the source server (2 required)
INFO: checking and correcting permissions on existing directory "/var/lib/pgsql/12/data"
NOTICE: starting backup (using pg_basebackup)...
HINT: this may take some time; consider using the -c/--fast-checkpoint option
INFO: executing:
  /usr/pgsql-12/bin/pg_basebackup -l "repmgr base backup"  -D /var/lib/pgsql/12/data -h 16.0.xxx.xxx -p 5432 -U repmgr -X stream
NOTICE: standby clone (using pg_basebackup) complete
NOTICE: you can now start your PostgreSQL server
HINT: for example: pg_ctl -D /var/lib/pgsql/12/data start
HINT: after starting the server, you need to register this standby with "repmgr standby register"
Step 10: Registering Standby Nodes with repmgr
At this stage, PostgreSQL isn’t running in any of the standby nodes, although both the nodes have their Postgres data directory copied from the primary (including any PostgreSQL configuration files present in the primary’s data directory). We start the postgresql service in both the nodes and enable the service:
# systemctl start postgresql-12.service
# systemctl enable postgresql-12.service
We then run the following command in each standby node as the postgres user to register it with repmgr:
[postgres@PG-NodeX ~]$ /usr/pgsql-12/bin/repmgr -f
/etc/repmgr/12/repmgr.conf standby register
A successful registration shows a series of messages like the following:
INFO: connecting to local node "PG-NodeX" (ID: 3)
INFO: connecting to primary database
WARNING: --upstream-node-id not supplied, assuming upstream node is primary (node ID 1)
INFO: standby registration complete
NOTICE: standby node "PG-NodeX" (ID: X) successfully registered
Final Step: Checking Replication Status
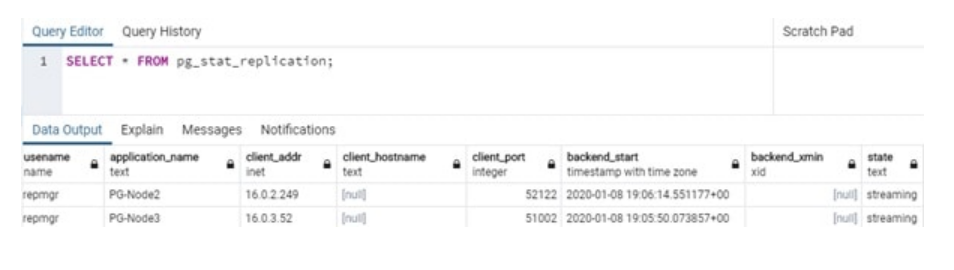
Everything is in place now: PG-Node1 is replicating to both PG-Node2 and PG-Node3. To test this, we can run the following command from any of the nodes as the postgres user:
SELECT * FROM pg_stat_replication;
The image of the query result below shows streaming replication is working:
Also, we run the following repmgr command from any of the nodes as the postgres user:
[postgres@PG-NodeX ~]$ /usr/pgsql-12/bin/repmgr -f
/etc/repmgr/12/repmgr.conf cluster show --compact
The result shows PG-NBode1 as the primary and the other two as standbys:

Conclusion
This was a very quick introduction to repmgr which provides an easy-to-use interface over the technology that is already built into PostgreSQL for setting up replication. With repmgr, we can quite easily setup as many standby nodes as needed (within the constraints of max_wal_senders), that would otherwise involve somewhat complex and multi-step setup/clone processes. All we needed here was installing and configuring repmgr in each node, and then run the “repmgr standby clone” command. Also, registering a node with repmgr allows us to see its status from any node.
Setting up streaming replication is only half the work done though. In order to get a truly automated failover, we have to configure extra parameters in the repmgr.conf file and make use of the repmgr daemon.