Achieve High Availability Using Virtual IPs

Why you need a High Availability setup
Looking at the highly critical applications/workloads, requiring 24/7 availability, High Availability is a very important and needed feature for your database. A High Availability (HA) database architecture aims to ensure the normal working of applications by automatically detecting and healing from a disaster. Objective is to avoid having a single point of failure, i.e. having a component in the system which is not redundant and can be disabled without impacting the overall performance.
HA architecture ensures the application is highly available throughout its operation even in case of malfunction of one or more components. Most critical measure of a HA system is MTR (mean time to recover), as opposed to MTBF (mean time between failures) which measures reliability. Adding redundant components to a system makes it less reliable, in the sense that it increases probability of failure of the components, but it makes it more available, as failure does not cause downtime of the whole system.
At database level, a High Availability cluster is a group of servers handling business critical workloads. It consists of a couple of servers replicating with each other. Applications are managed by the Primary database and, in case of any malfunction, the standby database gets promoted to handle the role of Primary.
A High Availability architecture ensures that the application connectivity and user experience does not get hampered during a disaster and the application can continue to fetch data without any manual interference. HA architecture should be capable of handling and recovering from disasters automatically with minimal downtime and without manual intervention.
Setting up a HA cluster using Repmgr
In this test case, we will be using PostgreSQL's repmgr utility to create and manage the replication setup. We will use 2 identical EC2 servers, to be used as Primary and Standby instances, where the PostgreSQL and repmgr binaries need to be installed and replication is set up between them, with one of them working as Primary and the other as a Standby instance. We will not go further on how to set up replication between PostgreSQL clusters, as this is well documented in other articles.
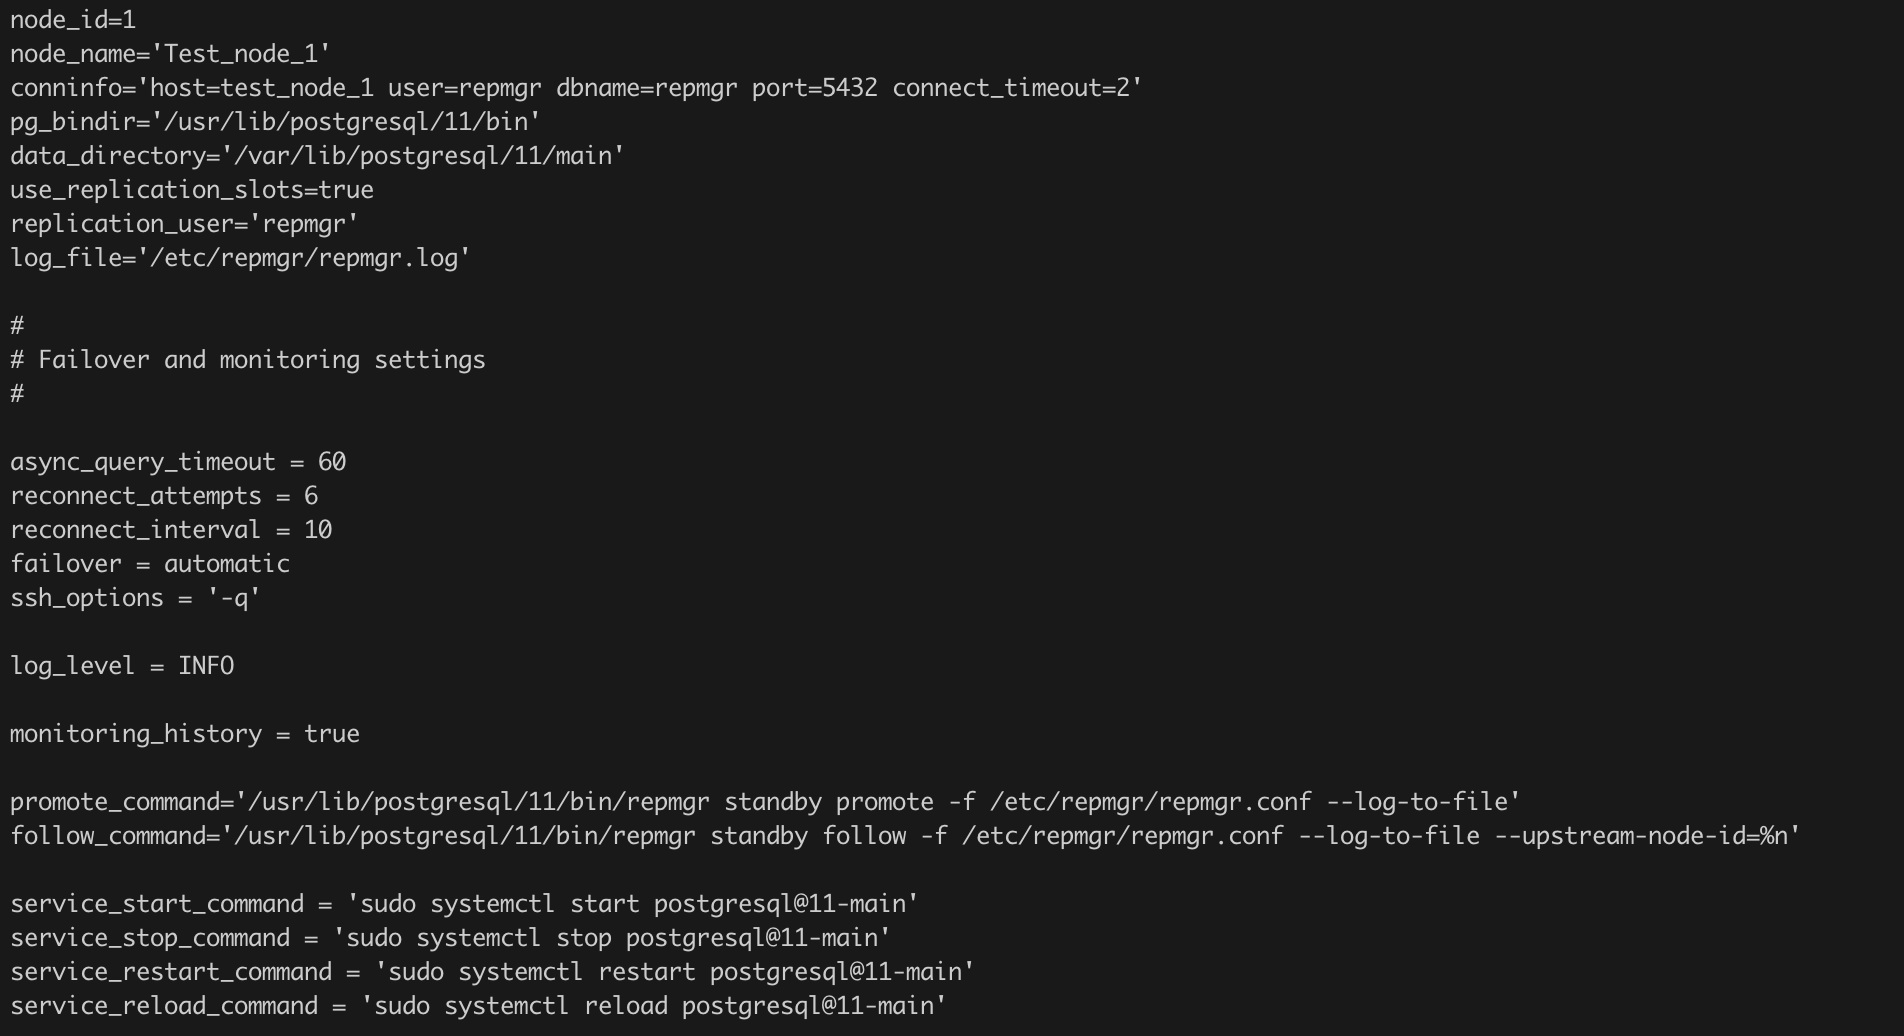
To use repmgr to manage the replication clusters, we need to first create the repmgr configuration file. Below is a sample configuration file used for setting up the replication manager on the 2 nodes:
Once you have the replication setup ready, we will add these clusters in the replication manager (repmgr) using the below commands:
1) Register the Primary node
repmgr primary register -f /etc/repmgr/repmgr.conf
2) Clone the Primary Cluster to the Standby node (skip if the Standby is already set up)
repmgr standby clone -h test_node_1 -U repmgr -D /var/lib/postgresql/11/main -f /etc/repmgr/repmgr.conf -F
3) Register the Standby node
4) Check Replication Status
repmgr service status -f /etc/repmgr/repmgr.confAfter successful repmgr setup, below would be the state of replication:

To enable the replication monitoring and automatic failover between the nodes, we will start the repmgr daemon (repmgrd) process on both nodes, which will continuously monitor the replication and perform failover in case the Primary node fails. Use below command to start the repmgr daemon on the local node:
repmgrd service start -f /etc/repmgr/repmgr.confrepmgrd state should change to running after starting the daemon process as seen below:

Now we have a basic replication cluster setup and ready. It is properly managed using repmgr and repmgrd processes. Till now, we have achieved continuous monitoring of the replication cluster and have added automatic failover to achieve High Availability.
Setup a Virtual IP (VIP) on the nodes
A Virtual IP is basically a secondary IP configured on the server which can be used to connect to the instance. We will use this VIP to connect to the Primary Database from the Application end. This will be done by rerouting the connections coming over the VIP to point to the Network interface of the Primary Database.
In case of disaster, the repmgr daemon process records the Primary node going down. Once it verifies that the Primary database is not reachable, it will promote the standby instance as Primary. Once the new Primary is up, we will update the Routing tables to reroute the VIP to connect to the new Primary node so that the application continues to fetch data over the same IP address.
To set up a Virtual IP, first we need to make sure the IP being used as a VIP is out of the Allowed IP range of the underlying VPC or Virtual Network, so that it does not conflict with any future IP allotments on the VPC. To define the VIP, we will use the Netplan utility that governs networking in Linux systems. We will need to create a new netplan configuration for attaching the failover IP on all the servers in the replication cluster as shown below:
- Login to the server as a root user.
- Create the Configuration file '/etc/netplan/60-failover-ip.yaml' to set up Failover IP.
- Add below contents in the config file, where virtual.ip denotes the Virtual IPv4 address we are using as a failover IP on the nodes:
- Apply the Network configuration using the below command:
You can verify the new VIP is added to the server using ifconfig to check the network configuration.
Once the new VIP is configured, we need to create routes to make this VIP point to the Network Interface of the Primary node in the Route Tables. You can do this using the AWS console under Route Tables service or using AWS CLI using below command for all the associated route tables:
aws ec2 create-route --route-table-id $route_table_id --destination-cidr-block virtual.ip/32 --network-interface-id $network_interface_idOne of the considerations to check when implementing the VIP failover setup is to disable the Source / Destination check for the EC2 instance on the AWS console. This check makes sure that the EC2 instance is either the Source or Destination of any traffic it sends or receives. By disabling the check we are allowing the EC2 instance to use VIPs to send / receive traffic instead of its original IP.
Here is a quick way to check and update the Source / Destination check for the EC2 instances using AWS CLI:
1) Check current state of the Source / Destination check attribute:
aws ec2 describe-instance-attribute --instance-id $AWS_INSTANCE_ID --attribute sourceDestCheck2) Disable Source / Destination check:
aws ec2 modify-instance-attribute --instance-id $AWS_INSTANCE_ID --no-source-dest-check
Handling repmgr events to perform VIP failover
During a disaster, or a manual switchover, we will need to switch the VIP to point to the new Primary node in the route tables, so that the application can continue to access data. The process of updating Routing tables and/or reattaching Elastic IP to the new Primary can be automated using repmgr events recorded and monitored by the daemon process. We can set up a repmgr hook script to execute the script which will update the routing table to point to the network interface of the new primary node. We can configure the repmgr event hook script in the repmgr config file using below parameters:
event_notifications = 'standby_register, standby_promote, primary_register, node_rejoin, standby_switchover' event_notification_command = '/etc/repmgr/repmgr-hook.sh %n %e %s "%t" "%d" >/tmp/repmgr-hook.out.$$ 2>&1'Here, the event_notifications parameter governs the list of events, for which the repmgr daemon can invoke the event_notification_command.
Below is the format of the event_notification_command:
%n - node ID
%e - event type
%s - success (1) or failure (0)
%t - timestamp
%d - details
Using the event notifications, we can invoke AWS CLI commands from a hook script to update the route tables and Elastic IP associations when repmgr observes a standby_promote event. We can also update the Route 53 DNS pointings, if the database is reachable externally, using CLI commands in the hook script.
Below is an example command using AWS CLI to update a route table association, to redirect the VIP to the Network interface of the new Primary node:
aws ec2 replace-route --route-table-id $route_table_id --destination-cidr-block virtual.ip/32 --network-interface-id $network_interface_id_primaryOnce everything is configured and you are able to connect to the Primary database using the Virtual IP, we can update the Connection strings at the Application end to point to the VIP to connect to the database. After this is done, your application will still connect to the Primary node using the same VIP, and the repmgr daemon will invoke repmgr hook script to handle the task of pointing the VIP to the current Primary node.
Handling Split Brain situations
In case of a split brain scenario, where the old primary database is started again after the failover is complete, the application will still point to the correct, new primary node, as the VIP is routing the connections to the network interface of the new Primary node. This prevents the application from connecting to the rebooted failed node and causing data integrity issues.
Using the repmgr checks, we can also monitor such split brain situations, where repmgr detects the replication is broken and both the nodes are working as primary. In such situations, the repmgr service status command in old Primary node will show the current state of Standby node as "running as primary" as seen below:

When the replication cluster comes in such a state, we can use the repmgr node rejoin to force the old Primary to rejoin the replication cluster as a Standby node. Below is an example using the node rejoin command to reattach the old Primary as a Standby node:
postgres@test_node_1:~$ repmgr node rejoin --force-rewind -f /etc/repmgr/repmgr.conf -h test_node_2 -U repmgr NOTICE: rejoin target is node "Test_node_2" (ID: 2) NOTICE: pg_rewind execution required for this node to attach to rejoin target node 2 DETAIL: rejoin target server's timeline 29 forked off current database system timeline 28 before current recovery point 0/56000028 NOTICE: executing pg_rewind DETAIL: pg_rewind command is "/usr/lib/postgresql/11/bin/pg_rewind -D '/var/lib/postgresql/11/main' --source-server='host=test_node_2 user=repmgr dbname=repmgr port=5432 connect_timeout=2'" NOTICE: 0 files copied to /var/lib/postgresql/11/main NOTICE: setting node 1's upstream to node 2 WARNING: unable to ping "host=test_node_1 user=repmgr dbname=repmgr port=5432 connect_timeout=2" DETAIL: PQping() returned "PQPING_NO_RESPONSE" NOTICE: starting server using "sudo systemctl start postgresql@11-main" INFO: executing notification command for event "node_rejoin" DETAIL: command is: /etc/repmgr/repmgr-agent.sh 1 node_rejoin 1 "2022-12-31 16:59:19.837178+00" "node 1 is now attached to node 2" >/tmp/repmgr-agent.out.$$ 2>&1 WARNING: unable to execute event notification command DETAIL: parsed event notification command was: /etc/repmgr/repmgr-agent.sh 1 node_rejoin 1 "2022-12-31 16:59:19.837178+00" "node 1 is now attached to node 2" >/tmp/repmgr-agent.out.$$ 2>&1 NOTICE: NODE REJOIN successful DETAIL: node 1 is now attached to node 2After the execution is complete, you should see the old Primary joined back to the replication cluster as a Standby node.

Monitoring and implementing the node rejoin during a split brain scenario can be automated as well to add Fault tolerance capability to the HA cluster, making it a reliable solution for Critical workloads.
At this point, we have successfully achieved High Availability with Fault tolerance in this cluster. This cluster can automatically detect and quickly recover from any sort of failure with minimal interruptions to the end user. The cluster is also highly reliable, it can detect dangerous scenarios like Split brain on the cluster and successfully recover without any impact on the user experience. This cluster is now sufficiently equipped to provide close to 100% availability and have minimal interruptions while handling critical workloads.