SSH Tunneling in pgAdmin 4

What is SSH Tunneling (or SSH port forwarding)?
SSH tunneling is a method of transporting arbitrary networking data over an encrypted SSH connection. It can be used to add encryption to legacy applications or implement VPNs (Virtual Private Networks). It is a way to secure the data traffic of any given application using port forwarding, basically tunneling any TCP/IP port over SSH.
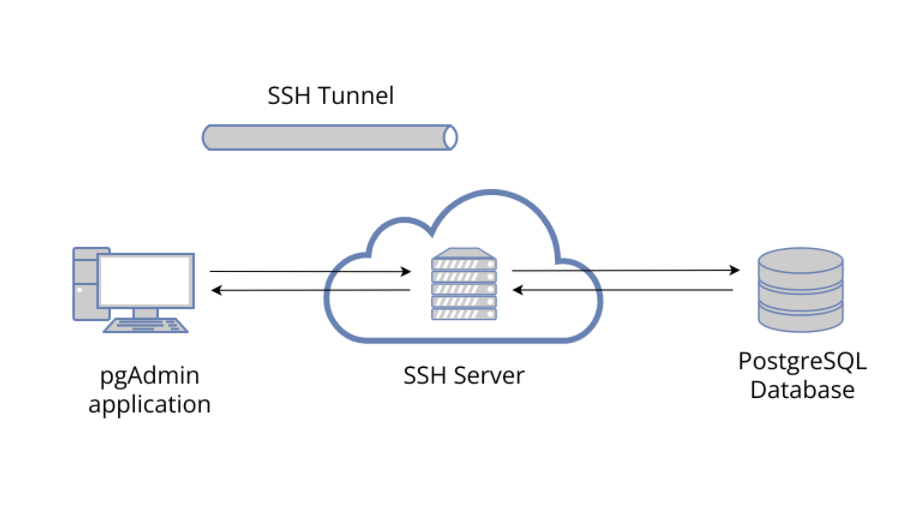
pgAdmin 4 supports SSH Tunneling, i.e. it - through an intermediary proxy host - can be connected to a PostgreSQL server that resides on a network to which the client may not be able to connect directly.
This blog will guide you to setup SSH tunneling with pgAdmin 4.
Connecting to a database server on a remote machine using SSH Tunnel
Let’s say, we have configured following machines as:
- Windows 64 (Windows Server) - machine having pgAdmin 4 installed
- macOS - as an SSH Server (or Shell server)
- Ubuntu 64 (18.04.4 LTS) - machine having a PostgreSQL server installed
Follow the process of creating a server normally with an IPv4 address (localhost or 127.0.0.1), please refer Server Dialog for more details.
Authentication using password
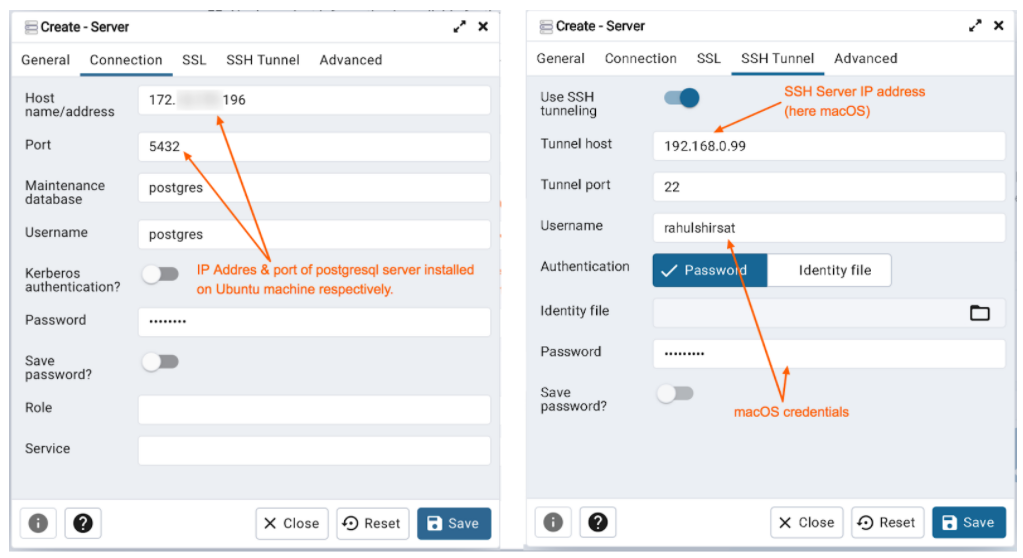
Setting up connection configuration via Connection tab
- Specify the IP address of the server host (i.e. Ubuntu system), or the fully qualified domain name in the Host name/address field
- Enter the listener port number of the server host in the Port field. The default is 5432.
- Use the Username field to specify the name of a role that will be used when authenticating with the server
- Use the Password field to provide a password that will be supplied when authenticating with the server
Setting up SSH Tunnel configuration via SSH Tunnel tab (to connect pgAdmin through an intermediary proxy host i.e. macOS) to a server host
- Enable “Use SSH tunneling” to specify that pgAdmin should use an SSH tunnel when connecting to the specified server
- Specify the name or IP address of the SSH host (i.e. macOS) through which client connections will be forwarded in the Tunnel host field
- Specify the port of the SSH host (through which client connections will be forwarded) in the Tunnel port field
- Specify the name of a user with login privileges for the SSH host in the Username field.
- Select the Password option in the Authentication field to specify that pgAdmin will use a password for authentication to the SSH host. This is the default option
For the identity file approach, users have to create an SSH key. To achieve this, detailed steps are mentioned in the next topic “Authentication using identity file''.
Setting the database connection can also be achieved for IPv6 protocol as well, just replace the host name in connection tab with the IPv6 address; assuming that IPv6 networking is configured on the machine.
pgAdmin 4 uses the sshtunnel library to access this; for in-depth information, visit https://pypi.org/project/sshtunnel.
Authentication using identity file
For identity file based authentication, users need to create an ssh key on Windows operating system (powershell, choco package manager, openssh were used to serve this purpose).
ssh-keygen -m PEM -t rsa -b 4096
or simply create with:
ssh-keygen -t rsa
Note: The SSH key above is generated with no passphrase.
Then copy the created ssh key to macOS via ssh-copy-id command.
ssh-copy-id macuser@mac_ip_address
If the above command does not work, as ssh-copy-id sometimes does not detect the pub file on windows, then provide it manually as -
ssh-copy-id -i "C:\Users\Rahul Shirsat\.ssh\id_rsa.pub" macuser@mac_ip_address
Enter the password of the machine if prompted.
Note: You may need to check the ssh authorized_keys file has been copied with the correct permissions in macOS; ssh-copy-id is used to help ensure the key is copied correctly and has the appropriate permissions.
SSH keys can also be generated in a similar way on Linux & macOS operating systems.
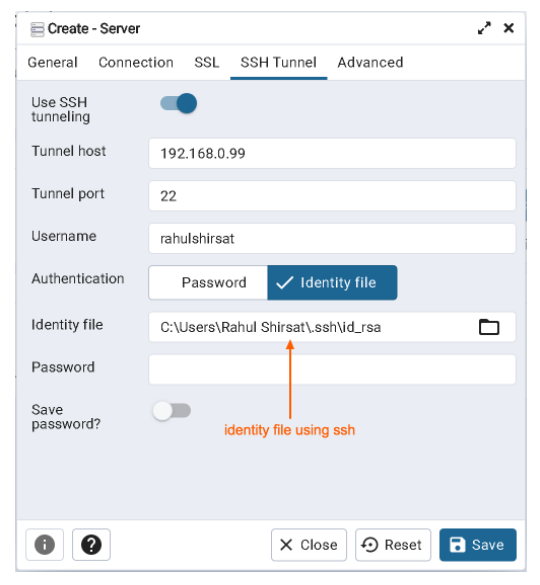
For SSH tunnel configuration, provide tunnel host as IP address of the macOS machine, identity file (private key) generated in the above steps & the macOS user.
Conclusion
You should now be able to connect to a database server with an SSH tunnel on pgAdmin 4. For any queries or further assistance, write to us at pgadmin-support@lists.postgresql.org.