If you are building a Spring Boot application for your next project, you would also be preparing and planning for the PostgreSQL database to store the data generated by your customers. In some previous posts on the topic of RESTful services in Spring Boot, we discussed how we can use JPA to automatically create and automatically apply the schema to the PostgreSQL database.
In this post, we will see why letting Hibernate control the schema changes is not best approach, and how to manage the schema, apply it to PostgreSQL database, synchronize your Java objects and PostgreSQL database tuples and how to version control your schema so your PostgreSQL database and web app are in sync.
Spring Boot: Hibernate Schema Generation
In Spring Boot and JPA/Hibernate, we were able to control the schema generation directly from our Entity objects and apply that to PostgreSQL database automatically. This can be controlled to:
- Either apply the changes always on the startup.
- Or apply the changes when there is a schema difference (the update configuration)
Although it is good for rapid prototyping and development / testing environment, it is discouraged to be used in the production environments. There are various reasons:
- Your PostgreSQL database schema gets destroyed and recreated each time you apply the changes from scratch.
- Your PostgreSQL database schema is controlled by the JPA—this can be a good thing if you want to avoid managing the DBA side. If you have a DBA, it is best approach to include them in your design process.
- JPA offers a very thin support of features when it comes to databases. JPA be able to manage your tables and their connections, but not be able to handle triggers / advanced key constraints.
Apart from this, if you end up modifying the database schema outside your application, JPA will not be able to accommodate the changes in your Java models. This leads to problematic behaviors in Java apps and Hibernate suggests that you consider controlling the schema changes manually and let Hibernate handle the object mappings.
Controlling PostgreSQL database Schema
For a fresh Java web application, you can start off the development with Java models and SQL schema side-by-side in a versioned environment. JPA (or Hibernate) will allow us to map the Java entities and their properties to the backend SQL query, but what we will change in the process is the way the schema is created. Then, as your schema changes, you write these changes in SQL and add them to your app’s version control history. These changes are known as migrations; or database migrations to be precise.
What are migrations? The database migrations in relational database world are the changes to the schema of your database. They help DBAs and Operations team manage and maintain a version history for your database schema and rollback if latest schema poses potential performance / security problems.
To do this, we will use Flyway as the database migration tool and create the database schema manually. Instead of having Hibernate generate the schema, we write the SQL scripts and add them to our application resources. The Flyway plugin will read the migrations from the resources and apply them one by one to synchronize the PostgreSQL database schema and app code.
Verifying the SQL
Before we go ahead, it is better to always verify the SQL and the schema changes you have made in the testing environment. Once the schema changes are run on production it will be difficult to reverse the change; as it might bring in unwanted PostgreSQL database down time.
Beyond this step, I assume that you have created a Spring Boot application, if you have not yet, you can always create a fresh copy of Spring Boot application from Spring Initializr. Also, note that this post will discuss the PostgreSQL database migrations instead of how RESTful services are configured, we have covered the RESTful bits in our Spring Boot and RESTful APIs with PostgreSQL series, please see.
Creating Initial Migration
Just as we start by defining the Java model, in code-first migration approach, we write the SQL schema and apply it to the PostgreSQL database. Then we create the JPA repositories and Java entities around this SQL schema. Flyway requires the migrations to follow a naming convention,
V{number}__helpful_title_for_migration.sql
If your schema migration files do not meet this, Flyway will simply ignore them. So, following this, we create our first migration to ensure that we have the schema created in the PostgreSQL database:
CREATE SCHEMA IF NOT EXISTS migrations;
Now, we add a migration and add the people table to the PostgreSQL database:
CREATE TABLE IF NOT EXISTS migrations.people (
    id INT2,
    name TEXT NOT NULL,
    role TEXT NOT NULL,
    PRIMARY KEY (id)
);
Moving onwards, we create another table, comments:
CREATE TABLE IF NOT EXISTS comments (
    id INT4,
    comment TEXT NOT NULL,
    author TEXT NOT NULL,
    PRIMARY KEY (id)
);
Lastly, we insert some records in the PostgreSQL database for the people table:
-- INSERT DATA
INSERT INTO migrations.people (id, name, role)
VALUES
    (1, 'Person 1', 'Technical Writer'),
    (2, 'Person 2', 'Editor'),
    (3, 'Person 3', 'Reviewer'),
    (4, 'Person 4', 'Reader');
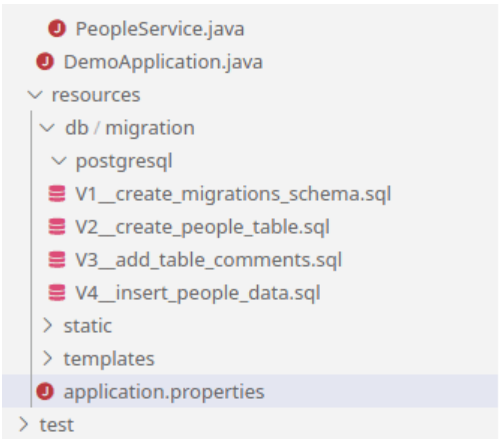
We create 4 files of the schema and name them accordingly. Here is the screenshot for these files, their file names and the directory where they reside:

Now that we have schema setup, we now need to configure Flyway plugin before we can start the application for testing.
Note: Whether you need to separate each schema update / object in a different file or make a compact file of all changes at a major release in a single file depends on the decision that you make with your DBAs. The approach that I have shown in this post is just a simple, quick-to-start one, and not recommended / prescribed one.
Update Flyway settings
Now, you will setup the Flyway plugin to be able to apply migrations to the PostgreSQL database. Flyway dependency can be added to your pom.xml file (for Maven projects; check for Gradle projects here).
<dependency>
    <groupId>org.flywaydb</groupId>
    <artifactId>flyway-core</artifactId>
</dependency>
Update your Maven system and let it download the dependencies for you. After this, you should update your application.properties file to include Flyway settings that Spring Boot will use to apply your schema changes:
# Flyway
spring.flyway.schemas=migrations
spring.flyway.locations=classpath:db/migration
The complete setting file now would be:
# DataSource
spring.datasource.url=jdbc:postgresql://172.17.0.2:5432/postgres
spring.datasource.username=postgres
spring.datasource.password=mysecretpassword
spring.datasource.hikari.schema=migrations

# Disable Hibernate schema generation/application
spring.jpa.hibernate.ddl-auto=none

# Flyway
spring.flyway.schemas=migrations
spring.flyway.locations=classpath:db/migration
At this point, you have configured the application to disable the Hibernate schema management, and you have specified the location for the schema migrations; which is under “resources” directory, under “db/migrations”—see the screenshot for the migrations folder and the names above.
Updating Spring Boot source code
Since we follow a code-first approach, we will “now” build the Java web app and its models to support the PostgreSQL database. We know that Hibernate will be able to send queries to the backend based on the Java model, so we need to configure the objects, their table configurations, their column details and if there are any relationships that are defined (though none are defined as of right now in our schema above!).
Updating Entity attribute
We create a new @Entity type in Java (the way we did in the previous posts) and we expose a public getter method to get the fields that are captured by Hibernate.
package com.demos.pgschemamigrations.models;

import javax.persistence.Column;
import javax.persistence.Entity;
import javax.persistence.Id;
import javax.persistence.Table;

@Entity
@Table(name = "people")
public class Person {

    @Id
    private Long id;

    @Column(name = "name")
    private String name;

    @Column(name = "role")
    private String role;

    public Person() { }

    public Person(Long id, String name, String role) {
        this.id = id;
        this.name = name;
        this.role = role;
    }

    public Long getId() {
        return this.id;
    }

    public String getName() {
        return this.name;
    }

    public String getRole() {
        return this.role;
    }
}
You do not need to set a column name, if the values in the PostgreSQL database and Java app are same; Hibernate takes care of this. Although, it is recommended to have different values for security.
Note: You can create Entity objects for other types as well, I will not explore this, since it is outside scope for the migration’s topic, and we already covered in the RESTful APIs post shared above. After this step, you need to create a repository to get the objects from PostgreSQL database. You can also use a RESTful controller to show the outputs in HTTP manner, or just log them manually.
Apply migrations to PostgreSQL database
At this point, we have our PostgreSQL database schema ready and prepared, we also have our Java web app ready to connect to and query from the PostgreSQL database using Hibernate. When you start the application, Spring Boot will automatically apply the migrations on boot up and verify the schema changes. Here is what happens when we launch our application on a fresh PostgreSQL database copy.

If you see, you will find that Flyway (o.f.core) is applying the migrations to the PostgreSQL database. The migrations are applied in this sequence:
- Flyway connects to the PostgreSQL database (using Spring Boot configurations / Flyway configurations; Spring Boot configurations are searched for first)
- Flyway checks if the PostgreSQL database contains required schema, and a table. See Line 2 and 3.
- Flyway now checks if the PostgreSQL database contains a table with Flyway history (this is what makes this approach code-first approach).
- Finally, Flyway iterates over all the migration files in our migrations directory and applies them one by one to the PostgreSQL database.
- Lastly, Flyway shows the success message sharing the schema has been generated.
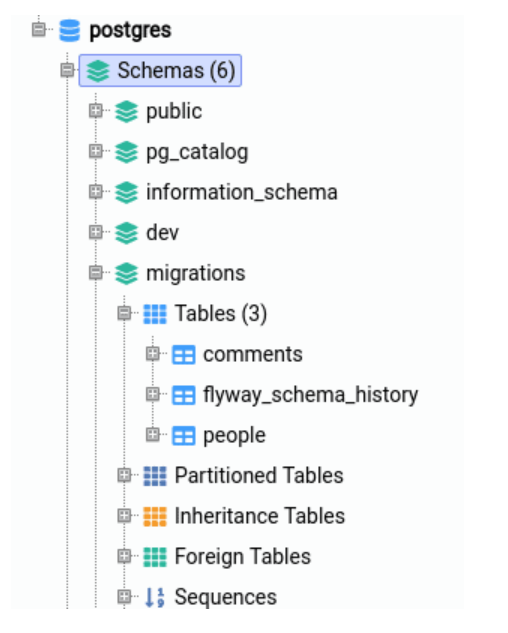
We can verify this through OmniDB tool and see the schema, tables and the Flyway history:

We can query the flyway_schema_history (an auto-generated table by Flyway) to see the migrations history and how they are applied in order. You can use the following SQL query:
SELECT * FROM migrations.flyway_schema_history;
Here is the output for this:

You can note that schema migrations are just SQL scripts that are executed on the PostgreSQL database; as shown in the 5th record, where I am inserting the records in the PostgreSQL database. Flyway tool, or PostgreSQL database has no bias to DDL and DML when it comes to schema migrations.
Interesting bit is, if you run the application which does not contain any new migrations, Flyway will not make any changes to your PostgreSQL database; it is a constant time operation that checks your PostgreSQL database for latest migration, and compares it with the migrations in app resources. Rerunning the application shows this log:

Flyway checks that no migrations are necessary, so it leaves the PostgreSQL database schema as it is. Now, let’s see how we can update the schema on a production database.
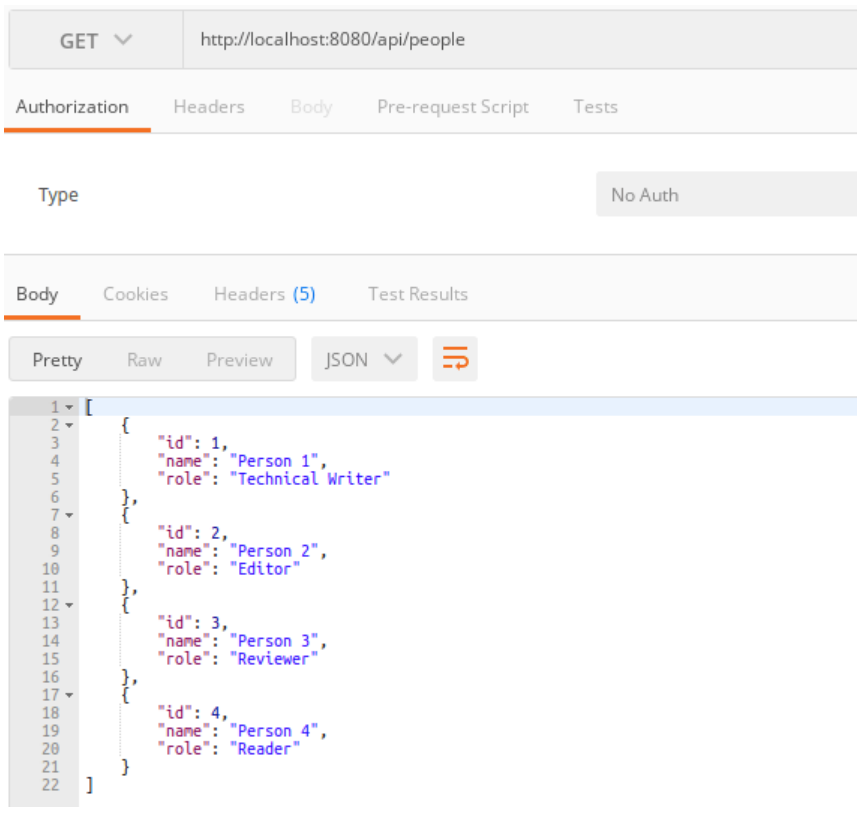
If we use RESTful API, and send a request to load data from the PostgreSQL database, we can easily see that the data from PostgreSQL database is easily captured and shown:

So far, so good. Now we can go ahead and see how to change the schema in code-first approach.
Warning: Make sure that you engage your DBAs once your PostgreSQL database has been live on production.
We will make the changes in our Java entity first (remember, code-first!) and add the experience field. Now our Java object becomes:
package com.demos.pgschemamigrations.models;

import javax.persistence.Column;
import javax.persistence.Entity;
import javax.persistence.Id;
import javax.persistence.Table;

@Entity
@Table(name = "people")
public class Person {

    @Id
    private Long id;

    @Column(name = "name")
    private String name;

    @Column(name = "role")
    private String role;

    @Column(name = "experience")
    private Integer experience;

    public Person() { }

    public Person(Long id, String name, String role, Integer experience) {
        this.id = id;
        this.name = name;
        this.role = role;
        this.experience = experience;
    }

    public Long getId() {
        return this.id;
    }

    public String getName() {
        return this.name;
    }

    public String getRole() {
        return this.role;
    }

    public Integer getExperience() {
        return this.experience;
    }
}
Now, we create a new migration, and change the table schema to include years of experience in their role, with SQL we can add the code to alter the table like:
ALTER TABLE migrations.people ADD COLUMN experience INTEGER DEFAULT 0;
We now have 5 migrations of our own, and we restart the application. Flyway finds a new migration pending, and applies it to the PostgreSQL database:

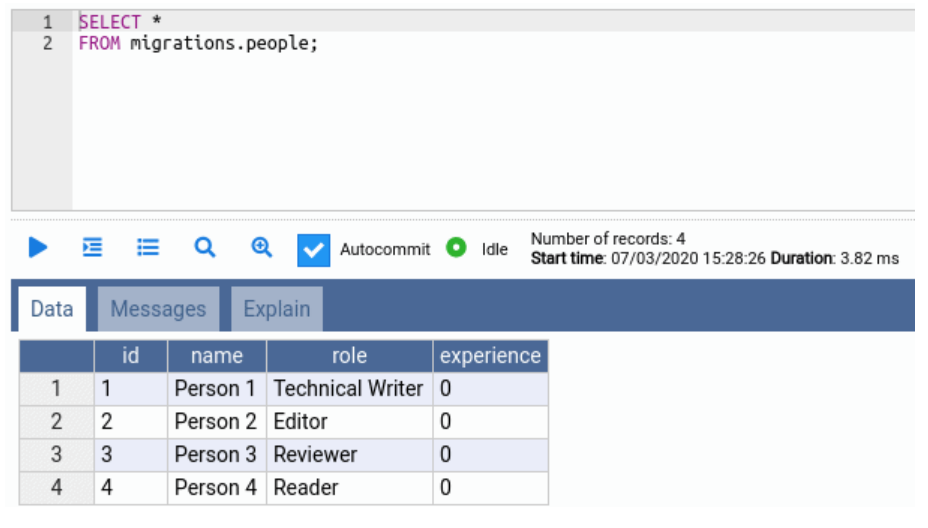
Now, we can confirm the schema changes from OmniDB as well:

The table contains the experience field, as required by our application. As I mentioned earlier, you should consult a DBA to apply the changes as they should happen in the PostgreSQL database.
Good practices
Apply via CLI
Flyway also offers an automation-friendly way of applying the migrations to a PostgreSQL database “before” you release to the production, using Flyway CLI. This approach can help you decrease or maintain the downtime for a PostgreSQL database. You can also use the Maven CLI tools for Flyway plugin to apply the migrations.
You can use your DevOps pipelines to prepare the PostgreSQL database for the upcoming release of the Java app.
Version control
It is a good approach to add the migrations to the version control, so each version of application contains the latest version of PostgreSQL database schema. Version control systems such as Git handle these good, and they can even control when and who can submit changes to the PostgreSQL database schema folder.
This can provide a greater separation of concerns to support DBAs and Java engineers, in that the DBAs can work on the database schema in separation—your migrations do not need to be in the application, they can be on a separate or independent project.
Conclusion
In this post, you learned how to synchronize our PostgreSQL database schema and Java web application models in a web app-first approach (code-first approach). You learned how to use Flyway to generate and apply migrations and how to keep a track of them. You saw how we can apply changes as they are needed.
