How to deploy PostgreSQL along with Monitoring and high availability tools on VMware vSphere using Terraform
This article outlines the steps for creating and configuring EDB Postgres on VMware vSphere using Terraform with deployment scripts available on GitHub.
- Clone the GitHub Repository
- Create a Postgres cluster (3-node—1 Master, 2 Standby)
- Set up EFM agents for each database node that will be responsible for failover management
- Set up the PEM server and agents for monitoring the database nodes
- Backup and Recovery for the clusters
- Resource cleanup
In this post we will outline the steps of creating and configuring the EDB Postgres platform in the VMware vSphere using the PostgreSQL deployment scripts made available on GitHub.
In the deployment scripts you can set up the PostgreSQL database of your choice (PostgreSQL or EDB Postgres Advanced Server), and, in addition, the scripts will deploy and configure the tools to take care of high availability, automatic failover, backup and recovery and also set up monitoring for the PostgreSQL cluster.
Let’s see what the architecture is going to look like: You can decide to take a step by step approach to achieve the following architecture or you can setup in a single option. In this article we are going to talk about the step by step approach to achieve the following use-case which is Highly available Postgres cluster with automatic failover, backups and monitoring enabled.
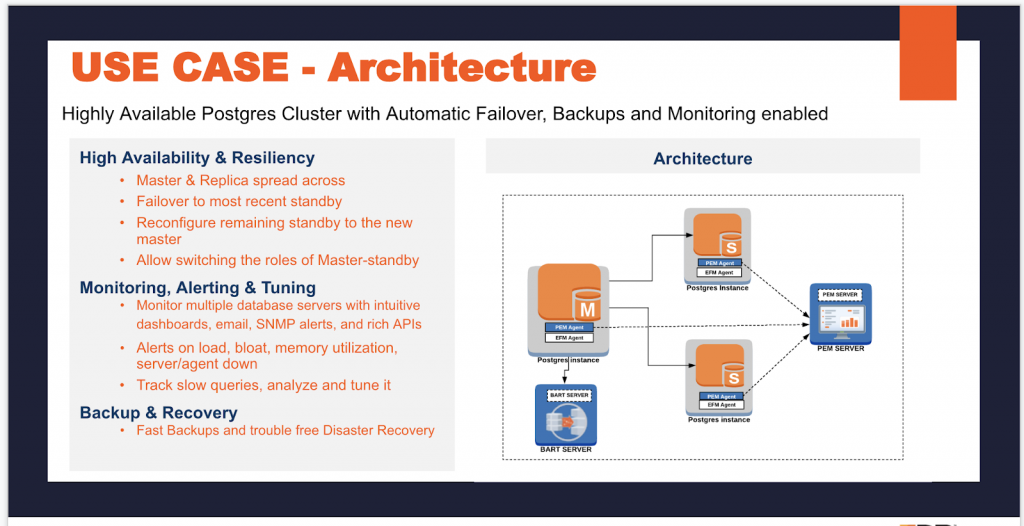
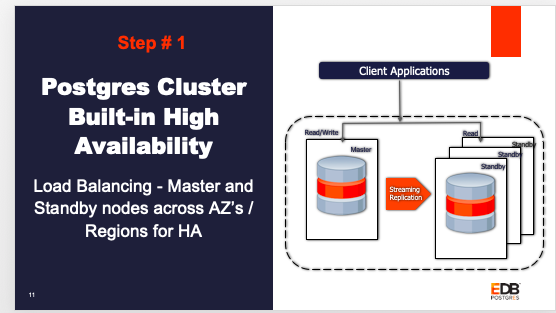
Step 1: By default the 3-node cluster would be provisioned – 1 master and 2 standby. They would have replication set up between the master and standby nodes. Users have an option to choose the replication type, either synchronous or asynchronous.
Step 2: Enterprise Failover Manager (EFM) agents are set up for each database node and will be responsible for failover management.
Step 3: The Postgres Enterprise Manager (PEM) server is set up for monitoring the database. PEM agents monitor the database nodes and send the data to the PEM server.
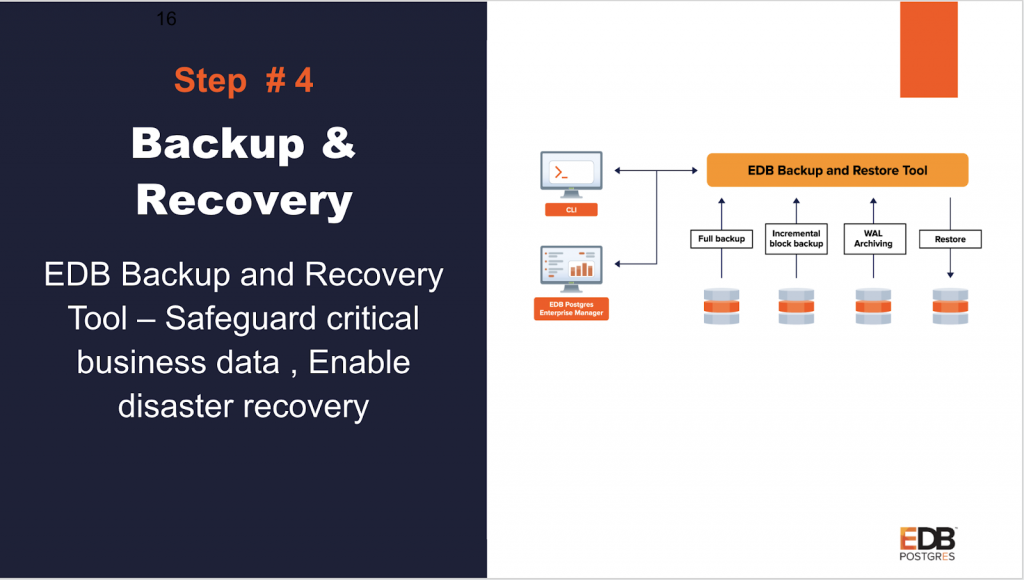
Step 4: EDB Backup and Recovery Tool (BART) is setup to Safeguard critical business data and enable trouble-free disaster recovery
Clone the GitHub Repository
Clone/download from the EnterpriseDB GitHub Repository - Here
Once you clone the directory structure will look like this:
laptop154-ma-us:postgres-deployments loaner$ ls -ll
total 8
drwxr-xr-x  10 loaner  staff  320 Mar  2 11:25 DB_Cluster_AWS
drwxr-xr-x  10 loaner  staff  320 Mar  2 09:44 DB_Cluster_VMWARE
drwxr-xr-x  10 loaner  staff  320 Mar  2 11:12 EFM_Setup_AWS
drwxr-xr-x  10 loaner  staff  320 Feb 27 14:21 EFM_Setup_VMWARE
drwxr-xr-x  10 loaner  staff  320 Mar  2 12:17 Expand_DB_Cluster_AWS
drwxr-xr-x   7 loaner   staff  224 Feb 11 12:27 Expand_DB_Cluster_VMWARE
drwxr-xr-x  10 loaner  staff  320 Mar  2 11:03 PEM_Agent_AWS
drwxr-xr-x  10 loaner  staff  320 Feb 27 14:21 PEM_Agent_VMWARE
drwxr-xr-x  10 loaner  staff  320 Mar  2 09:51 PEM_Server_AWS
drwxr-xr-x  10 loaner  staff  320 Feb 27 14:22 PEM_Server_VMWARE
laptop154-ma-us:postgres-deployments loaner$
We have used CentOS 7 as a base template for the creation of the virtual machine (vm).
Here is the list of prerequisites to get you started:
- Terraform installed on your machine
- Ansible installed on your machine
- VMware vSphere access information and rights
- CentOS 7 template created with GNOME configured
- Subscription for the EDB yum repository (f using EDB Postgres)
- sshpass installed on your machine
(Mac - sshpass - brew install https://raw.githubusercontent.com/kadwanev/bigboybrew/master/Library/Formula/sshpass.rb).
You can use your laptop or any other machine to deploy the Postgres platform on VMware. I did it on my MacBook.
Step 1: Create a Postgres cluster (3-node—1 Master, 2 Standby)
The following steps will create 3-node clusters.
Go inside the folder DB_Cluster_VMWARE and edit the file edb_cluster_input.tf using your favorite editor to input the values for the mandatory parameters listed in the file and save it. If you need help filling in any of the parameters, please check out the GitHub Wiki page, which describes each parameter in detail.
The optional parameters give you the option to fill in any customized value you want or use the default values provided in the input file.
laptop154-ma-us:postgres-deployments loaner$ ls -ll
total 8
drwxr-xr-x  11 loaner  staff  352 Mar  2 09:32 DB_Cluster_AWS
drwxr-xr-x  10 loaner  staff  320 Feb 27 14:22 DB_Cluster_VMWARE
drwxr-xr-x  10 loaner  staff  320 Feb 27 13:05 EFM_Setup_AWS
drwxr-xr-x  10 loaner  staff  320 Feb 27 14:21 EFM_Setup_VMWARE
drwxr-xr-x  10 loaner  staff  320 Feb 27 13:06 Expand_DB_Cluster_AWS
drwxr-xr-x   7 loaner  staff  224 Feb 11 12:27 Expand_DB_Cluster_VMWARE
drwxr-xr-x  10 loaner  staff  320 Feb 27 13:04 PEM_Agent_AWS
drwxr-xr-x  10 loaner  staff  320 Feb 27 14:21 PEM_Agent_VMWARE
drwxr-xr-x  10 loaner  staff  320 Feb 27 13:04 PEM_Server_AWS
drwxr-xr-x  10 loaner  staff  320 Feb 27 14:22 PEM_Server_VMWARE

laptop154-ma-us:postgres-deployments loaner$
laptop154-ma-us:postgres-deployments loaner$
laptop154-ma-us:postgres-deployments loaner$ cd DB_Cluster_VMWARE/
laptop154-ma-us:DB_Cluster_VMWARE loaner$
laptop154-ma-us:DB_Cluster_VMWARE loaner$
laptop154-ma-us:DB_Cluster_VMWARE loaner$ ls -ll
total 112
drwxr-xr-x  7 loaner  staff    224 Jan 28 10:28 EDB_SRSETUP_VMWARE
-rw-r--r--  1 loaner  staff   1444 Jan 28 10:28 README.md
-rw-r--r--  1 loaner  staff  19342 Jan 28 10:28 ansible.cfg
-rw-r--r--  1 loaner  staff   2913 Feb 27 13:03 edb_cluster_input.tf
-rw-r--r--  1 loaner  staff   1447 Feb 11 12:27 licence.txt

laptop154-ma-us:DB_Cluster_VMWARE loaner$
Terraform Deploy
Before executing the input file, make sure that the path is set correctly. Terraform needs this before we execute a terraform config file.
export PATH=$PATH:/path_of_terraform_binary_file_directory
This is an absolute path of the Terraform binary file you downloaded while installing Terraform. Once you have done this, run following command to run the Terraform config file:
terraform init
laptop284-ma-us:DB_Cluster_VMWARE edb$ terraform init
Initializing modules...

Initializing the backend...

Initializing provider plugins...

The following providers do not have any version constraints in configuration,
so the latest version was installed.

To prevent automatic upgrades to new major versions that may contain breaking
changes, it is recommended to add version = "..." constraints to the
corresponding provider blocks in configuration, with the constraint strings
suggested below.

* provider.null: version = "~> 2.1"

Terraform has been successfully initialized!

You may now begin working with Terraform. Try running "terraform plan" to see
any changes that are required for your infrastructure. All Terraform commands
should now work.

If you ever set or change modules or backend configuration for Terraform,
rerun this command to reinitialize your working directory. If you forget, other
commands will detect it and remind you to do so if necessary.
laptop284-ma-us:DB_Cluster_VMWARE edb$
terraform apply
This will again prompt you to enter “yes” to create the resource for confirmation. Type “yes” and hit the enter key. This will start the process of creating and configuring the DB cluster. Once it completes successfully, It will output the cluster output details and you can see the cluster IP address on the screen.
laptop284-ma-us:DB_Cluster_VMWARE edb$ terraform apply
module.edb-db-cluster.data.vsphere_datacenter.dc: Refreshing state...
module.edb-db-cluster.data.vsphere_network.network: Refreshing state...
module.edb-db-cluster.data.vsphere_datastore.datastore: Refreshing state...
module.edb-db-cluster.data.vsphere_virtual_machine.template: Refreshing state...
module.edb-db-cluster.data.vsphere_compute_cluster.cluster: Refreshing state...
An execution plan has been generated and is shown below.
Resource actions are indicated with the following symbols:
+ create
Terraform will perform the following actions:
# module.edb-db-cluster.null_resource.configuremaster will be created
+ resource "null_resource" "configuremaster" {
+ id = (known after apply)
+ triggers = (known after apply)
}
# module.edb-db-cluster.null_resource.configureslave1 will be created
+ resource "null_resource" "configureslave1" {
+ id = (known after apply)
+ triggers = (known after apply)
}
# module.edb-db-cluster.null_resource.configureslave2 will be created
+ resource "null_resource" "configureslave2" {
+ id = (known after apply)
+ triggers = (known after apply)
}
# module.edb-db-cluster.null_resource.removehostfile will be created
+ resource "null_resource" "removehostfile" {
+ id = (known after apply)
}
# module.edb-db-cluster.vsphere_virtual_machine.EDB_SR_SETUP[0] will be created
+ resource "vsphere_virtual_machine" "EDB_SR_SETUP" {
+ boot_retry_delay = 10000
+ change_version = (known after apply)
+ cpu_limit = -1
+ cpu_share_count = (known after apply)
+ cpu_share_level = "normal"
+ datastore_id = "datastore-25"
+ default_ip_address = (known after apply)
+ ept_rvi_mode = "automatic"
+ firmware = "bios"
+ force_power_off = true
+ guest_id = "centos7_64Guest"
+ guest_ip_addresses = (known after apply)
+ host_system_id = (known after apply)
+ hv_mode = "hvAuto"
+ id = (known after apply)
+ imported = (known after apply)
+ latency_sensitivity = "normal"
+ memory = 1024
+ memory_limit = -1
+ memory_share_count = (known after apply)
+ memory_share_level = "normal"
+ migrate_wait_timeout = 30
+ moid = (known after apply)
+ name = "pg11-master"
+ num_cores_per_socket = 1
+ num_cpus = 2
+ reboot_required = (known after apply)
+ resource_pool_id = "resgroup-22"
+ run_tools_scripts_after_power_on = true
+ run_tools_scripts_after_resume = true
+ run_tools_scripts_before_guest_shutdown = true
+ run_tools_scripts_before_guest_standby = true
+ scsi_bus_sharing = "noSharing"
+ scsi_controller_count = 1
+ scsi_type = "pvscsi"
+ shutdown_wait_timeout = 3
+ swap_placement_policy = "inherit"
+ uuid = (known after apply)
+ vapp_transport = (known after apply)
+ vmware_tools_status = (known after apply)
+ vmx_path = (known after apply)
+ wait_for_guest_ip_timeout = -1
+ wait_for_guest_net_routable = true
+ wait_for_guest_net_timeout = 5
+ clone {
+ template_uuid = "421afab9-e9ca-ef4b-6e41-67de458315ad"
+ timeout = 30
}
+ disk {
+ attach = false
+ datastore_id = "<computed>"
+ device_address = (known after apply)
+ disk_mode = "persistent"
+ disk_sharing = "sharingNone"
+ eagerly_scrub = false
+ io_limit = -1
+ io_reservation = 0
+ io_share_count = 0
+ io_share_level = "normal"
+ keep_on_remove = false
+ key = 0
+ label = "disk0"
+ path = (known after apply)
+ size = 16
+ thin_provisioned = false
+ unit_number = 0
+ uuid = (known after apply)
+ write_through = false
}
+ network_interface {
+ adapter_type = "vmxnet3"
+ bandwidth_limit = -1
+ bandwidth_reservation = 0
+ bandwidth_share_count = (known after apply)
+ bandwidth_share_level = "normal"
+ device_address = (known after apply)
+ key = (known after apply)
+ mac_address = (known after apply)
+ network_id = "network-26"
}
}
# module.edb-db-cluster.vsphere_virtual_machine.EDB_SR_SETUP[1] will be created
+ resource "vsphere_virtual_machine" "EDB_SR_SETUP" {
+ boot_retry_delay = 10000
+ change_version = (known after apply)
+ cpu_limit = -1
+ cpu_share_count = (known after apply)
+ cpu_share_level = "normal"
+ datastore_id = "datastore-25"
+ default_ip_address = (known after apply)
+ ept_rvi_mode = "automatic"
+ firmware = "bios"
+ force_power_off = true
+ guest_id = "centos7_64Guest"
+ guest_ip_addresses = (known after apply)
+ host_system_id = (known after apply)
+ hv_mode = "hvAuto"
+ id = (known after apply)
+ imported = (known after apply)
+ latency_sensitivity = "normal"
+ memory = 1024
+ memory_limit = -1
+ memory_share_count = (known after apply)
+ memory_share_level = "normal"
+ migrate_wait_timeout = 30
+ moid = (known after apply)
+ name = "pg11-slave1"
+ num_cores_per_socket = 1
+ num_cpus = 2
+ reboot_required = (known after apply)
+ resource_pool_id = "resgroup-22"
+ run_tools_scripts_after_power_on = true
+ run_tools_scripts_after_resume = true
+ run_tools_scripts_before_guest_shutdown = true
+ run_tools_scripts_before_guest_standby = true
+ scsi_bus_sharing = "noSharing"
+ scsi_controller_count = 1
+ scsi_type = "pvscsi"
+ shutdown_wait_timeout = 3
+ swap_placement_policy = "inherit"
+ uuid = (known after apply)
+ vapp_transport = (known after apply)
+ vmware_tools_status = (known after apply)
+ vmx_path = (known after apply)
+ wait_for_guest_ip_timeout = -1
+ wait_for_guest_net_routable = true
+ wait_for_guest_net_timeout = 5
+ clone {
+ template_uuid = "421afab9-e9ca-ef4b-6e41-67de458315ad"
+ timeout = 30
}
+ disk {
+ attach = false
+ datastore_id = "<computed>"
+ device_address = (known after apply)
+ disk_mode = "persistent"
+ disk_sharing = "sharingNone"
+ eagerly_scrub = false
+ io_limit = -1
+ io_reservation = 0
+ io_share_count = 0
+ io_share_level = "normal"
+ keep_on_remove = false
+ key = 0
+ label = "disk0"
+ path = (known after apply)
+ size = 16
+ thin_provisioned = false
+ unit_number = 0
+ uuid = (known after apply)
+ write_through = false
}
+ network_interface {
+ adapter_type = "vmxnet3"
+ bandwidth_limit = -1
+ bandwidth_reservation = 0
+ bandwidth_share_count = (known after apply)
+ bandwidth_share_level = "normal"
+ device_address = (known after apply)
+ key = (known after apply)
+ mac_address = (known after apply)
+ network_id = "network-26"
}
}
# module.edb-db-cluster.vsphere_virtual_machine.EDB_SR_SETUP[2] will be created
+ resource "vsphere_virtual_machine" "EDB_SR_SETUP" {
+ boot_retry_delay = 10000
+ change_version = (known after apply)
+ cpu_limit = -1
+ cpu_share_count = (known after apply)
+ cpu_share_level = "normal"
+ datastore_id = "datastore-25"
+ default_ip_address = (known after apply)
+ ept_rvi_mode = "automatic"
+ firmware = "bios"
+ force_power_off = true
+ guest_id = "centos7_64Guest"
+ guest_ip_addresses = (known after apply)
+ host_system_id = (known after apply)
+ hv_mode = "hvAuto"
+ id = (known after apply)
+ imported = (known after apply)
+ latency_sensitivity = "normal"
+ memory = 1024
+ memory_limit = -1
+ memory_share_count = (known after apply)
+ memory_share_level = "normal"
+ migrate_wait_timeout = 30
+ moid = (known after apply)
+ name = "pg11-slave2"
+ num_cores_per_socket = 1
+ num_cpus = 2
+ reboot_required = (known after apply)
+ resource_pool_id = "resgroup-22"
+ run_tools_scripts_after_power_on = true
+ run_tools_scripts_after_resume = true
+ run_tools_scripts_before_guest_shutdown = true
+ run_tools_scripts_before_guest_standby = true
+ scsi_bus_sharing = "noSharing"
+ scsi_controller_count = 1
+ scsi_type = "pvscsi"
+ shutdown_wait_timeout = 3
+ swap_placement_policy = "inherit"
+ uuid = (known after apply)
+ vapp_transport = (known after apply)
+ vmware_tools_status = (known after apply)
+ vmx_path = (known after apply)
+ wait_for_guest_ip_timeout = -1
+ wait_for_guest_net_routable = true
+ wait_for_guest_net_timeout = 5
+ clone {
+ template_uuid = "421afab9-e9ca-ef4b-6e41-67de458315ad"
+ timeout = 30
}
+ disk {
+ attach = false
+ datastore_id = "<computed>"
+ device_address = (known after apply)
+ disk_mode = "persistent"
+ disk_sharing = "sharingNone"
+ eagerly_scrub = false
+ io_limit = -1
+ io_reservation = 0
+ io_share_count = 0
+ io_share_level = "normal"
+ keep_on_remove = false
+ key = 0
+ label = "disk0"
+ path = (known after apply)
+ size = 16
+ thin_provisioned = false
+ unit_number = 0
+ uuid = (known after apply)
+ write_through = false
}
+ network_interface {
+ adapter_type = "vmxnet3"
+ bandwidth_limit = -1
+ bandwidth_reservation = 0
+ bandwidth_share_count = (known after apply)
+ bandwidth_share_level = "normal"
+ device_address = (known after apply)
+ key = (known after apply)
+ mac_address = (known after apply)
+ network_id = "network-26"
}
}
Plan: 7 to add, 0 to change, 0 to destroy.
Do you want to perform these actions?
Terraform will perform the actions described above.
Only 'yes' will be accepted to approve.
Enter a value: yes
module.edb-db-cluster.vsphere_virtual_machine.EDB_SR_SETUP[0]: Creating...
module.edb-db-cluster.vsphere_virtual_machine.EDB_SR_SETUP[2]: Creating...
module.edb-db-cluster.vsphere_virtual_machine.EDB_SR_SETUP[1]: Creating...
module.edb-db-cluster.vsphere_virtual_machine.EDB_SR_SETUP[2]: Still creating... [10s elapsed]
module.edb-db-cluster.vsphere_virtual_machine.EDB_SR_SETUP[0]: Still creating... [10s elapsed]
module.edb-db-cluster.vsphere_virtual_machine.EDB_SR_SETUP[1]: Still creating... [10s elapsed]
:
:
:
module.edb-db-cluster.null_resource.configureslave2 (local-exec): PLAY RECAP *********************************************************************
module.edb-db-cluster.null_resource.configureslave1 (local-exec): 172.22.16.122 : ok=2 changed=0 unreachable=0 failed=0 skipped=85 rescued=0 ignored=0
module.edb-db-cluster.null_resource.configureslave2 (local-exec): 172.22.16.122 : ok=2 changed=0 unreachable=0 failed=0 skipped=85 rescued=0 ignored=0
module.edb-db-cluster.null_resource.configureslave1 (local-exec): 172.22.16.124 : ok=10 changed=8 unreachable=0 failed=0 skipped=64 rescued=0 ignored=0
module.edb-db-cluster.null_resource.configureslave2 (local-exec): 172.22.16.123 : ok=10 changed=8 unreachable=0 failed=0 skipped=64 rescued=0 ignored=0
module.edb-db-cluster.null_resource.configureslave1: Creation complete after 22s [id=2879951867485944288]
module.edb-db-cluster.null_resource.configureslave2: Creation complete after 22s [id=7804499358179154378]
module.edb-db-cluster.null_resource.removehostfile: Creating...
module.edb-db-cluster.null_resource.removehostfile: Provisioning with 'local-exec'...
module.edb-db-cluster.null_resource.removehostfile (local-exec): Executing: ["/bin/sh" "-c" "rm -rf EDB_SRSETUP_VMWARE/utilities/scripts/hosts"]
module.edb-db-cluster.null_resource.removehostfile: Creation complete after 0s [id=7101779069400488912]
Apply complete! Resources: 7 added, 0 changed, 0 destroyed.
Outputs:
DBENGINE = pg11
Master-IP = 172.22.16.122
SSH-USER = root
Slave1-IP = 172.22.16.124
Slave2-IP = 172.22.16.123
Access the Postgres cluster
As Terraform outputs the master and standby node IPs, you can connect to the master database using your favorite client, pgAdmin or psql, and do a dataload, or you can ssh into the master instance and connect to the database. Remember to use the same credentials you used in the input file when Terraform provisioned your database node.
Confirm that the streaming replication is set up and working as expected by doing a SELECT query on one of your standby nodes or checking the replication status using the following query:
laptop284-ma-us:DB_Cluster_AWS edb$ ssh root@172.22.16.122
root@172.22.16.122's password:
Last login: Thu Mar  5 14:36:04 2020 from 172.22.15.173
-bash: warning: setlocale: LC_CTYPE: cannot change locale (UTF-8): No such file or directory
[root@centos-7-terraform ~]#
[root@centos-7-terraform ~]#
[root@centos-7-terraform ~]#
[root@centos-7-terraform ~]# psql postgres postgres
psql (11.7)
Type "help" for help.

postgres=#
postgres=# select version();
                                                 version
---------------------------------------------------------------------------------------------------------
 PostgreSQL 11.7 on x86_64-pc-linux-gnu, compiled by gcc (GCC) 4.8.5 20150623 (Red Hat 4.8.5-39), 64-bit
(1 row)

postgres=# create table test1 ( i int);
CREATE TABLE
postgres=# insert into test1 values ( generate_series(1,200000));
INSERT 0 200000
postgres=#
postgres=#
postgres=# select count(*) from test1;
 count
--------
 200000
(1 row)

postgres=# select * from pg_stat_replication;
 pid  | usesysid |  usename   | application_name |  client_addr  | client_hostname | client_port |         backend_start         | backend_xmin |   state   | sent_lsn  | write_lsn | flush_lsn | replay
_lsn |    write_lag    |    flush_lag    |   replay_lag    | sync_priority | sync_state
------+----------+------------+------------------+---------------+-----------------+-------------+-------------------------------+--------------+-----------+-----------+-----------+-----------+-------
-----+-----------------+-----------------+-----------------+---------------+------------
 4613 |    16384 | edbrepuser | walreceiver      | 172.22.16.123 |                 |       49030 | 2020-03-05 14:20:32.931705-05 |          573 | streaming | 0/4C58B58 | 0/4C58B58 | 0/4C58B58 | 0/4C58
B58  | 00:00:00.001318 | 00:00:00.001878 | 00:00:00.002315 |             0 | async
 4614 |    16384 | edbrepuser | walreceiver      | 172.22.16.124 |                 |       60714 | 2020-03-05 14:20:32.96959-05  |          573 | streaming | 0/4C58B58 | 0/4C58B58 | 0/4C58B58 | 0/4C58
B58  | 00:00:00.000826 | 00:00:00.001189 | 00:00:00.001614 |             0 | async
(2 rows)

postgres=#
Step 2: Set up EFM agents for each database node that will be responsible for failover management

In this section, we will walk you through steps for setting up the EFM on the database cluster created in Step 1.
Go inside the folder EFM_Setup_VMWARE and edit the file edb_efm_cluster_input.tf using your favorite editor to input the values for the mandatory parameters listed in the file and save it. If you need help filling in any of the parameters please check out the GitHub Wiki page, which describes each parameter in detail.
The optional parameters give you the option to fill in any customized value you want or use the default values provided in the input file.
laptop154-ma-us:postgres-deployments loaner$ ls -ll
total 8
drwxr-xr-x  10 loaner  staff  320 Mar  4 12:11 DB_Cluster_AWS
drwxr-xr-x  10 loaner  staff  320 Mar  4 13:58 DB_Cluster_VMWARE
drwxr-xr-x  10 loaner  staff  320 Mar  2 11:12 EFM_Setup_AWS
drwxr-xr-x  10 loaner  staff  320 Mar  4 12:01 EFM_Setup_VMWARE
drwxr-xr-x   8 loaner  staff  256 Mar  3 13:39 Expand_DB_Cluster_AWS
drwxr-xr-x   7 loaner  staff  224 Feb 11 12:27 Expand_DB_Cluster_VMWARE
drwxr-xr-x  10 loaner  staff  320 Mar  4 12:01 PEM_Agent_AWS
drwxr-xr-x  10 loaner  staff  320 Feb 27 14:21 PEM_Agent_VMWARE
drwxr-xr-x  10 loaner  staff  320 Mar  4 13:59 PEM_Server_AWS
drwxr-xr-x  11 loaner  staff  352 Mar  4 12:01 PEM_Server_VMWARE

laptop154-ma-us:postgres-deployments loaner$
laptop154-ma-us:postgres-deployments loaner$
laptop154-ma-us:postgres-deployments loaner$ cd EFM_Setup_VMWARE/
laptop154-ma-us:EFM_Setup_VMWARE loaner$
laptop154-ma-us:EFM_Setup_VMWARE loaner$
laptop154-ma-us:EFM_Setup_VMWARE loaner$ ls -ll
total 80
drwxr-xr-x  7 loaner  staff    224 Jan 28 10:28 EDB_EFM_VMWARE
-rw-r--r--  1 loaner  staff   1507 Jan 28 10:28 README.md
-rw-r--r--  1 loaner  staff  19342 Jan 28 10:28 ansible.cfg
-rw-r--r--  1 loaner  staff   1078 Feb 27 14:16 edb_efm_cluster_input.tf
-rw-r--r--  1 loaner  staff   1447 Feb 11 12:27 licence.txt
Terraform Deploy
Run the following command to start setting up the EFM cluster:
terraform init
laptop284-ma-us:EFM_Setup_VMWARE edb$ pwd
/Users/edb/pgdeploy/postgres-deployment/EFM_Setup_VMWARE
laptop284-ma-us:EFM_Setup_VMWARE edb$ terraform init
Initializing modules...
- efm-db-cluster in EDB_EFM_VMWARE

Initializing the backend...

Initializing provider plugins...
- Checking for available provider plugins...
- Downloading plugin for provider "null" (hashicorp/null) 2.1.2...

The following providers do not have any version constraints in configuration,
so the latest version was installed.

To prevent automatic upgrades to new major versions that may contain breaking
changes, it is recommended to add version = "..." constraints to the
corresponding provider blocks in configuration, with the constraint strings
suggested below.

* provider.null: version = "~> 2.1"

Terraform has been successfully initialized!

You may now begin working with Terraform. Try running "terraform plan" to see
any changes that are required for your infrastructure. All Terraform commands
should now work.

If you ever set or change modules or backend configuration for Terraform,
rerun this command to reinitialize your working directory. If you forget, other
commands will detect it and remind you to do so if necessary.
laptop284-ma-us:EFM_Setup_VMWARE edb$
laptop284-ma-us:EFM_Setup_VMWARE edb$
terraform apply
This will prompt you to confirm setting EFM on the database cluster we created in Step 1. Type “yes” and hit enter to proceed. Once finished, you should see messages on your terminal confirming the resources were created.
laptop284-ma-us:EFM_Setup_VMWARE edb$ terraform apply
module.efm-db-cluster.data.terraform_remote_state.SR: Refreshing state...

An execution plan has been generated and is shown below.
Resource actions are indicated with the following symbols:
  + create

Terraform will perform the following actions:

  # module.efm-db-cluster.null_resource.master will be created
  + resource "null_resource" "master" {
      + id       = (known after apply)
      + triggers = {
          + "path" = "./DB_Cluster_VMWARE"
        }
    }

  # module.efm-db-cluster.null_resource.removehostfile will be created
  + resource "null_resource" "removehostfile" {
      + id = (known after apply)
    }

  # module.efm-db-cluster.null_resource.slave1 will be created
  + resource "null_resource" "slave1" {
      + id       = (known after apply)
      + triggers = {
          + "path" = "./DB_Cluster_VMWARE"
        }
    }

  # module.efm-db-cluster.null_resource.slave2 will be created
  + resource "null_resource" "slave2" {
      + id       = (known after apply)
      + triggers = {
          + "path" = "./DB_Cluster_VMWARE"
        }
    }

Plan: 4 to add, 0 to change, 0 to destroy.

Do you want to perform these actions?
  Terraform will perform the actions described above.
  Only 'yes' will be accepted to approve.

  Enter a value: yes

module.efm-db-cluster.null_resource.slave1: Creating...
module.efm-db-cluster.null_resource.slave2: Creating...
module.efm-db-cluster.null_resource.master: Creating...
module.efm-db-cluster.null_resource.slave2: Provisioning with 'local-exec'...
module.efm-db-cluster.null_resource.slave1: Provisioning with 'local-exec'...
module.efm-db-cluster.null_resource.master: Provisioning with 'local-exec'...
module.efm-db-cluster.null_resource.slave1 (local-exec): Executing: ["/bin/sh" "-c" "sleep 30"]
module.efm-db-cluster.null_resource.master (local-exec): Executing: ["/bin/sh" "-c" "echo '172.22.16.122 ansible_user=root ansible_ssh_pass=adminedb' > EDB_EFM_VMWARE/utilities/scripts/hosts"]
module.efm-db-cluster.null_resource.slave2 (local-exec): Executing: ["/bin/sh" "-c" "sleep 30"]
module.efm-db-cluster.null_resource.master: Provisioning with 'local-exec'...
module.efm-db-cluster.null_resource.master (local-exec): Executing: ["/bin/sh" "-c" "echo '172.22.16.124 ansible_user=root ansible_ssh_pass=adminedb' >> EDB_EFM_VMWARE/utilities/scripts/hosts"]
module.efm-db-cluster.null_resource.master: Provisioning with 'local-exec'...
module.efm-db-cluster.null_resource.master (local-exec): Executing: ["/bin/sh" "-c" "echo '172.22.16.123 ansible_user=root ansible_ssh_pass=adminedb' >> EDB_EFM_VMWARE/utilities/scripts/hosts"]
module.efm-db-cluster.null_resource.master: Provisioning with 'local-exec'...
module.efm-db-cluster.null_resource.master (local-exec): Executing: ["/bin/sh" "-c" "sleep 30"]
module.efm-db-cluster.null_resource.slave2: Still creating... [10s elapsed]
module.efm-db-cluster.null_resource.slave1: Still creating... [10s elapsed]
module.efm-db-cluster.null_re
:
:
module.efm-db-cluster.null_resource.slave1 (local-exec): PLAY RECAP *********************************************************************
module.efm-db-cluster.null_resource.slave1 (local-exec): 172.22.16.124              : ok=17   changed=16   unreachable=0    failed=0    skipped=6    rescued=0    ignored=0

module.efm-db-cluster.null_resource.slave1: Creation complete after 1m49s [id=2753344876374981439]
module.efm-db-cluster.null_resource.master (local-exec): changed: [172.22.16.122]

module.efm-db-cluster.null_resource.master (local-exec): PLAY RECAP *********************************************************************
module.efm-db-cluster.null_resource.master (local-exec): 172.22.16.122              : ok=18   changed=17   unreachable=0    failed=0    skipped=7    rescued=0    ignored=0

module.efm-db-cluster.null_resource.master: Creation complete after 1m50s [id=8718803363721389911]
module.efm-db-cluster.null_resource.removehostfile: Creating...
module.efm-db-cluster.null_resource.removehostfile: Provisioning with 'local-exec'...
module.efm-db-cluster.null_resource.removehostfile (local-exec): Executing: ["/bin/sh" "-c" "rm -rf EDB_EFM_VMWARE/utilities/scripts/hosts"]
module.efm-db-cluster.null_resource.removehostfile: Creation complete after 0s [id=6417596566393426871]

Apply complete! Resources: 4 added, 0 changed, 0 destroyed.
laptop284-ma-us:EFM_Setup_VMWARE edb$
Check the EFM setup for the Postgres cluster
As Terraform outputs the master and standby node IPs, you can ssh into either the master or standby node and check for the EFM status. Here we are going to ssh into the master instance and confirm the EFM setup that was done by Terraform for us:
laptop284-ma-us:DB_Cluster_AWS edb$ ssh root@172.22.16.122
root@172.22.16.122's password:
Last login: Thu Mar  5 14:49:17 2020 from 172.22.15.173
-bash: warning: setlocale: LC_CTYPE: cannot change locale (UTF-8): No such file or directory
[root@centos-7-terraform ~]#
[root@centos-7-terraform ~]# cd /usr/edb/efm-3.8/bin/
[root@centos-7-terraform bin]#
[root@centos-7-terraform bin]# pwd
/usr/edb/efm-3.8/bin
[root@centos-7-terraform bin]# ./efm cluster-status efm
Cluster Status: efm

Agent Type  Address              Agent  DB       VIP
-----------------------------------------------------------------------
Master      172.22.16.122        UP     UP
Standby     172.22.16.123        UP     UP
Standby     172.22.16.124        UP     UP

Allowed node host list:
172.22.16.123 172.22.16.122 172.22.16.124

Membership coordinator: 172.22.16.123

Standby priority host list:
172.22.16.123 172.22.16.124

Promote Status:

DB Type     Address              WAL Received LSN   WAL Replayed LSN   Info
---------------------------------------------------------------------------
Master      172.22.16.122                           0/4C65960
Standby     172.22.16.124        0/4C65960          0/4C65960
Standby     172.22.16.123        0/4C65960          0/4C65960

Standby database(s) in sync with master. It is safe to promote.
[root@centos-7-terraform bin]#
You should also receive an email notification at the email address you provided in the input file for the cluster.

Step 3: Set up the PEM server and agents for monitoring the database nodes
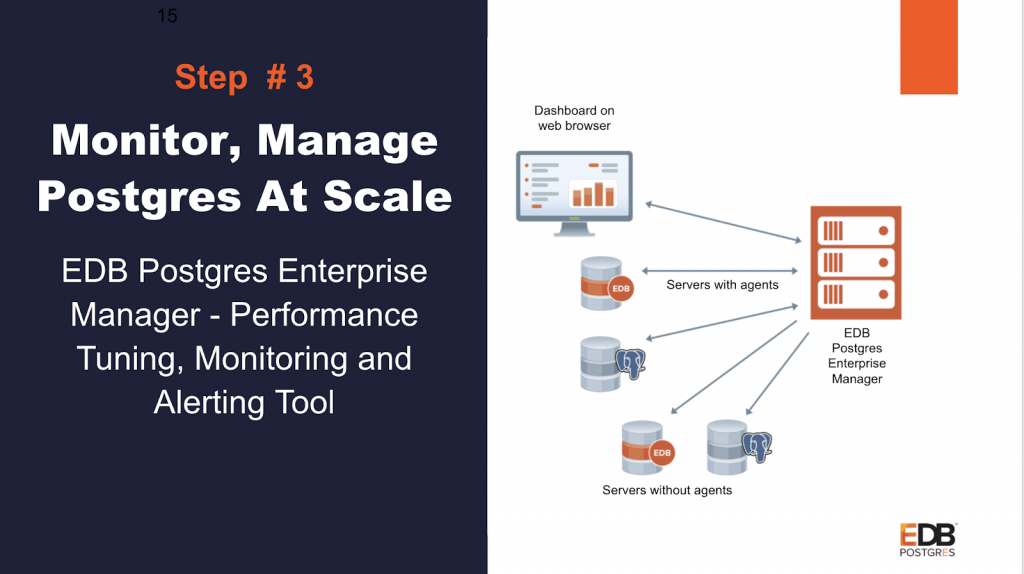
PEM server
The PEM monitoring server is used to monitor the database servers. In this section, we will walk you through steps of setting up the PEM server, followed by setting up PEM agents on the database cluster which was created in Step 1.
Go inside the folder PEM_Server_VMWARE and edit the file edb_pemserver_input.tf using your favorite editor to input the values for the mandatory parameters listed in the file and save it.
If you need any help filling in any of the parameters please check out the GitHub Wiki page which describes each parameter in detail.
The optional parameters give you the option to fill in any customized value you want or use the default values provided in the input file.
laptop154-ma-us:postgres-deployments loaner$ ls -ll
total 8
drwxr-xr-x  10 loaner  staff  320 Mar  4 12:11 DB_Cluster_AWS
drwxr-xr-x  10 loaner  staff  320 Mar  4 13:58 DB_Cluster_VMWARE
drwxr-xr-x  10 loaner  staff  320 Mar  2 11:12 EFM_Setup_AWS
drwxr-xr-x  10 loaner  staff  320 Mar  4 12:01 EFM_Setup_VMWARE
drwxr-xr-x   8 loaner  staff  256 Mar  3 13:39 Expand_DB_Cluster_AWS
drwxr-xr-x   7 loaner  staff  224 Feb 11 12:27 Expand_DB_Cluster_VMWARE
drwxr-xr-x  10 loaner  staff  320 Mar  4 12:01 PEM_Agent_AWS
drwxr-xr-x  10 loaner  staff  320 Feb 27 14:21 PEM_Agent_VMWARE
drwxr-xr-x  10 loaner  staff  320 Mar  4 13:59 PEM_Server_AWS
drwxr-xr-x  11 loaner  staff  352 Mar  4 12:01 PEM_Server_VMWARE
-rw-r--r--   1 loaner  staff  157 Feb 12 11:11 terraform.tfstate

laptop154-ma-us:PEM_Server_VMWARE loaner$
laptop154-ma-us:PEM_Server_VMWARE loaner$ ls -ll
total 88
drwxr-xr-x  7 loaner  staff    224 Jan 28 10:28 EDB_PEM_SERVER_VMWARE
-rw-r--r--  1 loaner  staff   1394 Jan 28 10:28 README.md
-rw-r--r--  1 loaner  staff  19342 Jan 28 10:28 ansible.cfg
-rw-r--r--  1 loaner  staff   1557 Feb 27 13:35 edb_pemserver_input.tf
-rw-r--r--  1 loaner  staff   1447 Feb 11 12:27 licence.txt
-rw-r--r--  1 loaner  staff   7857 Mar  3 13:51 terraform.tfstate
-rw-r--r--  1 loaner  staff    157 Mar  3 13:51 terraform.tfstate.backup
laptop154-ma-us:PEM_Server_VMWARE loaner$
Deploy
Run the following command to set up up a PEM server, which will monitor the database cluster created in Step1:
terraform init
laptop284-ma-us:PEM_Server_VMWARE edb$ pwd
/Users/edb/pgdeploy/postgres-deployment/PEM_Server_VMWARE
laptop284-ma-us:PEM_Server_VMWARE edb$ terraform init
Initializing modules...
- edb-pem-server in EDB_PEM_SERVER_VMWARE

Initializing the backend...

Initializing provider plugins...
- Checking for available provider plugins...
- Downloading plugin for provider "vsphere" (hashicorp/vsphere) 1.16.2...

The following providers do not have any version constraints in configuration,
so the latest version was installed.

To prevent automatic upgrades to new major versions that may contain breaking
changes, it is recommended to add version = "..." constraints to the
corresponding provider blocks in configuration, with the constraint strings
suggested below.

* provider.vsphere: version = "~> 1.16"

Terraform has been successfully initialized!

You may now begin working with Terraform. Try running "terraform plan" to see
any changes that are required for your infrastructure. All Terraform commands
should now work.

If you ever set or change modules or backend configuration for Terraform,
rerun this command to reinitialize your working directory. If you forget, other
commands will detect it and remind you to do so if necessary.
laptop284-ma-us:PEM_Server_VMWARE edb$
terraform apply
laptop284-ma-us:PEM_Server_VMWARE edb$
laptop284-ma-us:PEM_Server_VMWARE edb$ terraform apply
module.edb-pem-server.data.vsphere_datacenter.dc: Refreshing state...
module.edb-pem-server.data.vsphere_datastore.datastore: Refreshing state...
module.edb-pem-server.data.vsphere_compute_cluster.cluster: Refreshing state...
module.edb-pem-server.data.vsphere_virtual_machine.template: Refreshing state...
module.edb-pem-server.data.vsphere_network.network: Refreshing state...

An execution plan has been generated and is shown below.
Resource actions are indicated with the following symbols:
  + create

Terraform will perform the following actions:

  # module.edb-pem-server.vsphere_virtual_machine.EDB_PEM_SERVER will be created
  + resource "vsphere_virtual_machine" "EDB_PEM_SERVER" {
      + boot_retry_delay                        = 10000
      + change_version                          = (known after apply)
      + cpu_limit                               = -1
      + cpu_share_count                         = (known after apply)
      + cpu_share_level                         = "normal"
      + datastore_id                            = "datastore-25"
      + default_ip_address                      = (known after apply)
      + ept_rvi_mode                            = "automatic"
      + firmware                                = "bios"
      + force_power_off                         = true
      + guest_id                                = "centos7_64Guest"
      + guest_ip_addresses                      = (known after apply)
      + host_system_id                          = (known after apply)
      + hv_mode                                 = "hvAuto"
      + id                                      = (known after apply)
      + imported                                = (known after apply)
      + latency_sensitivity                     = "normal"
      + memory                                  = 1024
      + memory_limit                            = -1
      + memory_share_count                      = (known after apply)
      + memory_share_level                      = "normal"
      + migrate_wait_timeout                    = 30
      + moid                                    = (known after apply)
      + name                                    = "Pemserver"
      + num_cores_per_socket                    = 1
      + num_cpus                                = 2
      + reboot_required                         = (known after apply)
      + resource_pool_id                        = "resgroup-22"
      + run_tools_scripts_after_power_on        = true
      + run_tools_scripts_after_resume          = true
      + run_tools_scripts_before_guest_shutdown = true
      + run_tools_scripts_before_guest_standby  = true
      + scsi_bus_sharing                        = "noSharing"
      + scsi_controller_count                   = 1
      + scsi_type                               = "pvscsi"
      + shutdown_wait_timeout                   = 3
      + swap_placement_policy                   = "inherit"
      + uuid                                    = (known after apply)
      + vapp_transport                          = (known after apply)
      + vmware_tools_status                     = (known after apply)
      + vmx_path                                = (known after apply)
      + wait_for_guest_ip_timeout               = -1
      + wait_for_guest_net_routable             = true
      + wait_for_guest_net_timeout              = 5

      + clone {
          + template_uuid = "421afab9-e9ca-ef4b-6e41-67de458315ad"
          + timeout       = 30
        }

      + disk {
          + attach           = false
          + datastore_id     = "<computed>"
          + device_address   = (known after apply)
          + disk_mode        = "persistent"
          + disk_sharing     = "sharingNone"
          + eagerly_scrub    = false
          + io_limit         = -1
          + io_reservation   = 0
          + io_share_count   = 0
          + io_share_level   = "normal"
          + keep_on_remove   = false
          + key              = 0
          + label            = "disk0"
          + path             = (known after apply)
          + size             = 16
          + thin_provisioned = false
          + unit_number      = 0
          + uuid             = (known after apply)
          + write_through    = false
        }

      + network_interface {
          + adapter_type          = "vmxnet3"
          + bandwidth_limit       = -1
          + bandwidth_reservation = 0
          + bandwidth_share_count = (known after apply)
          + bandwidth_share_level = "normal"
          + device_address        = (known after apply)
          + key                   = (known after apply)
          + mac_address           = (known after apply)
          + network_id            = "network-26"
        }
    }

Plan: 1 to add, 0 to change, 0 to destroy.

Do you want to perform these actions?
  Terraform will perform the actions described above.
  Only 'yes' will be accepted to approve.

  Enter a value: yes

module.edb-pem-server.vsphere_virtual_machine.EDB_PEM_SERVER: Creating...
module.edb-pem-server.vsphere_virtual_machine.EDB_PEM_SERVER: Still creating... [10s elapsed]
module.edb-pem-server.vsphere_virtual_machine.EDB_PEM_SERVER: Still creating... [20s elapsed]
module.edb-pem-server.vsphere_virtual_machine.EDB_PEM_SERVER (local-exec): TASK [Assign password to DB user] **********************************************
module.edb-pem-server.vsphere_virtual_machine.EDB_PEM_SERVER (local-exec): changed: [172.22.16.130]

module.edb-pem-server.vsphere_virtual_machine.EDB_PEM_SERVER (local-exec): TASK [Create directory for PEM Agent certificate file] *************************
module.edb-pem-server.vsphere_virtual_machine.EDB_PEM_SERVER (local-exec): changed: [172.22.16.130]

module.edb-pem-server.vsphere_virtual_machine.EDB_PEM_SERVER (local-exec): TASK [Configure pem server] ****************************************************
module.edb-pem-server.vsphere_virtual_machine.EDB_PEM_SERVER: Still creating... [6m0s elapsed]
module.edb-pem-server.vsphere_virtual_machine.EDB_PEM_SERVER: Still creating... [6m10s elapsed]
module.edb-pem-server.vsphere_virtual_machine.EDB_PEM_SERVER: Still creating... [6m20s elapsed]
module.edb-pem-server.vsphere_virtual_machine.EDB_PEM_SERVER: Still creating... [6m30s elapsed]
module.edb-pem-server.vsphere_virtual_machine.EDB_PEM_SERVER (local-exec): changed: [172.22.16.130]

module.edb-pem-server.vsphere_virtual_machine.EDB_PEM_SERVER (local-exec): TASK [Flush iptables rule] *****************************************************
module.edb-pem-server.vsphere_virtual_machine.EDB_PEM_SERVER (local-exec): changed: [172.22.16.130]

module.edb-pem-server.vsphere_virtual_machine.EDB_PEM_SERVER (local-exec): PLAY RECAP *********************************************************************
module.edb-pem-server.vsphere_virtual_machine.EDB_PEM_SERVER (local-exec): 172.22.16.130              : ok=14   changed=13   unreachable=0    failed=0    skipped=0    rescued=0    ignored=0

module.edb-pem-server.vsphere_virtual_machine.EDB_PEM_SERVER: Creation complete after 6m34s [id=421ae297-4e0b-fe9f-0ac1-9f3bdc435be3]

Apply complete! Resources: 1 added, 0 changed, 0 destroyed.

Outputs:

PEM_SERVER_IP = 172.22.16.130
laptop284-ma-us:PEM_Server_VMWARE edb$
This command will start creating resources and will ask for your confirmation to create the resource. Type “yes”and hit the enter key. Terraform will start the creation of your resource, and the configuration of the PEM server will be done using Ansible playbooks we have in there.
Once this is complete you will see the PEM server IP as an output displayed on your screen.
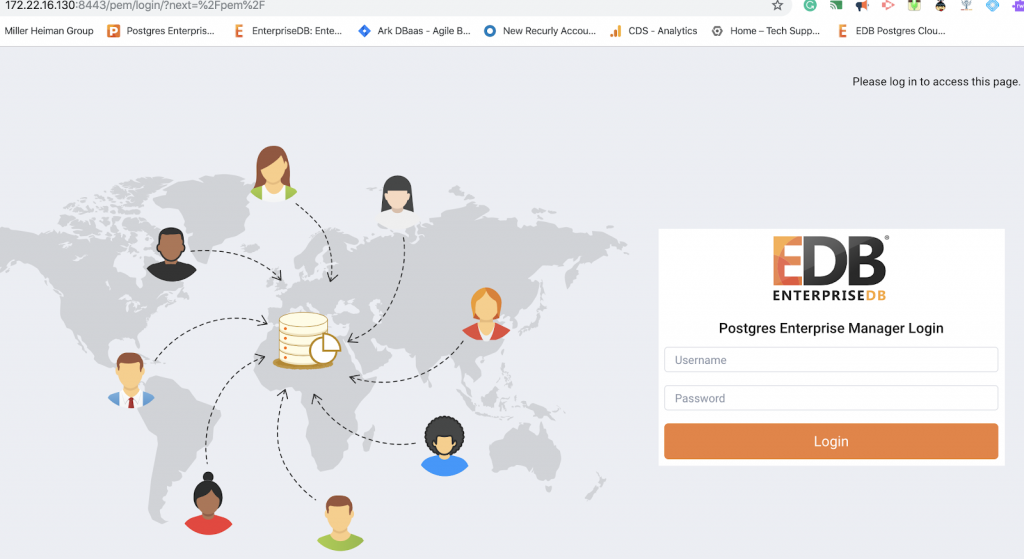
Access the PEM server
Type the PEM URL (https://<ip_address_of_PEM_host>:8443/pem) into your browser and hit enter. In our case the PEM server IP address is the one that Terraform gave above: 3.227.217.117. The default username that we had kept is Username: enterprisedb; Password: the DB password you entered in db_password field.
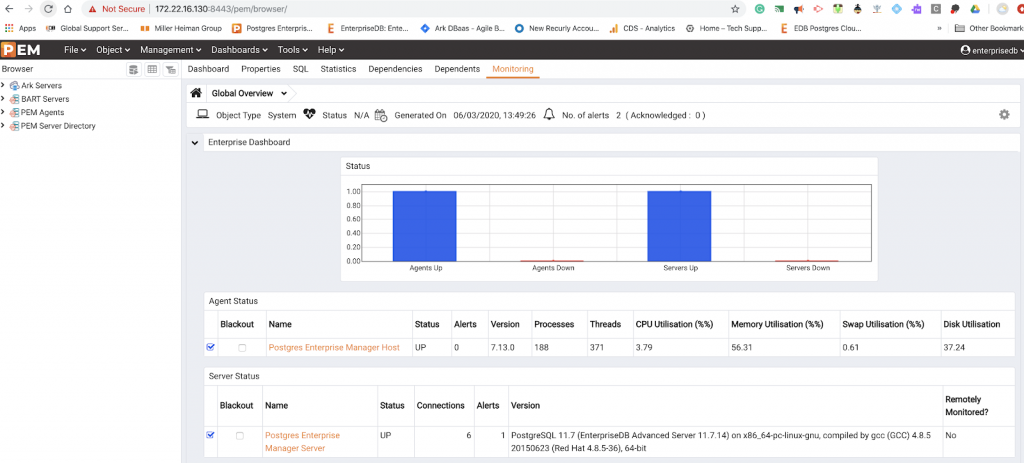
Register the PEM server and PEM agents setup
To start monitoring the DB servers created with the PEM monitoring servers, we need to register an agent with it. This is pemagent. The following steps will explain how we can register a PEM agent with a PEM server.
Prerequisites:
- DB cluster created using EDB deployment scripts.
- PEM server created using EDB deployment scripts.
Go inside the folder PEM_Agent_AWS and edit the file edb_pemagent_input.tf using your favorite editor to input the values for the mandatory parameters listed in the file and save it. If you need help filling in any of the parameters please check out the GitHub Wiki page, which describes each parameter in detail.
The optional parameters give you the option to fill in any customized value you want or use the default values provided in the input file.
laptop154-ma-us:postgres-deployments loaner$ ls -ll
total 8
drwxr-xr-x  10 loaner  staff  320 Mar  2 09:43 DB_Cluster_AWS
drwxr-xr-x  10 loaner  staff  320 Mar  2 09:44 DB_Cluster_VMWARE
drwxr-xr-x  10 loaner  staff  320 Feb 27 13:05 EFM_Setup_AWS
drwxr-xr-x  10 loaner  staff  320 Feb 27 14:21 EFM_Setup_VMWARE
drwxr-xr-x  10 loaner  staff  320 Feb 27 13:06 Expand_DB_Cluster_AWS
drwxr-xr-x   7 loaner  staff  224 Feb 11 12:27 Expand_DB_Cluster_VMWARE
drwxr-xr-x  10 loaner  staff  320 Feb 27 13:04 PEM_Agent_AWS
drwxr-xr-x  10 loaner  staff  320 Feb 27 14:21 PEM_Agent_VMWARE
drwxr-xr-x  10 loaner  staff  320 Mar  2 09:51 PEM_Server_AWS
drwxr-xr-x  10 loaner  staff  320 Feb 27 14:22 PEM_Server_VMWARE
-rw-r--r--   1 loaner  staff  157 Feb 12 11:11 terraform.tfstate
laptop154-ma-us:postgres-deployments loaner$
laptop154-ma-us:postgres-deployments loaner$
laptop154-ma-us:postgres-deployments loaner$ cd PEM_Agent_AWS/
laptop154-ma-us:PEM_Agent_AWS loaner$
laptop154-ma-us:PEM_Agent_AWS loaner$
laptop154-ma-us:PEM_Agent_AWS loaner$
laptop154-ma-us:PEM_Agent_AWS loaner$ ls -ll
total 80
drwxr-xr-x  7 loaner  staff    224 Jan 28 10:28 EDB_PEM_AGENT
-rw-r--r--  1 loaner  staff   1544 Jan 28 10:28 README.md
-rw-r--r--  1 loaner  staff  19342 Jan 28 10:28 ansible.cfg
-rw-r--r--  1 loaner  staff    991 Feb 12 12:46 edb_pemagent_input.tf
-rw-r--r--  1 loaner  staff   1447 Feb 11 12:27 licence.txt
-rw-r--r--  1 loaner  staff    158 Feb 27 13:04 terraform.tfstate
-rw-r--r--  1 loaner  staff   3977 Feb 27 13:04 terraform.tfstate.backup
laptop154-ma-us:PEM_Agent_AWS loaner$
laptop154-ma-us:PEM_Agent_AWS loaner$
Deploy
Run the following command to start the process of registering the PEM agent with the PEM server:
terraform init
aptop284-ma-us:PEM_Agent_VMWARE edb$ terraform init
Initializing modules...
- edb-pem-agent in EDB_PEM_AGENT_VMWARE

Initializing the backend...

Initializing provider plugins...
- Checking for available provider plugins...
- Downloading plugin for provider "null" (hashicorp/null) 2.1.2...

The following providers do not have any version constraints in configuration,
so the latest version was installed.

To prevent automatic upgrades to new major versions that may contain breaking
changes, it is recommended to add version = "..." constraints to the
corresponding provider blocks in configuration, with the constraint strings
suggested below.

* provider.null: version = "~> 2.1"

Terraform has been successfully initialized!

You may now begin working with Terraform. Try running "terraform plan" to see
any changes that are required for your infrastructure. All Terraform commands
should now work.

If you ever set or change modules or backend configuration for Terraform,
rerun this command to reinitialize your working directory. If you forget, other
commands will detect it and remind you to do so if necessary.
laptop284-ma-us:PEM_Agent_VMWARE edb$
terraform apply
This will prompt you to enter “yes.” Type “yes” and hit enter. This will start the process of registering a PEM agent with the PEM server and when it is completed you will see a message that the resource was added.
laptop284-ma-us:PEM_Agent_VMWARE edb$ terraform apply
module.edb-pem-agent.data.terraform_remote_state.DB_CLUSTER: Refreshing state...
module.edb-pem-agent.data.terraform_remote_state.PEM_SERVER: Refreshing state...

An execution plan has been generated and is shown below.
Resource actions are indicated with the following symbols:
  + create

Terraform will perform the following actions:

  # module.edb-pem-agent.null_resource.configurepemagent will be created
  + resource "null_resource" "configurepemagent" {
      + id       = (known after apply)
      + triggers = {
          + "path" = "./PEM_Server_VMWARE"
        }
    }

  # module.edb-pem-agent.null_resource.removehostfile will be created
  + resource "null_resource" "removehostfile" {
      + id = (known after apply)
    }

Plan: 2 to add, 0 to change, 0 to destroy.

Do you want to perform these actions?
  Terraform will perform the actions described above.
  Only 'yes' will be accepted to approve.

  Enter a value: yes

module.edb-pem-agent.null_resource.configurepemagent: Creating...
module.edb-pem-agent.null_resource.configurepemagent: Provisioning with 'local-exec'...
module.edb-pem-agent.null_resource.configurepemagent (local-exec): Executing: ["/bin/sh" "-c" "echo '172.22.16.122 ansible_user= ansible_ssh_pass=' > EDB_PEM_AGENT_VMWARE/utilities/scripts/hosts"]
module.edb-pem-agent.null_resource.configurepemagent: Provisioning with 'local-exec'...
module.edb-pem-agent.null_resource.configurepemagent (local-exec): Executing: ["/bin/sh" "-c" "echo '172.22.16.124 ansible_user= ansible_ssh_pass=' >> EDB_PEM_AGENT_VMWARE/utilities/scripts/hosts"]
module.edb-pem-agent.null_resource.configurepemagent: Provisioning with 'local-exec'...
module.edb-pem-agent.null_resource.configurepemagent (local-exec): Executing: ["/bin/sh" "-c" "echo '172.22.16.123 ansible_user= ansible_ssh_pass=' >> EDB_PEM_AGENT_VMWARE/utilities/scripts/hosts"]
module.edb-pem-agent.null_resource.configurepemagent: Provisioning with 'local-exec'...
module.edb-pem-agent.null_resource.configurepemagent (local-exec): Executing: ["/bin/sh" "-c" "sleep 30"]
module.edb-pem-agent.null_resource.configurepemagent: Still creating... [10s elapsed]
module.edb-pem-agent.null_resource.configurepemagent: Still creating... [20s elapsed]
module.edb-pem-agent.null_resource.configurepemagent: Still creating... [30s elapsed]
module.edb-pem-agent.null_resource.configurepemagent: Provisioning with 'local-exec'...
module.edb-pem-agent.null_resource.configurepemagent (local-exec): Executing: ["/bin/sh" "-c" "ansible-playbook -i EDB_PEM_AGENT_VMWARE/utilities/scripts/hosts  EDB_PEM_AGENT_VMWARE/utilities/scripts/installpemagent.yml --extra-vars='DBPASSWORD= PEM_IP=172.22.16.130 PEM_WEB_PASSWORD= USER= PASS= DB_ENGINE=pg11 PGDBUSER=postgres  EPASDBUSER=enterprisedb'"]
module.edb-pem-agent.null_resource.configurepemagent (local-exec): TASK [Restart pem agent] *******************************************************
module.edb-pem-agent.null_resource.configurepemagent (local-exec): changed: [172.22.16.124]
module.edb-pem-agent.null_resource.configurepemagent (local-exec): changed: [172.22.16.122]
module.edb-pem-agent.null_resource.configurepemagent (local-exec): changed: [172.22.16.123]

module.edb-pem-agent.null_resource.configurepemagent (local-exec): PLAY RECAP *********************************************************************
module.edb-pem-agent.null_resource.configurepemagent (local-exec): 172.22.16.122              : ok=12   changed=10   unreachable=0    failed=0    skipped=5    rescued=0    ignored=0
module.edb-pem-agent.null_resource.configurepemagent (local-exec): 172.22.16.123              : ok=12   changed=10   unreachable=0    failed=0    skipped=5    rescued=0    ignored=0
module.edb-pem-agent.null_resource.configurepemagent (local-exec): 172.22.16.124              : ok=12   changed=10   unreachable=0    failed=0    skipped=5    rescued=0    ignored=0

module.edb-pem-agent.null_resource.configurepemagent: Creation complete after 2m3s [id=6876237086787652473]
module.edb-pem-agent.null_resource.removehostfile: Creating...
module.edb-pem-agent.null_resource.removehostfile: Provisioning with 'local-exec'...
module.edb-pem-agent.null_resource.removehostfile (local-exec): Executing: ["/bin/sh" "-c" "rm -rf EDB_PEM_AGENT_VMWARE/utilities/scripts/hosts"]
module.edb-pem-agent.null_resource.removehostfile: Creation complete after 0s [id=1763985139095090072]

Apply complete! Resources: 2 added, 0 changed, 0 destroyed.
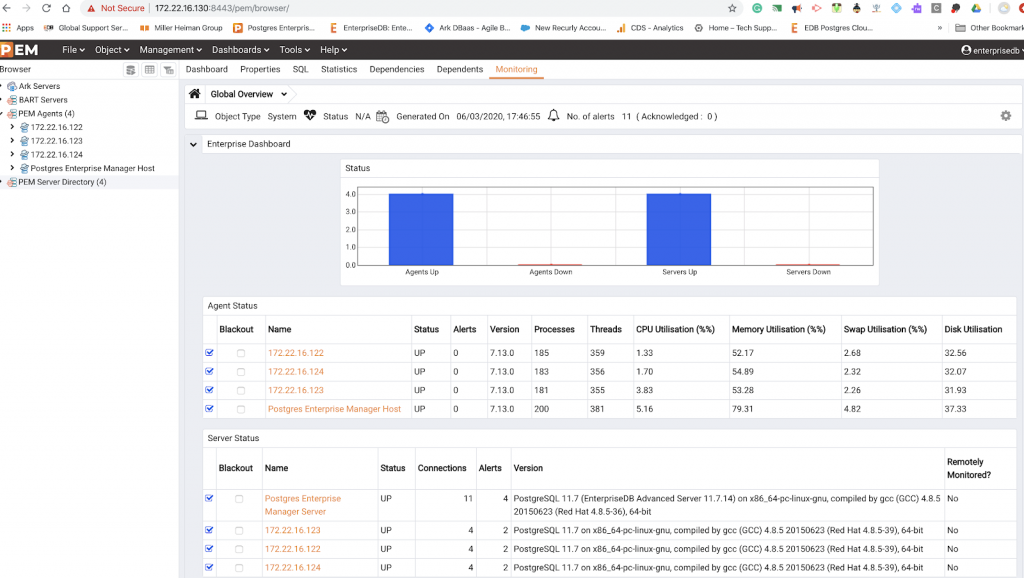
Confirm the PEM server for the PEM agents setup
Type the PEM URL (https://<ip_address_of_PEM_host>:8443/pem) into the browser and hit enter. In our case the PEM server IP address is the one that Terraform gave above: 3.227.217.117. The default username that we kept is Username: enterprisedb; Password: The DB password you entered in db_password field.

With pemagents on each of the 3 nodes, 1 Master and 2 standby can be confirmed once you login in the PEM server.
Step 4 : Set up the BART server
BART Server
The BART server is used for maintaining the backups for the database cluster. In this section, we will walk you through steps of setting up the BART server.
Go inside the folder BART_VMWARE and edit the file edb_bart_input.tf using your favorite editor to input the values for the mandatory parameters listed in the file and save it.
If you need any help filling in any of the parameters please check out the GitHub Wiki page which describes each parameter in detail.
The optional parameters give you the option to fill in any customized value you want or use the default values provided in the input file.
laptop284-ma-us:postgres-deployments edb$ ls -ll
total 0
drwxr-xr-x   7 edb  staff  224 Apr  3 11:05 BART_AWS
drwxr-xr-x   7 edb  staff  224 Apr  3 11:05 BART_VMWARE
drwxr-xr-x   7 edb  staff  224 Apr  3 11:05 DB_Cluster_AWS
drwxr-xr-x   7 edb  staff  224 Apr  3 11:05 DB_Cluster_VMWARE
drwxr-xr-x   5 edb  staff  160 Apr  3 11:05 EDBR_Cluster_AWS
drwxr-xr-x   9 edb  staff  288 Apr  3 11:13 EDB_Tools_AWS
drwxr-xr-x  10 edb  staff  320 Apr  7 11:26 EDB_Tools_VMWARE
drwxr-xr-x   7 edb  staff  224 Apr  3 11:05 EFM_Setup_AWS
drwxr-xr-x   7 edb  staff  224 Apr  3 11:05 EFM_Setup_VMWARE
drwxr-xr-x   3 edb  staff   96 Apr  3 11:05 EPRS_Cluster_AWS
drwxr-xr-x   7 edb  staff  224 Apr  3 11:05 Expand_DB_Cluster_AWS
drwxr-xr-x   7 edb  staff  224 Apr  3 11:05 Expand_DB_Cluster_VMWARE
drwxr-xr-x   7 edb  staff  224 Apr  3 11:05 PEM_Agent_AWS
drwxr-xr-x   7 edb  staff  224 Apr  3 11:05 PEM_Agent_VMWARE
drwxr-xr-x   7 edb  staff  224 Apr  3 11:05 PEM_Server_AWS
drwxr-xr-x   7 edb  staff  224 Apr  3 11:05 PEM_Server_VMWARE
laptop284-ma-us:postgres-deployments edb$ cd BART_VMWARE
laptop284-ma-us:BART_VMWARE edb$

laptop284-ma-us:BART_VMWARE edb$ ls -ll
total 64
drwxr-xr-x  7 edb  staff    224 Apr  3 11:05 EDB_BART_Server
-rw-r--r--  1 edb  staff   1535 Apr  3 11:05 README.md
-rw-r--r--  1 edb  staff  19342 Apr  3 11:05 ansible.cfg
-rw-r--r--  1 edb  staff   2164 Apr  3 11:05 edb_bart_input.tf
-rw-r--r--  1 edb  staff   1447 Apr  3 11:05 licence.txt
laptop284-ma-us:BART_VMWARE edb$
Deploy
terraform init
laptop284-ma-us:BART_VMWARE edb$ terraform init
Initializing modules...
- edb-bart-server in EDB_BART_Server

Initializing the backend...

Initializing provider plugins...
- Checking for available provider plugins...
- Downloading plugin for provider "null" (hashicorp/null) 2.1.2...
- Downloading plugin for provider "vsphere" (hashicorp/vsphere) 1.15.0...

The following providers do not have any version constraints in configuration,
so the latest version was installed.

To prevent automatic upgrades to new major versions that may contain breaking
changes, it is recommended to add version = "..." constraints to the
corresponding provider blocks in configuration, with the constraint strings
suggested below.

* provider.null: version = "~> 2.1"

Terraform has been successfully initialized!

You may now begin working with Terraform. Try running "terraform plan" to see
any changes that are required for your infrastructure. All Terraform commands
should now work.

If you ever set or change modules or backend configuration for Terraform,
rerun this command to reinitialize your working directory. If you forget, other
commands will detect it and remind you to do so if necessary.
laptop284-ma-us:BART_VMWARE edb$
terraform apply
laptop284-ma-us:BART_VMWARE edb$ terraform apply
module.edb-bart-server.data.terraform_remote_state.SR: Refreshing state...
module.edb-bart-server.data.vsphere_datacenter.dc: Refreshing state...
module.edb-bart-server.data.vsphere_compute_cluster.cluster: Refreshing state...
module.edb-bart-server.data.vsphere_virtual_machine.template: Refreshing state...
module.edb-bart-server.data.vsphere_network.network: Refreshing state...
module.edb-bart-server.data.vsphere_datastore.datastore: Refreshing state...

An execution plan has been generated and is shown below.
Resource actions are indicated with the following symbols:
  + create

Terraform will perform the following actions:

  # module.edb-bart-server.null_resource.removehostfile will be created
  + resource "null_resource" "removehostfile" {
      + id = (known after apply)
    }

  # module.edb-bart-server.vsphere_virtual_machine.BART_SERVER will be created
  + resource "vsphere_virtual_machine" "BART_SERVER" {
      + boot_retry_delay                        = 10000
      + change_version                          = (known after apply)
      + cpu_limit                               = -1
      + cpu_share_count                         = (known after apply)
      + cpu_share_level                         = "normal"
      + datastore_id                            = "datastore-25"
      + default_ip_address                      = (known after apply)
      + ept_rvi_mode                            = "automatic"
      + firmware                                = "bios"
      + force_power_off                         = true
      + guest_id                                = "centos7_64Guest"
      + guest_ip_addresses                      = (known after apply)
      + host_system_id                          = (known after apply)
      + hv_mode                                 = "hvAuto"
      + id                                      = (known after apply)
      + imported                                = (known after apply)
      + latency_sensitivity                     = "normal"
      + memory                                  = 1024
      + memory_limit                            = -1
      + memory_share_count                      = (known after apply)
      + memory_share_level                      = "normal"
      + migrate_wait_timeout                    = 30
      + moid                                    = (known after apply)
      + name                                    = "edb-bart-server-new"
      + num_cores_per_socket                    = 1
      + num_cpus                                = 2
      + reboot_required                         = (known after apply)
      + resource_pool_id                        = "resgroup-22"
      + run_tools_scripts_after_power_on        = true
      + run_tools_scripts_after_resume          = true
      + run_tools_scripts_before_guest_shutdown = true
      + run_tools_scripts_before_guest_standby  = true
      + scsi_bus_sharing                        = "noSharing"
      + scsi_controller_count                   = 1
      + scsi_type                               = "pvscsi"
      + shutdown_wait_timeout                   = 3
      + swap_placement_policy                   = "inherit"
      + uuid                                    = (known after apply)
      + vapp_transport                          = (known after apply)
      + vmware_tools_status                     = (known after apply)
      + vmx_path                                = (known after apply)
      + wait_for_guest_ip_timeout               = -1
      + wait_for_guest_net_routable             = true
      + wait_for_guest_net_timeout              = 5

      + clone {
          + template_uuid = "421afab9-e9ca-ef4b-6e41-67de458315ad"
          + timeout       = 30
        }

      + disk {
          + attach           = false
          + datastore_id     = "<computed>"
          + device_address   = (known after apply)
          + disk_mode        = "persistent"
          + disk_sharing     = "sharingNone"
          + eagerly_scrub    = false
          + io_limit         = -1
          + io_reservation   = 0
          + io_share_count   = 0
          + io_share_level   = "normal"
          + keep_on_remove   = false
          + key              = 0
          + label            = "disk0"
          + path             = (known after apply)
          + size             = 16
          + thin_provisioned = false
          + unit_number      = 0
          + uuid             = (known after apply)
          + write_through    = false
        }
      + disk {
          + attach           = false
          + datastore_id     = "datastore-25"
          + device_address   = (known after apply)
          + disk_mode        = "persistent"
          + disk_sharing     = "sharingNone"
          + eagerly_scrub    = false
          + io_limit         = -1
          + io_reservation   = 0
          + io_share_count   = 0
          + io_share_level   = "normal"
          + keep_on_remove   = false
          + key              = 0
          + label            = "disk1"
          + path             = (known after apply)
          + size             = 2
          + thin_provisioned = true
          + unit_number      = 1
          + uuid             = (known after apply)
          + write_through    = false
        }

      + network_interface {
          + adapter_type          = "vmxnet3"
          + bandwidth_limit       = -1
          + bandwidth_reservation = 0
          + bandwidth_share_count = (known after apply)
          + bandwidth_share_level = "normal"
          + device_address        = (known after apply)
          + key                   = (known after apply)
          + mac_address           = (known after apply)
          + network_id            = "network-26"
        }
    }

Plan: 2 to add, 0 to change, 0 to destroy.

Do you want to perform these actions?
  Terraform will perform the actions described above.
  Only 'yes' will be accepted to approve.

  Enter a value: yes

module.edb-bart-server.vsphere_virtual_machine.BART_SERVER: Creating...
module.edb-bart-server.vsphere_virtual_machine.BART_SERVER: Still creating... [10s elapsed]
module.edb-bart-server.vsphere_virtual_machine.BART_SERVER: Still creating... [20s elapsed]
module.edb-bart-server.vsphere_virtual_machine.BART_SERVER: Still creating... [30s elapsed]
module.edb-bart-server.vsphere_virtual_machine.BART_SERVER: Still creating... [40s elapsed]
module.edb-bart-server.vsphere_virtual_machine.BART_SERVER: Still creating... [50s elapsed]
module.edb-bart-server.vsphere_virtual_machine.BART_SERVER: Still creating... [1m0s elapsed]
module.edb-bart-server.vsphere_virtual_machine.BART_SERVER: Still creating... [1m10s elapsed]
module.edb-bart-server.vsphere_virtual_machine.BART_SERVER: Still creating... [1m20s elapsed]
module.edb-bart-server.vsphere_virtual_machine.BART_SERVER: Still creating... [1m30s elapsed]
module.edb-bart-server.vsphere_virtual_machine.BART_SERVER: Still creating... [1m40s elapsed]
module.edb-bart-server.vsphere_virtual_machine.BART_SERVER: Provisioning with 'local-exec'...
module.edb-bart-server.vsphere_virtual_machine.BART_SERVER (local-exec): Executing: ["/bin/sh" "-c" "echo '172.22.17.17 ansible_user=root ansible_ssh_pass=adminedb' > EDB_BART_Server/utilities/scripts/hosts"]
module.edb-bart-server.vsphere_virtual_machine.BART_SERVER: Provisioning with 'local-exec'...
module.edb-bart-server.vsphere_virtual_machine.BART_SERVER (local-exec): Executing: ["/bin/sh" "-c" "echo '172.22.17.14 ansible_user=root ansible_ssh_pass=adminedb' >> EDB_BART_Server/utilities/scripts/hosts"
:
:
:
module.edb-bart-server.vsphere_virtual_machine.BART_SERVER (local-exec): TASK [Sleep time] **************************************************************
module.edb-bart-server.vsphere_virtual_machine.BART_SERVER: Still creating... [5m20s elapsed]
module.edb-bart-server.vsphere_virtual_machine.BART_SERVER: Still creating... [5m30s elapsed]
module.edb-bart-server.vsphere_virtual_machine.BART_SERVER: Still creating... [5m40s elapsed]
module.edb-bart-server.vsphere_virtual_machine.BART_SERVER (local-exec): changed: [172.22.17.17]

module.edb-bart-server.vsphere_virtual_machine.BART_SERVER (local-exec): TASK [Create and add line in file] *********************************************
module.edb-bart-server.vsphere_virtual_machine.BART_SERVER (local-exec): changed: [172.22.17.17]

module.edb-bart-server.vsphere_virtual_machine.BART_SERVER (local-exec): TASK [Take backup] *************************************************************
module.edb-bart-server.vsphere_virtual_machine.BART_SERVER (local-exec): changed: [172.22.17.17]

module.edb-bart-server.vsphere_virtual_machine.BART_SERVER (local-exec): TASK [Add cron job for scheduing bart full backup] *****************************
module.edb-bart-server.vsphere_virtual_machine.BART_SERVER (local-exec): changed: [172.22.17.17]

module.edb-bart-server.vsphere_virtual_machine.BART_SERVER (local-exec): TASK [Add cron job for incremental backup.] ************************************
module.edb-bart-server.vsphere_virtual_machine.BART_SERVER (local-exec): changed: [172.22.17.17]

module.edb-bart-server.vsphere_virtual_machine.BART_SERVER (local-exec): PLAY RECAP *********************************************************************
module.edb-bart-server.vsphere_virtual_machine.BART_SERVER (local-exec): 172.22.17.14               : ok=15   changed=11   unreachable=0    failed=0    skipped=23   rescued=0    ignored=0
module.edb-bart-server.vsphere_virtual_machine.BART_SERVER (local-exec): 172.22.17.17               : ok=40   changed=37   unreachable=0    failed=0    skipped=15   rescued=0    ignored=0

module.edb-bart-server.vsphere_virtual_machine.BART_SERVER: Creation complete after 5m49s [id=421a64a1-e2d4-9669-219c-b8ac3ce0e615]
module.edb-bart-server.null_resource.removehostfile: Creating...
module.edb-bart-server.null_resource.removehostfile: Provisioning with 'local-exec'...
module.edb-bart-server.null_resource.removehostfile (local-exec): Executing: ["/bin/sh" "-c" "rm -rf EDB_BART_Server/utilities/scripts/hosts"]
module.edb-bart-server.null_resource.removehostfile: Creation complete after 1s [id=436114256411293257]

Apply complete! Resources: 2 added, 0 changed, 0 destroyed.

Outputs:

Bart_SERVER_IP = 172.22.17.17
Access the BART server
Login into the BART server and confirm that server is configured correctly and the backups are being taken
laptop284-ma-us:Downloads edb$ ssh -i pgdeploy.pem root@172.22.17.17
root@172.22.17.17's password:
Last login: Thu Apr 16 10:14:19 2020 from 172.24.67.114
[root@centos-7-terraform ~]#
[root@centos-7-terraform bin]# export LC_ALL=en_US.UTF-8

[root@centos-7-terraform bin]# bart check-config -s dbserver
INFO:  Checking server dbserver
INFO:  Verifying cluster_owner and ssh/scp connectivity
INFO:  success
INFO:  Verifying user, host, and replication connectivity
INFO:  success
INFO:  Verifying that user is a database superuser
INFO:  success
INFO:  Verifying that cluster_owner can read cluster data files
INFO:  success
INFO:  Verifying that you have permission to write to vault
INFO:  success
INFO:  /opt/backups/dbserver
INFO:  Verifying database server configuration
INFO:  success
INFO:  Verifying that WAL archiving is working
INFO:  waiting 30 seconds for /opt/backups/dbserver/archived_wals/00000001000000000000000A
INFO:  success
INFO:  Verifying that bart-scanner is configured and running
INFO:  waiting 30 seconds for /opt/backups/dbserver/archived_wals/00000001000000000A000028000000000B000000.mbm
INFO:  success

[root@centos-7-terraform bin]# bart backup -s dbserver
INFO:  DebugTarget - getVar(checkDiskSpace.bytesAvailable)
INFO:  creating full backup using pg_basebackup for server 'dbserver'
INFO:  creating backup for server 'dbserver'
INFO:  backup identifier: '1587133130545'
INFO:  backup completed successfully
INFO:
BART VERSION: 2.5.3
BACKUP DETAILS:
BACKUP STATUS: active
BACKUP IDENTIFIER: 1587133130545
BACKUP NAME: none
BACKUP PARENT: none
BACKUP LOCATION: /opt/backups/dbserver/1587133130545
BACKUP SIZE: 67.77 MB
BACKUP FORMAT: tar
BACKUP TIMEZONE: America/New_York
XLOG METHOD: fetch
BACKUP CHECKSUM(s): 0
TABLESPACE(s): 0
START WAL LOCATION: 00000001000000000000000C
BACKUP METHOD: streamed
BACKUP FROM: master
START TIME: 2020-04-17 10:18:50 EDT
STOP TIME: 2020-04-17 10:18:53 EDT
TOTAL DURATION: 3 sec(s)

[root@centos-7-terraform bin]# bart show-backups -s dbserver
 SERVER NAME   BACKUP ID       BACKUP NAME   BACKUP PARENT   BACKUP TIME               BACKUP SIZE   WAL(s) SIZE   WAL FILES   STATUS

 dbserver      1587133130545   none          none            2020-04-17 10:18:53 EDT   67.77 MB      16.00 MB      1           active
 dbserver      1587098701931   none          1587046455084   2020-04-17 00:45:12 EDT   39.19 MB                                active
 dbserver      1587046455084   none          none            2020-04-16 10:14:15 EDT   67.77 MB      96.00 MB      6           active

[root@centos-7-terraform bin]# backupid=`bart show-backups -s dbserver |awk '{print $2}'| sed '/^$/d'| grep -v 'NAME'| head -1` && bart backup -s DBSERVER -F p --parent $backupid
INFO:  DebugTarget - getVar(checkDiskSpace.bytesAvailable)
INFO:  checking /opt/backups/dbserver/archived_wals for MBM files from 0/C000028 to 0/E000000
INFO:  new backup identifier generated 1587133190347
INFO:  creating 1 harvester threads
NOTICE:  all required WAL segments have been archived
INFO:  backup completed successfully
INFO:
BART VERSION: 2.5.3
BACKUP DETAILS:
BACKUP STATUS: active
BACKUP IDENTIFIER: 1587133190347
BACKUP NAME: none
BACKUP PARENT: 1587133130545
BACKUP LOCATION: /opt/backups/dbserver/1587133190347
BACKUP SIZE: 7.19 MB
BACKUP FORMAT: plain
BACKUP TIMEZONE: America/New_York
XLOG METHOD: fetch
BACKUP CHECKSUM(s): 0
TABLESPACE(s): 0
START WAL LOCATION: 00000001000000000000000E
BACKUP METHOD: streamed
BACKUP FROM: master
START TIME: 2020-04-17 10:19:50 EDT
STOP TIME: 2020-04-17 10:19:58 EDT
TOTAL DURATION: 8 sec(s)

[root@centos-7-terraform bin]#
Resource cleanup
You can always clean up the resources using a destroy command. The Terraform destroy command can be used to destroy the Terraform-managed infrastructure:
terraform destroy
This should clean up all the resources that Terraform created.