How to use PostgreSQL with Laravel

PostgreSQL is a powerful database that has been battle-tested in many applications. Laravel is a reliable and flexible PHP framework with great community support. Together, they enable PHP developers to deploy web applications quickly and cleanly. This quick tutorial will lay the groundwork for any aspiring PHP developer looking to merge the best of both worlds of fast application development and database reliability.
Prerequisites
As of the time of this writing, the latest available version of Laravel is 6.0 LTS, and can be used with any supported version of PostgreSQL. In reality, Laravel can be used with any of several database engines because of the underlying Eloquent ORM. This article will focus on how to set it up with Postgres, because why would you use anything else? Here’s what you’ll need:
- PHP 7.2+
- Composer (a dependency manager for PHP)
- PostgreSQL 9.5+
Installation of these components is falls outside the scope of this article, but if you need help, you can check out instructions on how to install PHP 7.3 (RHEL/CentOS, Ubuntu) and PostgreSQL (RHEL/CentOS, Ubuntu).
Installing Laravel
To install Laravel, simply use Composer to create a new project:
composer create-project --prefer-dist laravel/laravel myproject
Note that Laravel is a framework, or a collection of PHP libraries, to assist in development while keeping the code clean. Once the project has been created and the Laravel framework is pulled, you should be able to see several directories and files in the myproject folder:
# ls -l

total 248

drwxr-xr-x  6 root root   4096 Nov 28 19:39 app

-rwxr-xr-x  1 root root   1686 Nov 21 17:28 artisan

drwxr-xr-x  3 root root   4096 Nov 21 17:28 bootstrap

-rw-r--r--  1 root root   1501 Nov 21 17:28 composer.json

-rw-r--r--  1 root root 178552 Nov 28 07:46 composer.lock

drwxr-xr-x  2 root root   4096 Nov 21 17:28 config

drwxr-xr-x  5 root root   4096 Nov 21 17:28 database

-rw-r--r--  1 root root   1013 Nov 21 17:28 package.json

-rw-r--r--  1 root root   1297 Nov 21 17:28 phpunit.xml

drwxr-xr-x  2 root root   4096 Nov 21 17:28 public

-rw-r--r--  1 root root   4455 Nov 21 17:28 README.md

drwxr-xr-x  6 root root   4096 Nov 21 17:28 resources

drwxr-xr-x  2 root root   4096 Nov 21 17:28 routes

-rw-r--r--  1 root root    563 Nov 21 17:28 server.php

drwxr-xr-x  5 root root   4096 Nov 21 17:28 storage

drwxr-xr-x  4 root root   4096 Nov 21 17:28 tests

drwxr-xr-x 41 root root   4096 Nov 28 07:46 vendor

-rw-r--r--  1 root root    538 Nov 21 17:28 webpack.mix.js
Getting the plumbing in place
PHP and Laravel both need to know how to talk to talk to PostgreSQL, so the first step is to make sure that the PostgreSQL drivers for PHP are installed. That means you need to have php-pgsql installed. For Linux users, this can be done with “apt-get install php-pgsql” or “yum install php-pgsql” (you may need to customize these commands based on your distribution and/or version of PHP).
Then, edit your “.env” file in the project folder and update the database information accordingly (the values included here are defaults—please adjust to match your configuration):
# cat myproject/.env | grep DB

DB_CONNECTION=pgsql

DB_HOST=<your_database_IP_address>

DB_PORT=5432

DB_DATABASE=postgres

DB_USERNAME=postgres

DB_PASSWORD=postgres
In some instances, you may need to link “pgsql.so” to “/usr/lib64/php/modules” and also create a corresponding “/etc/php.d/pdo_pgsql.ini”—it really depends on how your PHP was set up.
Finally, test to see if you can communicate with your PostgreSQL database via Laravel:
# cd myproject

# php artisan migrate:install

Migration table created successfully.
Installing the default schema
Laravel comes with a basic user/password schema for testing and tinkering. To load it, simply call it:
# php artisan migrate:fresh

Dropped all tables successfully.

Migration table created successfully.

Migrating: 2014_10_12_000000_create_users_table

Migrated:  2014_10_12_000000_create_users_table (0.01 seconds)

Migrating: 2014_10_12_100000_create_password_resets_table

Migrated:  2014_10_12_100000_create_password_resets_table (0.01 seconds)

Migrating: 2019_08_19_000000_create_failed_jobs_table

Migrated:  2019_08_19_000000_create_failed_jobs_table (0.01 seconds)

[root@pga laravel-contacts]# php artisan migrate:status

+------+------------------------------------------------+-------+

| Ran? | Migration                                      | Batch |

+------+------------------------------------------------+-------+

| Yes  | 2014_10_12_000000_create_users_table           | 1     |

| Yes  | 2014_10_12_100000_create_password_resets_table | 1     |

| Yes  | 2019_08_19_000000_create_failed_jobs_table     | 1     |

+------+------------------------------------------------+-------+
You can verify that the tables were created by connecting to your PostgreSQL database with “psql”:
postgres=# \d

                 List of relations

 Schema |        Name        |   Type   |  Owner

--------+--------------------+----------+----------

 public | failed_jobs        | table    | postgres

 public | failed_jobs_id_seq | sequence | postgres

 public | migrations         | table    | postgres

 public | migrations_id_seq  | sequence | postgres

 public | password_resets    | table    | postgres

 public | users              | table    | postgres

 public | users_id_seq       | sequence | postgres

(7 rows)
Adding test data
Laravel comes with a nice facility to generate test data for its default schema. To generate users in the default schema, first uncomment the UsersTableSeeder reference in “myproject/database/seeds/DatabaseSeeder.php”:
# cat seeds/DatabaseSeeder.php

<?php


use Illuminate\Database\Seeder;


class DatabaseSeeder extends Seeder

{

    /**

     * Seed the application's database.

     *

     * @return void

     */

    public function run()

    {

        $this->call(UsersTableSeeder::class);

    }

}
Then, create a “UsersTableSeeder” class:
# php artisan make:seeder UsersTableSeeder
Update the newly-generated “myproject/database/seeds/UsersTableSeeder.php” so that the `run()` function looks like this:
    public function run()

    {

        factory(App\User::class, 10)->create();

    }
Finally, seed the database:
# php artisan db:seed

Seeding: UsersTableSeeder

Seeded:  UsersTableSeeder (0.05 seconds)

Database seeding completed successfully.
You can now look in the tables to see that data was generated:
postgres=# \x

Expanded display is on.

postgres=# SELECT * FROM users LIMIT 1;

-[ RECORD 1 ]-----+-------------------------------------------------------------

id                | 1

name              | Miss Yvonne Kunze

email             | hschuster@example.org

email_verified_at | 2019-12-03 01:30:57

password          | $2y$10$92IXUNpkjO0rOQ5byMi.Ye4oKoEa3Ro9llC/.og/at2.uheWG/igi

remember_token    | boCKVi9ydO

created_at        | 2019-12-03 01:30:57

updated_at        | 2019-12-03 01:30:57
Showing data in the browser
What’s the point of using Laravel if you can’t make a web page with it? Now that the data has been generated, you can display it in your browser. First, make sure the route exists:
# tail -n3  myproject/routes/web.php

Route::get('/', function () {

    return view('welcome', ['users' => App\User::all()]);

});
Next, replace the default welcome Blade with a simple listing of all users:
# cat resources/views/welcome.blade.php

<!doctype html>

<html>

    <head>

        <meta charset="utf-8">

        <meta name="viewport" content="width=device-width, initial-scale=1">


        <title>Users</title>

        <link rel="stylesheet" href="https://unpkg.com/tachyons@4.10.0/css/tachyons.min.css"/>

    </head>

    <body>

        <div class="mw6 center pa3 sans-serif">

            <h1 class="mb4">Users</h1>


            @foreach($users as $user)

            <div class="pa2 mb3 striped--near-white">

                <header class="b mb2">{{ $user->name }}</header>

                <div class="pl2">

                    <p class="mb2">id: {{ $user->id }}</p>

                    <p class="mb2">email: {{ $user->email }}</p>

                    <p class="mb2">details: {{ $user->remember_token }}</p>

                </div>

            </div>

            @endforeach

        </div>

    </body>

</html>
This code pulls all the users out of the database and prints each one out to the screen. From within the “myproject” directory, call “php artisan serve” and point your browser to http://127.0.0.1:8000. You should see this result:

Note: If you are using a virtualization engine like Docker or Vagrant, you may need to add “--host=0.0.0.0” and a custom port number (“--port=5000” in the screenshot above) in order to route traffic to your VM properly.
Creating new tables
To expand the schema, you simply need to create a migration and fill in the blanks. For example, to create a Cars table, first create a migration:
# cd myproject

# php artisan make:model -f -m Cars
Then, edit the “myproject/database/migrations/*_create_cars_table.php” and fill in “Schema::create”:
# cat database/migrations/2019_12_03_083214_create_cars_table.php

…

        Schema::create('cars', function (Blueprint $table) {

            $table->bigIncrements('id');

            $table->string('make');

            $table->string('model');

            $table->integer('year');

            $table->timestamps();

        });

…
To autogenerate Car information, edit the factory:
# cat database/factories/CarsFactory.php

<?php


/** @var \Illuminate\Database\Eloquent\Factory $factory */


use App\Cars;

use Faker\Generator as Faker;


$factory->define(Cars::class, function (Faker $faker) {

    return [

        'make' => $faker->company,

        'model' => $faker->word,

        'year' => $faker->randomNumber,

    ];

});
Then, create the seeder and edit it:
# php artisan make:seeder CarsTableSeeder

Seeder created successfully.

# cat database/seeds/CarsTableSeeder.php

<?php


use Illuminate\Database\Seeder;


class CarsTableSeeder extends Seeder

{

    /**

     * Run the database seeds.

     *

     * @return void

     */

    public function run()

    {

        factory(App\Cars::class, 10)->create();

    }

}
Run the migration and seed the table:
# php artisan migrate --seed

Migrating: 2019_12_03_083214_create_cars_table

Migrated:  2019_12_03_083214_create_cars_table (0.01 seconds)

Seeding: UsersTableSeeder

Seeded:  UsersTableSeeder (0.06 seconds)

Seeding: CarsTableSeeder

Seeded:  CarsTableSeeder (0.01 seconds)

Database seeding completed successfully.
Add a route:
# tail -n 6 routes/web.php

Route::get('/', function () {

    return view('welcome', ['users' => App\User::all()]);

});

Route::get('/cars', function () {

    $cars = DB::table('cars')

               ->join('users', 'users.id', 'cars.id')

               ->select('users.name', 'users.email', 'cars.*')

               ->get();

    return view('cars', ['cars' => $cars]);

});
Create a template:
# cat resources/views/cars.blade.php

<!doctype html>

<html>

    <head>

        <meta charset="utf-8">

        <meta name="viewport" content="width=device-width, initial-scale=1">


        <title>Cars</title>

        <link rel="stylesheet" href="https://unpkg.com/tachyons@4.10.0/css/tachyons.min.css"/>

    </head>

    <body>

        <div class="mw6 center pa3 sans-serif">

            <h1 class="mb4">Cars</h1>


            @foreach($cars as $car)

            <div class="pa2 mb3 striped--near-white">

                <header class="b mb2">{{ $car->make }}</header>

                <div class="pl2">

                    <p class="mb2">model: {{ $car->model }}</p>

                    <p class="mb2">year: {{ $car->year }}</p>

                    <p class="mb2">owner: {{ $car->name }}</p>

                    <p class="mb2">email: {{ $car->email }}</p>

                </div>

            </div>

            @endforeach

        </div>

    </body>

</html>
Serve it up with “php artisan serve” and point your browser to http://127.0.0.1:8000/cars:
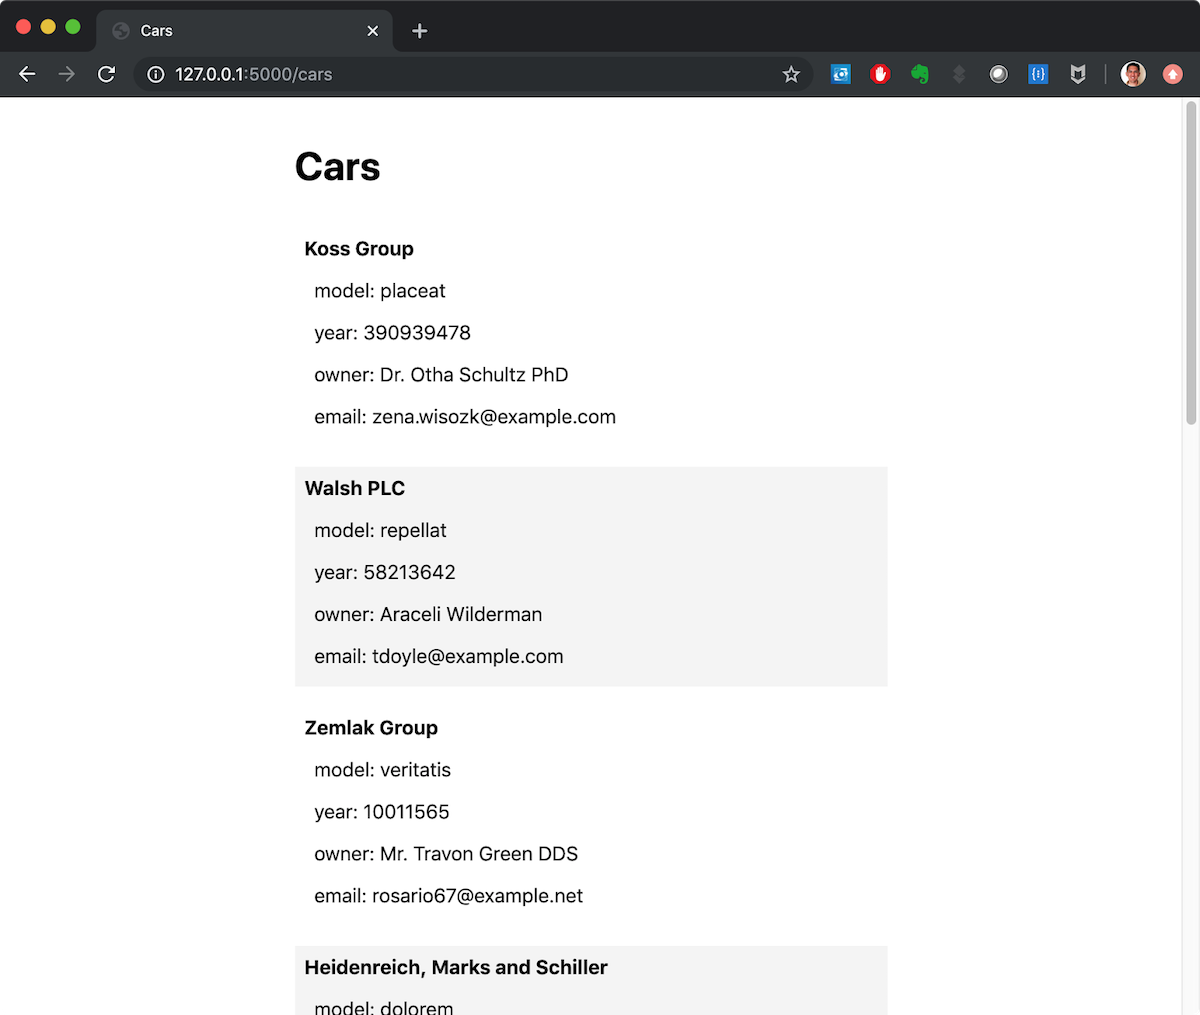
That’s all there is to it! Note that creating seeders is not entirely necessary, but can be very useful for demonstrating proof-of-concept and for testing. In the real world, you should define ways for Laravel to insert/update data in the database.
Notice also that when displaying the “Cars” information, we didn’t access the “Cars” class (i.e., in “routes/web.php”, we didn’t call “App/Cars” like we called “App/User”), but used the DB object to join with the “users” table. Laravel allows database access both by using the Query Builder and by the Eloquent ORM. Depending on the design of your app, you may wish to tightly join the Cars and Users tables by defining a One-to-One or One-To-Many relationship in Eloquent. This will not be covered here, but instructions are readily available in the Laravel documentation.
Related Content
BLOG POST
How to secure PostgreSQL
BLOG POST
Oracle to PostgreSQL Migration Guide
TUTORIAL
How to use Coalesce in PostgreSQL
BLOG POST
How to Monitor PostgreSQL Like a Pro!
BLOG POST
PostgreSQL Vs. MySQL