PostgreSQL Replication and Automatic Failover Tutorial
1. What Is PostgreSQL Replication?
The process of copying data from a PostgreSQL database server to another server is called PostgreSQL Replication. The source database server is usually called the Master server, whereas the database server receiving the copied data is called the Replica server.

2. What Is Automatic Failover in PostgreSQL?
Once physical streaming replication has been set up and configured in PostgreSQL, failover can take place if the primary server for the database fails. Failover is the term to describe the recovery process, which in PostgreSQL, can take some time, particularly as PostgreSQL itself does not provide built-in tools for detecting server failures. Fortunately, there are tools available that allow for Automatic Failover, which can help detect failures and automatically switch to the standby, minimizing database downtime.
EnterpriseDB’s EDB Postgres Failover Manager lets you automatically detect database failures and promotes the most current standby server as the new master, helping to avoid costly database downtime. EDB Failover Manager even provides fast, automatic failure detection.
3. High Availability and Failover Replication
High Availability refers to database systems that are set up so that standby servers can take over quickly when the master or primary server fails. To achieve high availability, a database system should meet some key requirements: it should have redundancy to prevent single points of failure, reliable switchover mechanisms, and active monitoring to detect any failures that may occur. Setting up failover replication provides the needed redundancy to allow for high availability by ensuring that standbys are available if the master or primary server ever goes down.
4. Why Use PostgreSQL Replication?
Replication of data can have many uses:
- OLTP Performance
- Fault Tolerance
- Data Migration
- Testing Systems in Parallel
OLTP performance: Removing reporting query load from the online transaction processing (OLTP) system improves both reporting query time and transaction processing performance.
Fault tolerance: In the event of master database server failure, the replica server can take over, since it already contains the master server’s data. In this configuration the replica server is also called the standby server. This configuration can also be used for regular maintenance of the primary server.
Data migration: To upgrade database server hardware, or to deploy the same system for another customer.
Testing systems in parallel: When porting the application from one DBMS to another, the results on the same data from both the old and new systems must be compared to ensure that the new system works as expected.
EnterpriseDB’s EDB Postgres Replication Server makes managing Postgres replication easy, offering all the benefits replication provides.
5. What Are the Models of PostgreSQL Database Replication (Single-Master & Multi-Master)?
- Single-Master Replication (SMR)
- Multi-Master Replication (MMR)
In Single-Master Replication (SMR), changes to table rows in a designated master database server are replicated to one or more replica servers. The replicated tables in the replica database are not permitted to accept any changes (except from the master). But even if they do, changes are not replicated back to the master server.
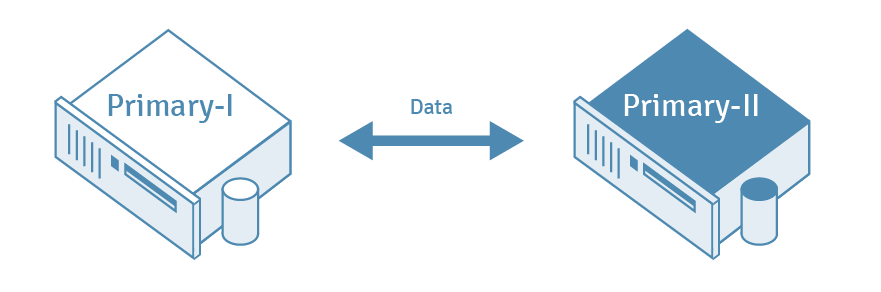
In Multi-Master Replication (MMR), changes to table rows in more than one designated master database are replicated to their counterpart tables in every other master database. In this model conflict resolution schemes are often employed to avoid problems like duplicate primary keys.
Multi-Master Replication (MMR) adds to the uses of replication:
- Write availability and scalability.
- Ability to employ a wide area network (WAN) of master databases that can be geographically close to groups of clients, yet maintain data consistency across the network.
6. What Are the Classes of PostgreSQL Replication?
- Unidirectional Replication
- Bidirectional Replication
Single-Master Replication is also called unidirectional, since replication data flows in one direction only, from master to replica.
Multi-Master Replication data, on the other hand, flows in both directions, and it is therefore called bidirectional replication.
7. What Are the Replication Modes in PostgreSQL Database?
- Asynchronous Mode of Replication
- Synchronous Mode of Replication
In synchronous mode replication, transactions on the master database are declared complete only when those changes have been replicated to all the replicas. The replica servers must all be available all the time for the transactions to complete on the master.
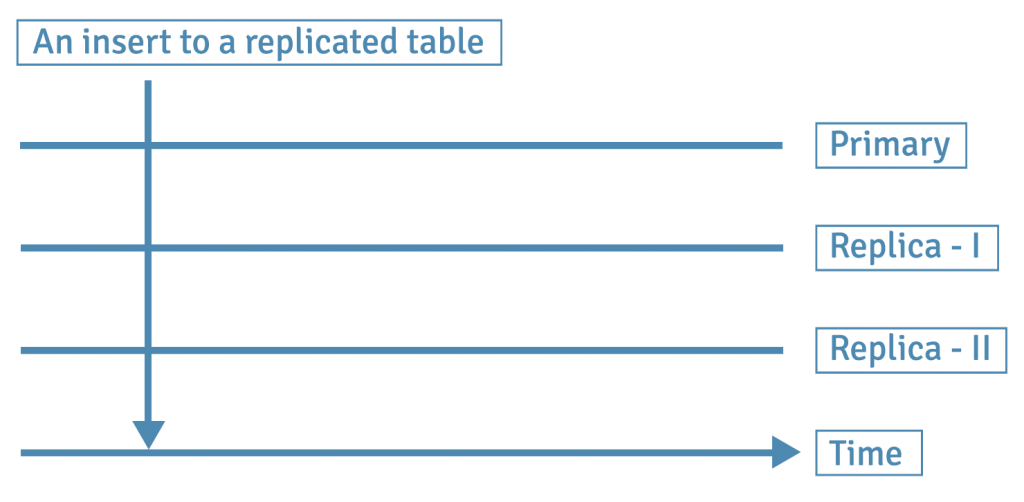
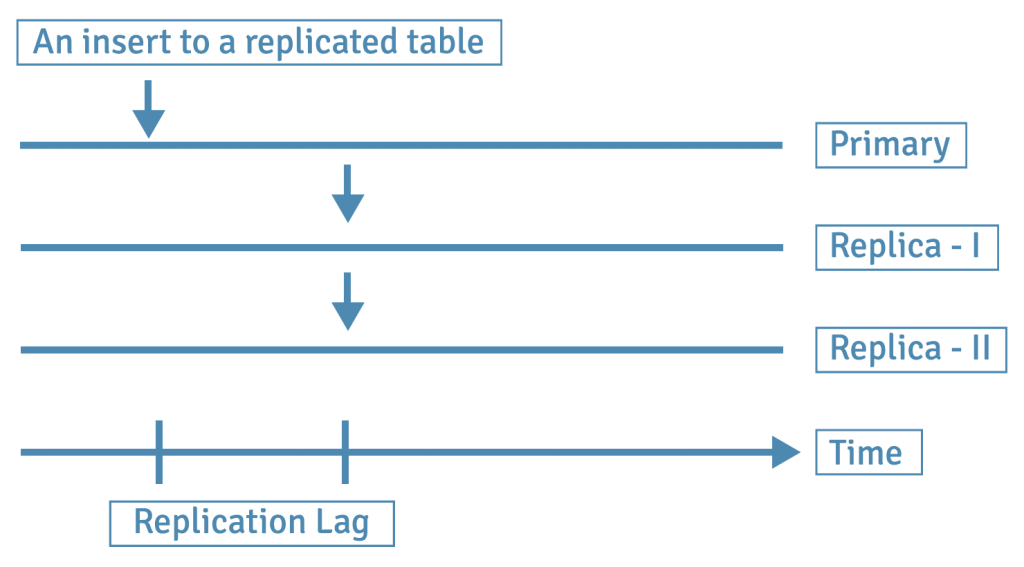
In asynchronous mode, transactions on the master server can be declared complete when the changes have been done on just the master server. These changes are then replicated to the replicas later in time. The replica servers can remain out-of-sync for a certain duration, which is called a replication lag.
Synchronous and asynchronous modes both have their costs and benefits, and users will want to consider safety and performance when configuring their replication settings.
8. What Are the Types of PostgreSQL Database Replication?
- Physical Replication of PostgreSQL Database
- Logical Replication of PostgreSQL Database
Before we discuss physical and logical replication types, let’s review the context of the terms “physical” and “logical” here.
| Logical Operation | Physical Operation | |
|---|---|---|
| 1 | initdb | Creates a base directory for the cluster |
| 2 | CREATE DATABASE | Creates a subdirectory in the base directory |
| 3 | CREATE TABLE | Creates a file within the subdirectory of the database |
| 4 | INSERT | Changes the file that was created for this particular table and writes new WAL records in the current WAL segment |
For example:
ramp=# create table sample_tbl(a int, b varchar(255));
CREATE TABLE
ramp=# SELECT pg_relation_filepath('sample_tbl');
 pg_relation_filepath
----------------------
 base/34740/706736
(1 row)
ramp=# SELECT datname, oid FROM pg_database WHERE datname = 'ramp';
 datname |  oid
---------+-------
 ramp    | 34740
(1 row)
ramp=# SELECT relname, oid FROM pg_class WHERE relname = 'sample_tbl';
  relname   |  oid
------------+--------
 sample_tbl | 706736
(1 row)
Physical replication deals with files and directories. It has no knowledge of what these files and directories represent. Physical replication is done at file system level or disk level.
Logical replication, on the other hand, deals with databases, tables, and DML operations. It is therefore possible in logical replication to replicate a certain set of tables only. Logical replication is done at the database cluster level.
9. Introduction to Write-Ahead Logging (WAL) in PostgreSQL Database
9.1 What is Write-Ahead Logging (WAL) in PostgreSQL and Why Is It Required?
In PostgreSQL, all changes made by a transaction are first saved in a log file, and then the result of the transaction is sent to the initiating client. Data files themselves are not changed on every transaction. This is a standard mechanism to prevent data loss in case of circumstances like operating system crash, hardware failure, or PostgreSQL crash. This mechanism is called Write Ahead Logging (WAL), and the log file is called Write Ahead Log.
Each change that the transaction performs (INSERT, UPDATE, DELETE, COMMIT) is written in the log as a WAL record. WAL records are first written into an in-memory WAL buffer. When the transaction is committed the records are written into a WAL segment file on the disk.
A WAL record’s Log Sequence Number (LSN) represents the location/position where the record is saved in the log file. LSN is used as a unique id of the WAL record. Logically, a transaction log is a file whose size is 2^64 bytes. LSN is therefore a 64-bit number represented as two 32-bit hexadecimal numbers separated by a /. For example:
select pg_current_wal_lsn();
 pg_current_wal_lsn
--------------------
 0/2BDBBD0
(1 row)
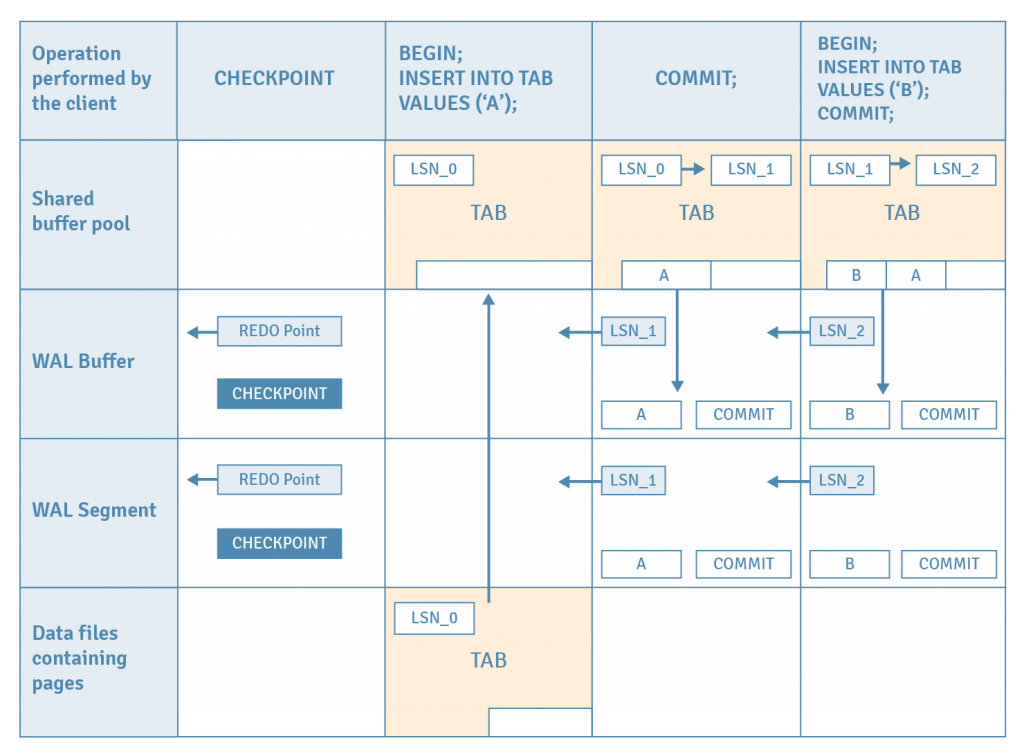
If there is a system crash, the database can recover committed transactions from the WAL. The recovery starts from the last REDO point or checkpoint. A checkpoint is a point in the transaction log at which all data files have been updated to match the information in the log. The process of saving the WAL records from the log file to the actual data files is called check-pointing.
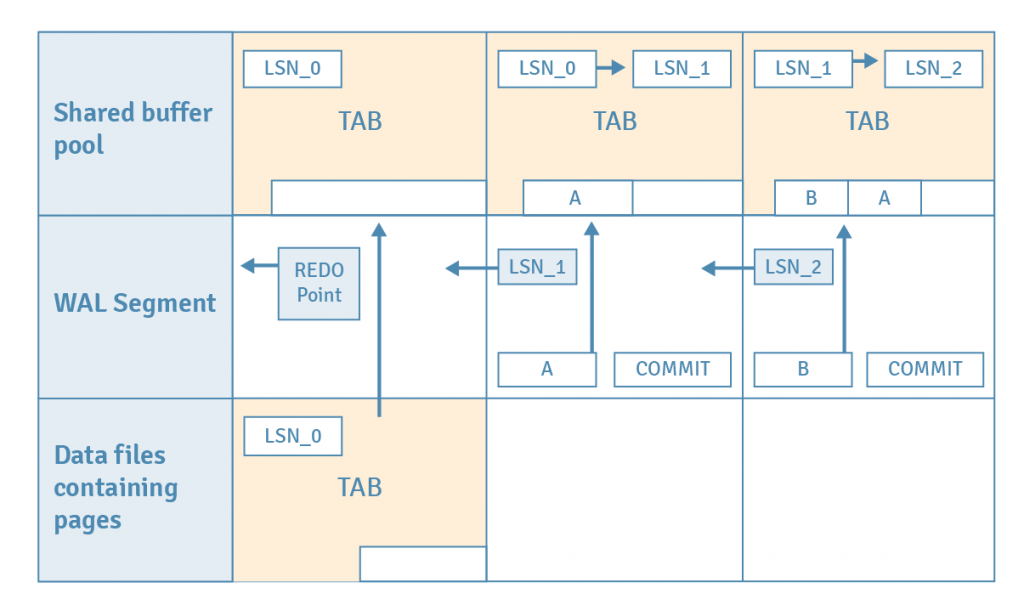
Let’s consider a case where the database crashes after two transactions that perform one insert each and WAL is used for recovery.
- Assume a checkpoint has been issued, which stores the location of the latest REDO point in the current WAL segment. This also flushes all dirty pages in the shared buffer pool to the disk. This action guarantees that WAL records before the REDO point are no longer needed for recovery, since all data has been flushed to the disk pages.
- The first INSERT statement is issued. The table’s page is loaded from disk to the buffer pool.
- A tuple is inserted into the loaded page.
- The WAL record of this insert is saved into the WAL buffer at location LSN_1.
- The page’s LSN is updated from LSN_0 to LSN_1, which identifies the WAL record for the last change to this page.
- The first COMMIT statement is issued.
- The WAL record of this commit action is written into the WAL buffer, and then all WAL records in the WAL buffer up to this page’s LSN are flushed to the WAL segment file.
- For the second INSERT and commit, steps 2 to 7 are repeated.
If there is an operating system crash, all the data on the shared buffer pool will be lost. However all modifications to the page have been written into the WAL segment files as history data. The following steps show how our database cluster can be restored back to the state immediately before the crash using WAL records. Nothing special needs to be done—PostgreSQL will automatically enter into recovery mode after restarting.
- PostgreSQL reads the WAL record of the first INSERT statement from the appropriate WAL segment file.
- PostgreSQL loads the table's page from the database cluster into the shared buffer pool.
- PostgreSQL compares the WAL record's LSN (LSN_1) with the page LSN (LSN_0). Since LSN_1 is greater than LSN_0, the tuple in the WAL record is inserted into the page and the page's LSN is updated to LSN_1.
The remaining WAL records are replayed in the similar manner.
10. What Are the Transaction Log and WAL Segment Files in PostgreSQL?
The PostgreSQL transaction log is a virtual file with a capacity of 8-byte length. Physically, the log is divided into 16-MB files, each of which is called a WAL segment.
The WAL segment file name is a 24-digit number whose naming rule is as follows:

Assuming that current time line ID is 0x00000001 the first WAL segment file names will be:
00000001 00000000 0000000
00000001 00000000 0000001
00000001 00000000 0000002
……….
00000001 00000001 0000000
00000001 00000001 0000001
00000001 00000001 0000002
…………
00000001 FFFFFFFF FFFFFFFD
00000001 FFFFFFFF FFFFFFFE
00000001 FFFFFFFF FFFFFFFF
For example:
select pg_walfile_name('0/2BDBBD0');
     pg_walfile_name
--------------------------
 000000010000000000000002
11. What Is the WAL Writer in PostgreSQL?
The WAL writer is a background process that periodically checks the WAL buffer and writes any unwritten WAL records into the WAL segments. The WAL writer avoids bursts of IO activity and instead spans its process over time with little IO activity. The configuration parameter wal_writer_delay controls how often the WAL writer flushes the WAL, with a default value of 200 ms.
12. WAL Segment File Management
12.1 Where WAL segment files are stored?
WAL segment files are stored in the pg_wal subdirectory.
12.2 What are the conditions when PostgreSQL switches to a new WAL segment file?
PostgreSQL switches to a new WAL segment file under the following conditions:
- The WAL segment has been filled up.
- The function pg_switch_wal has been issued.
- archive_mode is enabled and the time set to archive_timeout has been exceeded.
After they are switched out, WAL files can either be removed or recycled—i.e., renamed and reused for the future. The number of WAL files that the server would retain at any point in time depends on server configuration and server activity.
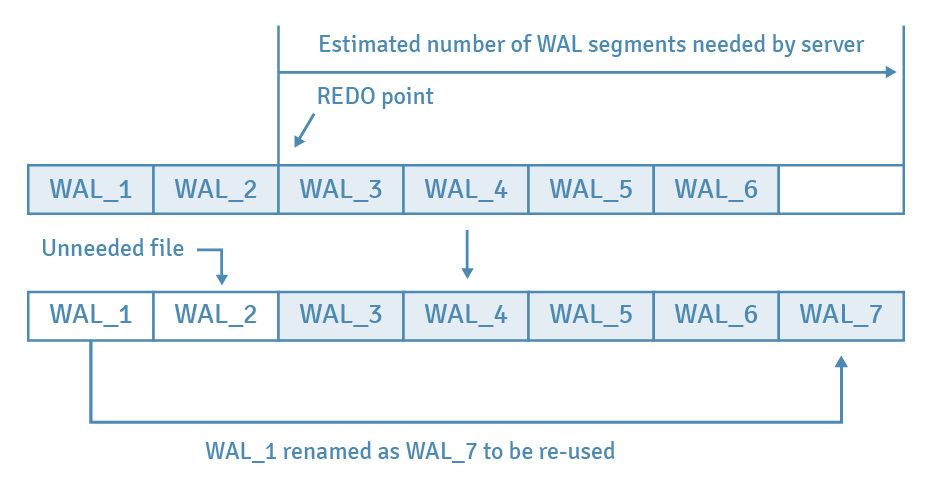
Whenever the checkpoint starts, PostgreSQL estimates and prepares the number of WAL segment files required for this checkpoint cycle. Such an estimate is made based on the numbers of files consumed in previous checkpoint cycles. They are counted from the segment that contains the prior REDO point, and the value is to be between min_wal_size (by default, 80 MB, or 5 files) and max_wal_size (1 GB, or 64 files). If a checkpoint starts, necessary files will be held and recycled, while the unnecessary ones will be removed.
An example is provided in the diagram below. Assume that there are six files before checkpoint starts, the previous REDO point is contained in the file WAL_3, and PostgreSQL estimates that five files are to be retained. In this case, WAL_1 will be renamed as WAL_7 for recycling, and WAL_2 will be removed.
13. Write-Ahead Logging (WAL) Example for PostgreSQL
Step 1:
SELECT datname, oid FROM pg_database WHERE datname = 'postgres';
datname  |  oid
----------+-------
postgres | 15709
Note the database OID, i.e. 15709
Step 2:
SELECT oid,* from pg_tablespace;
oid  |  spcname   | spcowner | spcacl | spcoptions
------+------------+----------+--------+------------
1663 | pg_default |       10 |        |
1664 | pg_global  |       10 |        |
Note the table space OID, i.e. 1663
Step 3:
SELECT pg_current_wal_lsn();
pg_current_wal_lsn
--------------------
0/1C420B8
Note the LSN, i.e. 0/1C420B8
Step 4:
CREATE TABLE abc(a VARCHAR(10));Step 5:
SELECT pg_relation_filepath('abc');
pg_relation_filepath
----------------------
base/15709/16384
Note the relation filename, base/15709/16384
Step 6:
View the contents of the files at ./pg_waldump --path=/tmp/sd/pg_wal –start=0/1C420B8
Using the start LSN noted in step 3.
Note that the WAL contains the instruction to create physical file
15709 → database postgres → noted in step 1
16384 → table abc → noted in step 5
| rmgr | Len(rec/tot) | tx | lsn | prev | desc |
| XLOG | 30/ 30 | 0 | 0/01C420B8 | 0/01C42080 | NEXTOID 24576 |
| Storage | 42/ 42 | 0 | 0/01C420D8 | 0/01C420B8 | CREATE base/15709/16384 |
| Heap | 203/203 | 1216 | 0/01C42108 | 0/01C420D8 | INSERT off 2, blkref #0: rel 1663/15709/1247 blk 0 |
| Btree | 64/ 64 | 1216 | 0/01C421D8 | 0/01C42108 | INSERT_LEAF off 298, blkref #0: rel 1663/15709/2703 blk 2 |
| Btree | 64/ 64 | 1216 | 0/01C42218 | 0/01C421D8 | INSERT_LEAF off 7, blkref #0: rel 1663/15709/2704 blk 5 |
| Heap | 80/ 80 | 1216 | 0/01C42258 | 0/01C42218 | INSERT off 30, blkref #0: rel 1663/15709/2608 blk 9 |
| Btree | 72/ 72 | 1216 | 0/01C422A8 | 0/01C42258 | INSERT_LEAF off 243, blkref #0: rel 1663/15709/2673 blk 51 |
| Btree | 72/ 72 | 1216 | 0/01C422F0 | 0/01C422A8 | INSERT_LEAF off 170, blkref #0: rel 1663/15709/2674 blk 61 |
| Heap | 203/203 | 1216 | 0/01C42338 | 0/01C422F0 | INSERT off 6, blkref #0: rel 1663/15709/1247 blk 1 |
| Btree | 64/64 | 1216 | 0/01C42408 | 0/01C42338 | INSERT_LEAF off 298, blkref #0: rel 1663/15709/2703 blk 2 |
| Btree | 72/ 72 | 1216 | 0/01C42448 | 0/01C42408 | INSERT_LEAF off 3, blkref #0: rel 1663/15709/2704 blk 1 |
| Heap | 80/ 80 | 1216 | 0/01C42490 | 0/01C42448 | INSERT off 36, blkref #0: rel 1663/15709/2608 blk 9 |
| Btree | 72/ 72 | 1216 | 0/01C424E0 | 0/01C42490 | INSERT_LEAF off 243, blkref #0: rel 1663/15709/2673 blk 51 |
| Btree | 72/ 72 | 1216 | 0/01C42528 | 0/01C424E0 | INSERT_LEAF off 97, blkref #0: rel 1663/15709/2674 blk 57 |
| Heap | 199/199 | 1216 | 0/01C42570 | 0/01C42528 | INSERT off 2, blkref #0: rel 1663/15709/1259 blk 0 |
| Btree | 64/ 64 | 1216 | 0/01C42638 | 0/01C42570 | INSERT_LEAF off 257, blkref #0: rel 1663/15709/2662 blk 2 |
| Btree | 64/ 64 | 1216 | 0/01C42678 | 0/01C42638 | INSERT_LEAF off 8, blkref #0: rel 1663/15709/2663 blk 1 |
| Btree | 64/ 64 | 1216 | 0/01C426B8 | 0/01C42678 | INSERT_LEAF off 217, blkref #0: rel 1663/15709/3455 blk 5 |
| Heap | 171/171 | 1216 | 0/01C426F8 | 0/01C426B8 | INSERT off 53, blkref #0: rel 1663/15709/1249 blk 16 |
| Btree | 64/ 64 | 1216 | 0/01C427A8 | 0/01C426F8 | INSERT_LEAF off 185, blkref #0: rel 1663/15709/2658 blk 25 |
| Btree | 64/ 64 | 1216 | 0/01C427E8 | 0/01C427A8 | INSERT_LEAF off 194, blkref #0: rel 1663/15709/2659 blk 16 |
| Heap | 171/171 | 1216 | 0/01C42828 | 0/01C427E8 | INSERT off 54, blkref #0: rel 1663/15709/1249 blk 16 |
| Btree | 72/ 72 | 1216 | 0/01C428D8 | 0/01C42828 | INSERT_LEAF off 186, blkref #0: rel 1663/15709/2658 blk 25 |
| Btree | 64/ 64 | 1216 | 0/01C42920 | 0/01C428D8 | INSERT_LEAF off 194, blkref #0: rel 1663/15709/2659 blk 16 |
| Heap | 171/171 | 1216 | 0/01C42960 | 0/01C42920 | INSERT off 55, blkref #0: rel 1663/15709/1249 blk 16 |
| Btree | 72/ 72 | 1216 | 0/01C42A10 | 0/01C42960 | INSERT_LEAF off 187, blkref #0: rel 1663/15709/2658 blk 25 |
| Btree | 64/ 64 | 1216 | 0/01C42A58 | 0/01C42A10 | INSERT_LEAF off 194, blkref #0: rel 1663/15709/2659 blk 16 |
| Heap | 171/171 | 1216 | 0/01C42A98 | 0/01C42A58 | INSERT off 1, blkref #0: rel 1663/15709/1249 blk 17 |
| Btree | 72/ 72 | 1216 | 0/01C42B48 | 0/01C42A98 | INSERT_LEAF off 186, blkref #0: rel 1663/15709/2658 blk 25 |
| Btree | 64/ 64 | 1216 | 0/01C42B90 | 0/01C42B48 | INSERT_LEAF off 194, blkref #0: rel 1663/15709/2659 blk 16 |
| Heap | 171/171 | 1216 | 0/01C42BD0 | 0/01C42B90 | INSERT off 3, blkref #0: rel 1663/15709/1249 blk 17 |
| Btree | 72/ 72 | 1216 | 0/01C42C80 | 0/01C42BD0 | INSERT_LEAF off 188, blkref #0: rel 1663/15709/2658 blk 25 |
| Btree | 64/ 64 | 1216 | 0/01C42CC8 | 0/01C42C80 | INSERT_LEAF off 194, blkref #0: rel 1663/15709/2659 blk 16 |
| Heap | 171/171 | 1216 | 0/01C42D08 | 0/01C42CC8 | INSERT off 5, blkref #0: rel 1663/15709/1249 blk 17 |
| Btree | 72/ 72 | 1216 | 0/01C42DB8 | 0/01C42D08 | INSERT_LEAF off 186, blkref #0: rel 1663/15709/2658 blk 25 |
| Btree | 64/ 64 | 1216 | 0/01C42E00 | 0/01C42DB8 | INSERT_LEAF off 194, blkref #0: rel 1663/15709/2659 blk 16 |
| Heap | 171/171 | 1216 | 0/01C42E40 | 0/01C42E00 | INSERT off 30, blkref #0: rel 1663/15709/1249 blk 32 |
| Btree | 72/ 72 | 1216 | 0/01C42EF0 | 0/01C42E40 | INSERT_LEAF off 189, blkref #0: rel 1663/15709/2658 blk 25 |
| Btree | 64/ 64 | 1216 | 0/01C42F38 | 0/01C42EF0 | INSERT_LEAF off 194, blkref #0: rel 1663/15709/2659 blk 16 |
| Heap | 80/ 80 | 1216 | 0/01C42F78 | 0/01C42F38 | INSERT off 25, blkref #0: rel 1663/15709/2608 blk 11 |
| Btree | 72/ 72 | 1216 | 0/01C42FC8 | 0/01C42F78 | INSERT_LEAF off 131, blkref #0: rel 1663/15709/2673 blk 44 |
| Btree | 72/ 72 | 1216 | 0/01C43010 | 0/01C42FC8 | INSERT_LEAF off 66, blkref #0: rel 1663/15709/2674 blk 46 |
| Standby | 42/ 42 | 1216 | 0/01C43058 | 0/01C43010 | LOCK xid 1216 db 15709 rel 16384 |
| Txn | 405/405 | 1216 | 0/01C43088 | 0/01C43058 | COMMIT 2019-03-04 07:42:23.165514 EST;... snapshot 2608 relcache 16384 |
| Standby | 50/ 50 | 0 | 0/01C43220 | 0/01C43088 | RUNNING_XACTS nextXid 1217 latestCompletedXid 1216 oldestRunningXid 1217 |
Step 7:
SELECT pg_current_wal_lsn();
 pg_current_wal_lsn
--------------------
 0/1C43258
(1 row)
Step 8:
INSERT INTO abc VALUES('pkn');Step 9:
./pg_waldump --path=/tmp/sd/pg_wal --start=0/1C43258
using the start LSN from step 7.
1663 → pg_default tablespace → noted in step 2
15709 → database postgres → noted in step 1
16384 → table abc → noted in step 5
| rmgr | Len (rec/tot) | tx | lsn | prev | desc |
| Heap | 59/59 | 1217 | 0/01C43258 | 0/01C43220 | INSERT+INIT off 1, blkref #0: rel 1663/15709/16384 blk 0 |
| Transaction | 34/34 | 1217 | 0/01C43298 | 0/01C43258 | COMMIT 2019-03-04 07:43:45.887511 EST |
| Standby | 54/54 | 0 | 0/01C432C0 | 0/01C43298 | RUNNING_XACTS nextXid 1218 latestCompletedXid 1216 oldestRunningXid 1217; 1 xacts: 1217 |
Step 10:
SELECT pg_current_wal_lsn();
 pg_current_wal_lsn
--------------------
 0/1C432F8
(1 row)
Step 11:
INSERT INTO abc VALUES('ujy');Step 12:
./pg_waldump --path=/tmp/sd/pg_wal –start=0/1C432F8
Using the start LSN from step 10.
| rmgr | Len (rec/tot) | tx | lsn | prev | desc |
| Heap | 59/59 | 1218 | 0/01C432F8 | 0/01C432C0 | INSERT off 2, blkref #0: rel 1663/15709/16384 blk 0 |
| Transaction | 34/34 | 1218 | 0/01C43338 | 0/01C432F8 | COMMIT 2019-03-04 07:44:25.449151 EST |
| Standby | 50/50 | 0 | 0/01C43360 | 0/01C43338 | RUNNING_XACTS nextXid 1219 latestCompletedXid 1218 oldestRunningXid 1219 |
Step 13: Check the actual tuples in the WAL segment files.
---------+---------------------------------------------------+----------------+
 Offset  | Hex Bytes                                         | ASCII chars    |
---------+---------------------------------------------------+----------------+
00000060 | 3b 00 00 00 c3 04 00 00  28 00 40 02 00 00 00 00  |;.......(.@.....|
00000070 | 00 0a 00 00 ec 28 75 6e  00 20 0a 00 7f 06 00 00  |.....(un. ......|
00000080 | 5d 3d 00 00 00 40 00 00  00 00 00 00 ff 03 01 00  |]=...@..........|
00000090 | 02 08 18 00 09 70 6b 6e  03 00 00 00 00 00 00 00  |.....pkn........|
000000a0 | 22 00 00 00 c3 04 00 00  60 00 40 02 00 00 00 00  |".......`.@.....|
000000b0 | 00 01 00 00 dd 4c 87 04  ff 08 e4 73 44 e7 41 26  |.....L.....sD.A&|
000000c0 | 02 00 00 00 00 00 00 00  32 00 00 00 00 00 00 00  |........2.......|
000000d0 | a0 00 40 02 00 00 00 00  10 08 00 00 9e 01 36 88  |..@...........6.|
000000e0 | ff 18 00 00 00 00 00 00  00 00 00 03 00 00 c4 04  |................|
000000f0 | 00 00 c4 04 00 00 c3 04  00 00 00 00 00 00 00 00  |................|
00000100 | 3b 00 00 00 c4 04 00 00  c8 00 40 02 00 00 00 00  |;.........@.....|
00000110 | 00 0a 00 00 33 df b4 71  00 20 0a 00 7f 06 00 00  |....3..q. ......|
00000120 | 5d 3d 00 00 00 40 00 00  00 00 00 00 ff 03 01 00  |]=...@..........|
00000130 | 02 08 18 00 09 75 6a 79  04 00 00 00 00 00 00 00  |.....ujy........|
00000140 | 22 00 00 00 c4 04 00 00  00 01 40 02 00 00 00 00  |".........@.....|
00000150 | 00 01 00 00 96 2e 96 a6  ff 08 d8 f3 79 ed 41 26  |............y.A&|
00000160 | 02 00 00 00 00 00 00 00  32 00 00 00 00 00 00 00  |........2.......|
00000170 | 40 01 40 02 00 00 00 00  10 08 00 00 eb 6b 95 36  |@.@..........k.6|
00000180 | ff 18 00 00 00 00 00 00  00 00 00 03 00 00 c5 04  |................|
00000190 | 00 00 c5 04 00 00 c4 04  00 00 00 00 00 00 00 00  |................|
000001a0 | 00 00 00 00 00 00 00 00  00 00 00 00 00 00 00 00  |................|
14. What Are The Replication Options Based on WAL in PostgreSQL?
- Continuous WAL Archiving
- Log Shipping Based Replication — File Level
- Log Shipping Based Replication — Block Level
14.1 Continuous WAL Archiving
Copying WAL files as they are generated into any location other than the pg_wal subdirectory for the purpose of archiving them is called WAL archiving. PostgreSQL will invoke a script provided by the user for archiving each time a WAL file is generated. The script can use the scp command to copy the file to one or more locations. The location can be an NFS mount. Once archived the WAL segment files can be used to recover the database at any specified point in time.
14.2 Log Shipping Based Replication — File Level
Copying log files to another PostgreSQL server for the purpose of creating another standby server by replaying WAL files is called Log Shipping. This standby server is configured to be in recovery mode, and its sole purpose is to apply any new WAL files as they arrive. This second server (also termed as standby) then becomes a warm backup of the primary PostgreSQL server. The standby can also be configured to be a read replica, where it can also serve read-only queries. This is called a hot standby.
14.3 Log Shipping Based Replication — Block Level
Streaming replication improves the log shipping process. Instead of waiting for the WAL switch, the records are sent as they are generated, thus reducing replication delay. Another improvement is that the standby server will connect to the primary server over the network using a replication protocol. The primary server can then send WAL records directly over this connection without having to rely on scripts provided by the end user.
14.4 How long should the primary server retain WAL segment files?
If there aren’t any streaming replication clients, the server can discard/recycle the WAL segment file once the archive script reports success, if they are not required for crash recovery.
The presence of standby clients, though, creates a problem: the server needs to keep WAL files around for as long as the slowest standby needs them. If, for example, the standby was taken down for a while, then comes back online and asks the primary for a WAL file that the primary no longer has, the replication fails with an error similar to:
ERROR: requested WAL segment 00000001000000010000002D has already been removed
The primary server should therefore keep track of how far behind the standby is, and not delete/recycle WAL files that any standbys still need. This feature is provided through replication slots.
Each replication slot has a name which is used to identify the slot. Each slot is associated with:
- The oldest WAL segment file required by the consumer of the slot. WAL segment files more recent than this are not deleted/recycled during checkpoints.
- The oldest transaction ID required to be retained by the consumer of the slot. Rows needed by any transactions more recent than this are not deleted by vacuum.
15. Log Shipping Based Replication
15.1 Physical Streaming Replication
Physical Streaming Replication in PostgreSQL database is the data replication based on WAL. In streaming replication the standby server connects to the primary server and receives WAL records using a replication protocol.
What are the advantages of physical streaming replication?
- The standby server does not need to wait for the WAL file to fill up, which improves replication lag.
- The dependency on the user-provided script and an intermediate shared storage between the servers is removed.
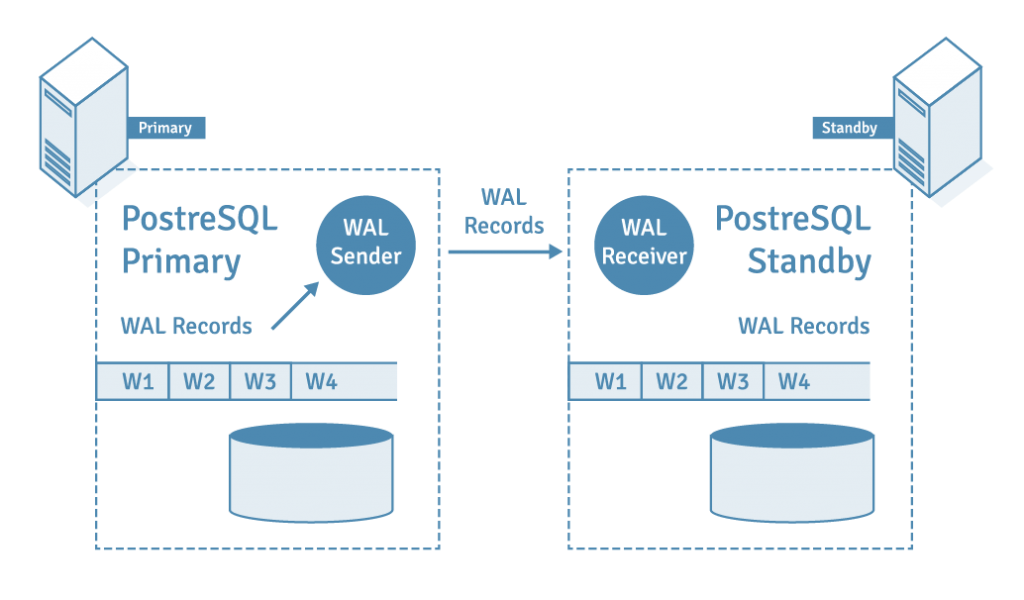
16. What Are WAL Sender and WAL Receiver in PostgreSQL?
A process called WAL receiver, running on the standby server, uses the connection details provided in the primary_conninfo parameter of recovery.conf and connects to the primary server using a TCP/IP connection.
WAL sender is another process running on the primary server and is in charge of sending the WAL records to the standby server as they are generated. The WAL receiver saves the WAL records in WAL as if they were generated by client activity of locally connected clients. Once the WAL records reach the WAL segment files the standby server constantly keeps replaying the WAL so that standby and primary are up to date.
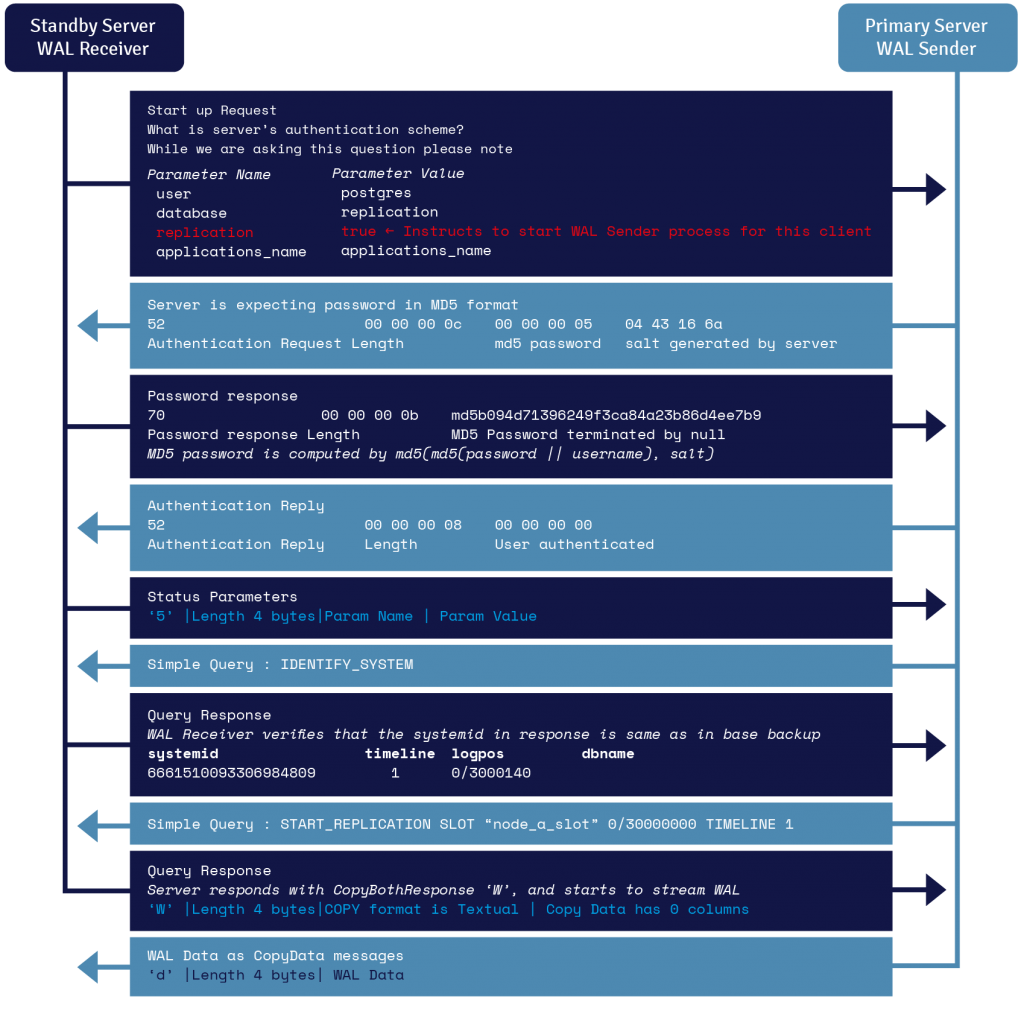
16.1 WAL Streaming Protocol Details
17. PostgreSQL Replication and Failover Over Setup
The setup consists of two CentOS 7 machines connected via LAN on which PostgreSQL version 10.7 is installed.
17.1 Configuring PostgreSQL Replication using WAL Streaming
Step 1: Disable and stop firewall on both the machines:
sudo firewall-cmd --state
sudo systemctl stop firewalld
sudo systemctl disable firewalld
sudo systemctl mask --now firewalld
Step 2: On the primary server, allow replication connections and connections from the same network. Modify pg_hba.conf:
Local  all           all                       md5
host   all           all   172.16.214.167/24   md5
host   all           all   ::1/128             md5
local  replication   all                       md5
host   replication   all   172.16.214.167/24   md5
host   replication   all   ::1/128             md5
Step 3: On the primary server, edit postgresql.conf to modify the following parameters:
max_wal_senders = 10
wal_level = replica
max_replication_slots = 10
synchronous_commit = on
synchronous_standby_names = '*'
listen_addresses = '*'
Step 4: Start the primary server:
./postgres -D ../pr_data -p 5432Step 5: Take base backup to bootstrap the standby server:
./pg_basebackup
--pgdata=/tmp/sb_data/
--format=p
--write-recovery-conf
--checkpoint=fast
--label=mffb
--progress
--verbose
--host=172.16.214.167
--port=5432
--username=postgres
Step 6: Check the base backup label file:
START WAL LOCATION: 0/2000028 (file 000000010000000000000002)
CHECKPOINT LOCATION: 0/2000060
BACKUP METHOD: streamed
BACKUP FROM: master
START TIME: 2019-02-24 05:25:30 EST
LABEL: mffb
Step 7: In the base backup, add the following line in the recovery.conf:
primary_slot_name = 'node_a_slot'Step 8: Check the /tmp/sb_data/recovery.conf file
standby_mode = 'on'
primary_conninfo = 'user=enterprisedb
password=abc123
host=172.16.214.167
port=5432
sslmode=prefer
sslcompression=1
krbsrvname=postgres
target_session_attrs=any'
primary_slot_name = 'node_a_slot'
Step 9: Connect to the primary server and issue this command:
edb=# SELECT * FROM pg_create_physical_replication_slot('node_a_slot');
      slot_name  | xlog_position
    -------------+---------------
     node_a_slot |
    (1 row)
edb=# SELECT slot_name, slot_type, active FROM pg_replication_slots;
      slot_name  | slot_type | active
    -------------+-----------+--------
     node_a_slot | physical  | f
    (1 row)
Step 10: Transfer the base backup to the standby server:
scp /tmp/sb_data.tar.gz abbas@172.16.214.166:/tmp
sudo mv /tmp/sb_data /opt/PostgreSQL/10/
sudo chown postgres:postgres /opt/PostgreSQL/10/sb_data/
sudo chown -R postgres:postgres /opt/PostgreSQL/10/sb_data/
sudo chmod 700 /opt/PostgreSQL/10/sb_data/
Step 11: Start the standby server:
./postgres -D ../sb_data/ -p 5432
The primary will show this in the log:
LOG: standby "walreceiver" is now a synchronous standby with priority 1
The standby will show:
LOG: database system was interrupted; last known up at 2018-10-24 15:49:55
LOG: entering standby mode
LOG: redo starts at 0/3000028
LOG: consistent recovery state reached at 0/30000F8
LOG: started streaming WAL from primary at 0/4000000 on timeline 1
Step 12: Connect to the primary server and issue some simple commands:
-bash-4.2$ ./edb-psql -p 5432 edb
Password:
psql.bin (10.7)
Type "help" for help.
create table abc(a int, b varchar(250));
insert into abc values(1,'One');
insert into abc values(2,'Two');
insert into abc values(3,'Three');
Step 13: Check the data on the replica:
./psql -p 5432 -U postgres postgres
Password for user postgres:
psql.bin (10.7)
Type "help" for help.
postgres=# select * from abc;
a |   b
---+-------
1 | One
2 | Two
3 | Three
(3 rows)
18. What are the PostgreSQL Manual Failover Steps?
Step 1: Crash the primary server.
Step 2: Promote the standby server by running the following command on the standby server:
./pg_ctl promote -D ../sb_data/
server promoting
Step 3: Connect to the promoted standby server and insert a row:
-bash-4.2$ ./edb-psql -p 5432 edb
Password:
psql.bin (10.7)
Type "help" for help.
edb=# insert into abc values(4,'Four');
The fact that this insert works fine means that the standby, which otherwise is a read-only server, has been promoted as the new primary server.
19. How to Automate Failover and Replication in PostgreSQL
Setting up automatic failover is easy using EDB Postgres Failover Manager (EFM). After downloading and installing EFM on each master and standby node, you can create an EFM Cluster, which consists of a Master node, one or more Standby nodes, and an optional Witness node that confirms assertions in case of failure.
EFM continuously monitors system health and sends email alerts based on system events. When a failure occurs, it automatically switches over to the most up-to-date standby, and reconfigures all other standby servers to recognize the new master. It also reconfigures load balancers (such as pgPool) and prevents “split brain” (when two nodes each think they are primary) from occurring.
20. repmgr for PostgreSQL
Another open source tool is repmgr (Replication Manager), which also manages replication and failover for PostgreSQL clusters. EDB has provided an in-depth tutorial for installing and running repmgr for PostgreSQL. When correctly configured, repmgr can detect when the master server fails and perform automatic failover.
Related Tutorials
How to implement repmgr for PostgreSQL automatic failover
Ranjeet Dhumal · March 23, 2020
This article discusses the open source tool repmgr (Replication Manager) and how to set up and configure it for automatic failover in PostgreSQL.
Logical Replication in PostgreSQL Explained
Kuntal Ghosh · December 4, 2019
This post discusses logical replication in PostgreSQL. It reviews the differences between physical or binary replication and logical or transactional replication.
How to manage Replication and Failover in Postgres Version 12 without recovery.conf file
Tushar Ahuja · November 6, 2019
With PostgreSQL v12, “recovery.conf” is no longer valid. Even if someone were to create a recovery.conf file manually and keep it under the data directory, the server is not going to start and will throw the following error
Scalable Replication for Postgres
Zahid Iqbal · September 11, 2019
Scalable Replication Tools Scalable replication tools are a key component for Postgres data integration and migration. Compatible with data from...
Switchover/Failover and Session Migration
Bruce Momjian · October 5, 2018
I have already covered switchover and failover. In the case of failover, the old primary is offline so there are no options for migrating clients from the old primary to the new primary. If there is a switchover, there are options for client migration. Assuming you are using streaming replication, only one server can accept writes
Cheat Sheet: Configuring Streaming Postgres Synchronous Replication
Thomas Munro · May 10, 2017
Streaming replication in PostgreSQL can be asynchronous or synchronous. The Postgres synchronous replication option provides greater data protection in case of disaster, or if a server or data center goes down
Monitoring approach for Streaming Replication with Hot Standby in PostgreSQL 9.3.
Vibhor Kumar · May 21, 2014
.inline-cta { margin: 11px 0; } .inline-cta.cta-tall { margin: 30px 0; } .inline-cta b { font-size: 18px; } The people using PostgreSQL and the...
How to determine Single Master XDB replication lag
Richard Yen · October 27, 2017
I recently had a few customers ask me about using a query for monitoring SMR XDB lag, so they can keep tabs on replication progress and set up notifications.
Session State Failover
Bruce Momjian · October 23, 2017
On the server side, high availability means having the ability to quickly failover to standby hardware, hopefully with no data loss. Failover behavior...
Benchmarks Reveal Major Increase in EDB Replication Performance
Dick Dowdell · March 10, 2017
A fundamental question database administrators ask before deploying replication services is what they can expect in terms of performance. As described...
Near-Zero Downtime with New Postgres Failover Manager
Jason Davis · November 16, 2016
A main pillar of the EDB Postgres™ Platform from EnterpriseDB™ (EDB) is the Management Suite, which provides capabilities for disaster recovery, high...
EDB Replication Server is First to Adopt Faster WAL-based Postgres Replication
Zahid Iqbal · May 10, 2016
Data replication has become a more strategic operation as datacenters expand in complexity and geographically. Data is increasingly off-loaded from...
Tool Time: Replication and Failover
Jason Davis · June 3, 2014
With more than 2,400 customers, EnterpriseDB is well positioned to learn a great deal from Postgres users and gain deep insight into their needs and...
Running EDB Postgres Failover Manager Without Sudo
Bobby Bissett · April 24, 2018
In the default mode of operation, EDB Postgres Failover Manager (EFM) agents run as the ‘efm’ operating system user. The agent uses sudo to perform...
What Happens When I Press Enter? -- EDB failover manager Switchover
Richard Yen · August 18, 2017
nterpriseDB Failover Manager (EFM) is a great tool to automate failover/switchover if you use Postgres' streaming replication feature. Not only do you get High Availability (HA), you can do so with just a few simple commands to make it all happen very quickly.
Videos: Learn to Install and Start EDB Postgres Failover Manager
Bobby Bissett · February 3, 2017
A cornerstone for ensuring ongoing data access during scheduled downtime or unexpected failures is a high availability design. The EDB Postgres™...
Easy Upgrade Tips for the New EDB Failover Manager
Bobby Bissett · November 16, 2016
High availability means keeping the enterprise’s critical data infrastructure running well with virtually no downtime, and ensuring the database...
Improve database resiliency with new JDBC Connectors and EDB Failover Manager
ahsan hadi · November 18, 2015
This blog was co-written by Jason Davis. EnterpriseDB is about to release an update to the Connectors for Postgres and EDB Postgres. The update will...
EDB Failover Manager 2.0 Improves Productivity of DBAs and the Availability of their Data Infrastructure
Pierre Fricke · June 17, 2015
Database Administrators wrestle with a range of issues to keep the enterprise’s critical data infrastructure running well with virtually no downtime...